
•
Discover the average shower door installation cost, including labor and materials, plus tips to save on your bathroom upgrade.
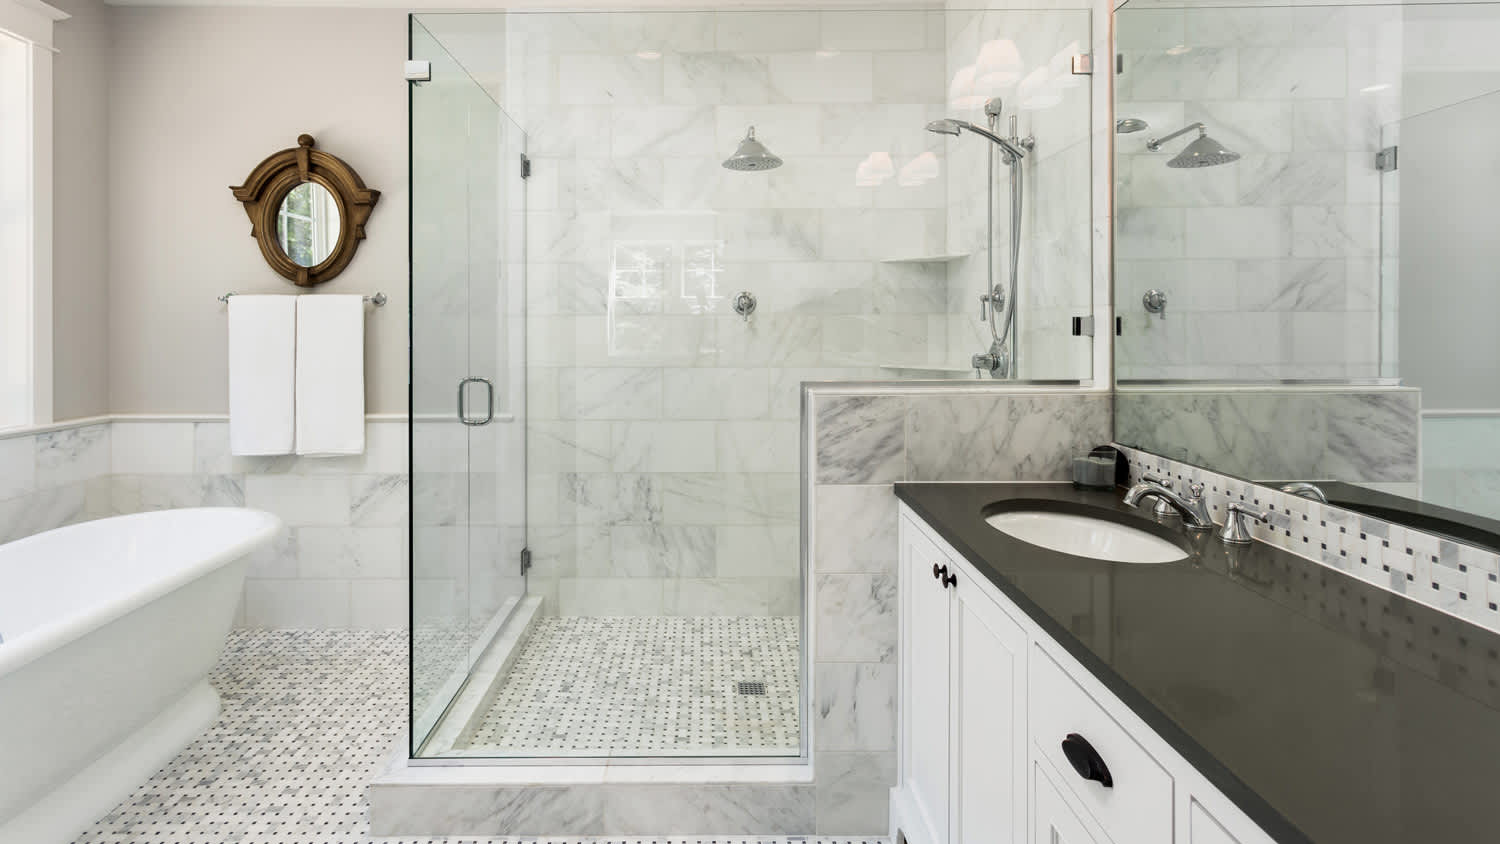
Glass shower doors have a transparent installation process, but it can still be tricky

Installing a bathtub liner gives your existing tub a fresh look without the full replacement cost, as long as your tub has no cracks or drainage issues.
Expect to pay $500 to $2,800 for DIY materials or around $6,400 for professional installation, while tub replacement costs $2,000 to $9,400.
You'll need to clean your tub thoroughly, remove all hardware, apply primer and adhesive, then carefully fit the liner to avoid trapping moisture underneath.
Hiring a local bathtub repair professional provides reliable help with proper sealing and adhesive application, preventing water damage and mold from improper installation.
If you don’t have the budget for a full bathroom remodel, installing glass doors in your shower will give your space an instant makeover. Unfortunately, learning how to install a shower door is a complicated DIY unless you have experience. You’ll need to ensure everything is level, plumb, secure, and sealed—but the right guidance can help. Here’s how to install a shower door in 17 straightforward steps.
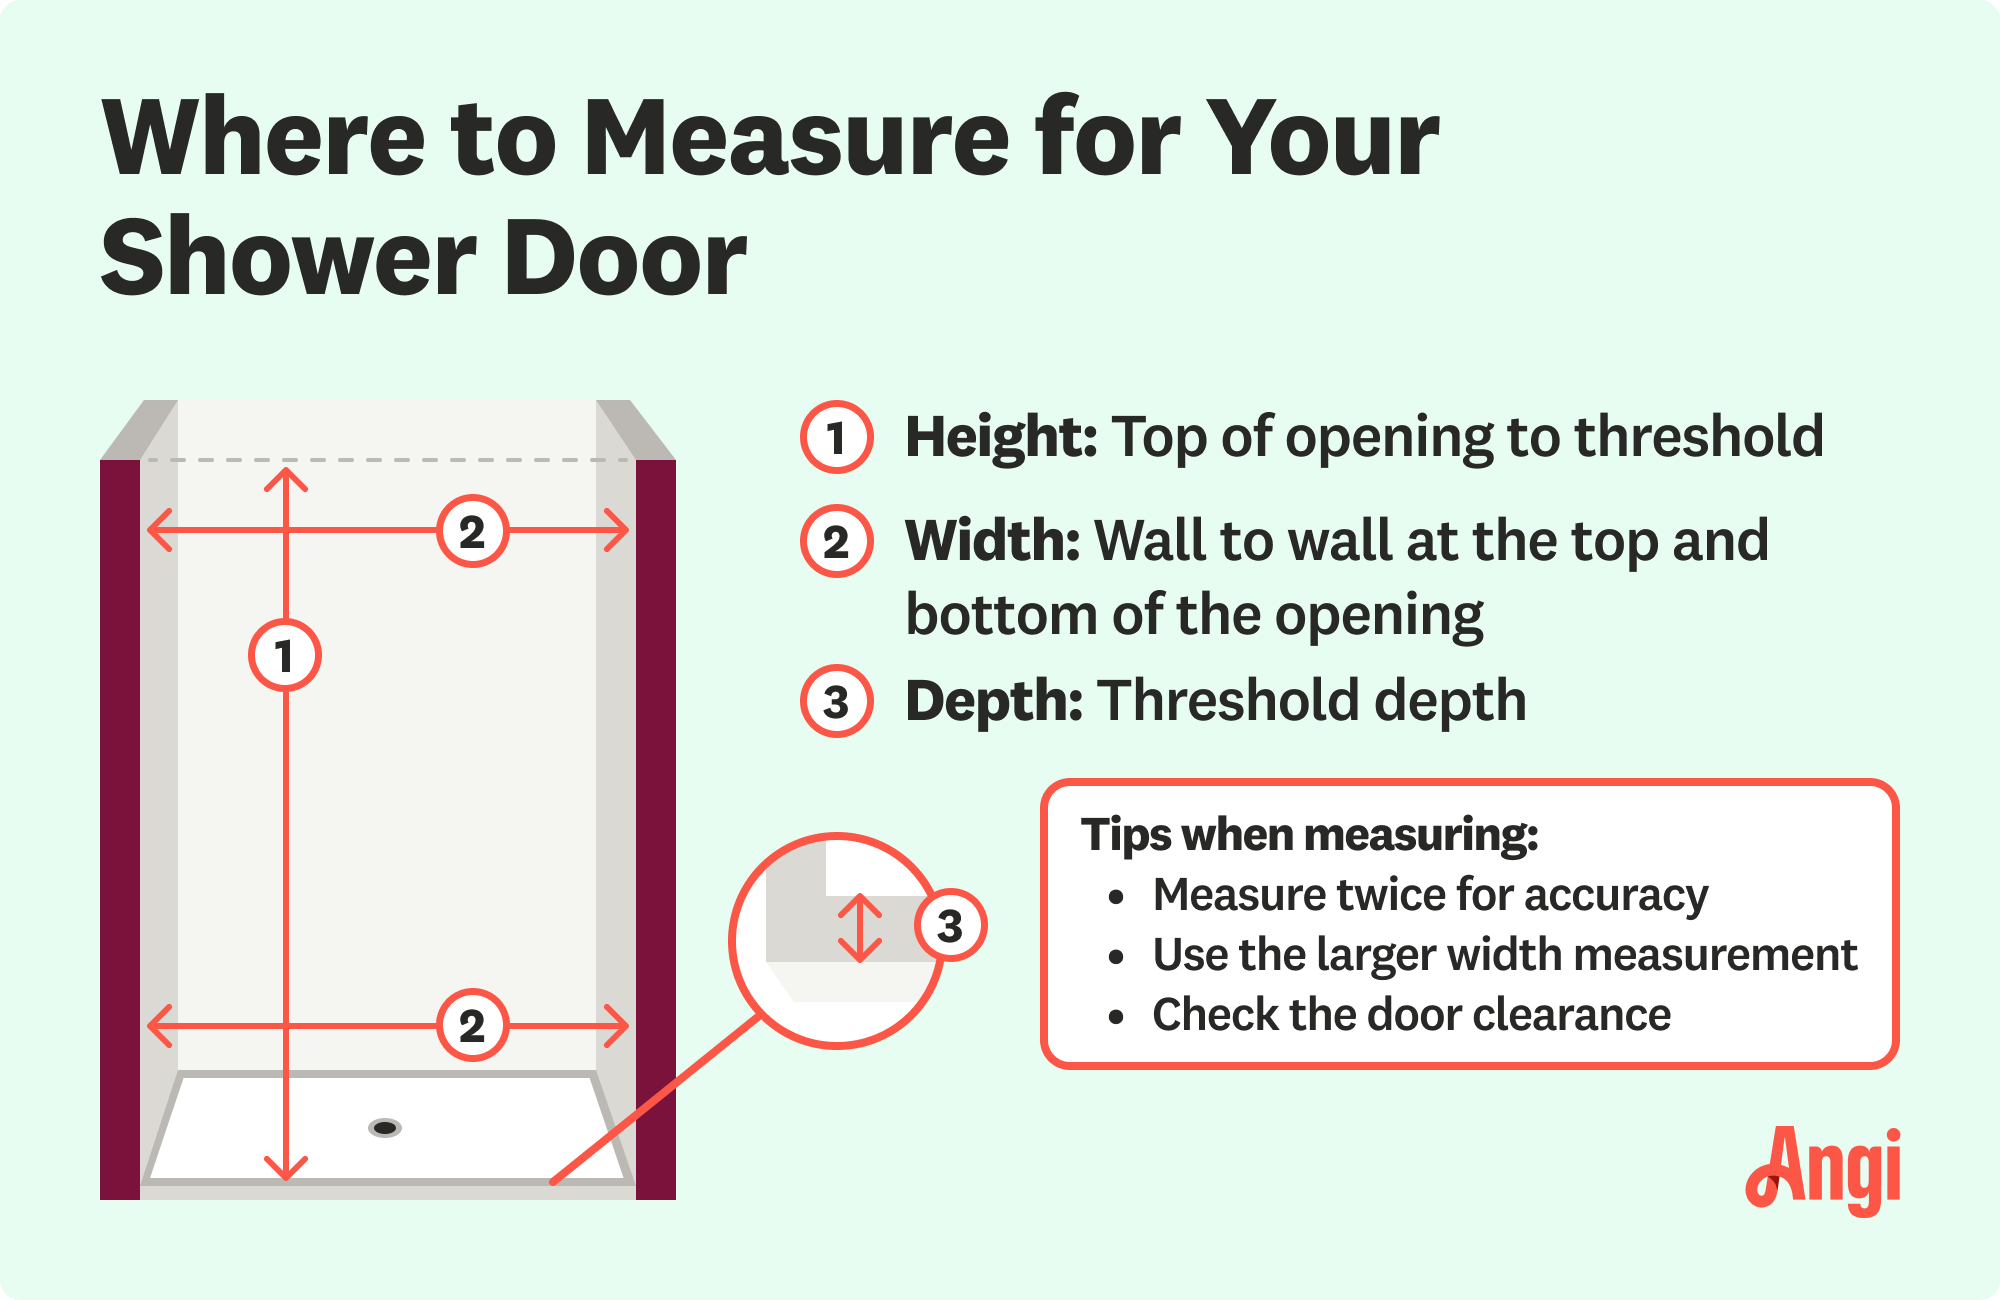
Start by grabbing a measuring tape and finding the dimensions of three key areas:
Height of the door opening from the threshold to the top of the shower.
Width of the shower opening. You should measure the width in at least two spots in case the walls are uneven.
Depth of the shower’s threshold or base.
Start by cutting the base track to the appropriate length using your hacksaw. Your base track should run the length of the threshold and fit tightly between the shower walls. Make sure you file the rough edge with a cut file and vacuum up the metal filings.
Install the base track on the threshold. Use your tape measure to ensure it’s completely centered. Before you seal it, mark the location with scotch tape or a pencil in case it slides out of place.
Next, plan where you’ll put your hinge-side jamb. The hinged portion of the door goes on the wall furthest from the showerhead. Fit the bottom of the jamb into the base track and press it flush against the wall. Use a level to ensure it’s plumb, but be careful not to move the base track.
Once it’s flush and plumb, use your pencil to mark the screw holes where you’ll need to drill. This will be where you screw your jamb in place against the wall.

Remove the jamb, then carefully drill screw holes in the tile over your pencil markings using your 3/16-inch masonry bit. Insert the wall anchors into the drill holes. If the anchors are stubborn, try tapping them into place with a plastic mallet.
Put your jamb back up on the wall. Make sure the screw holes align with the anchors and the end of the jamb is in place on the bottom track. Screw the jamb in place.
Some doors have a strike-side jamb on the opposite end of the threshold (on the same wall as your showerhead). If that’s the case, follow the same installation process as the hinge-side jamb.

Glass doors can get pretty heavy, so have a helper give you an extra hand. Lift and put the door in place so the hinges swing outward and away from the shower. Slide the hinge rail into the jamb, and use a level to ensure it’s plumb. If it’s not plumb, then readjust.
Have your helper hold the door in place. From here, you’ll need to drill holes to screw the hinge rail into the jamb. There should be screw holes in the hinge rail. Drill through the holes and into the jamb to create 7/32-inch pilot holes. Take the screws that came with your door, and screw your hinge rail into place.
Some doors come with a second glass panel that attaches to the strike-side jamb. You’ll need to attach the magnetic strike rail on the edge closest to the door. This holds the door in place when it’s shut. Slide the strike rail into place, make sure it’s secure, and move on to the next step.

Install the second glass panel in the strike-side jamb. In a previous step, you should have already screwed the jamb into the wall. From here, fit the glass panel into the base track and carefully slide it into the strike-side jamb. Make sure it’s plumb.
Pull your shower door closed and carefully measure the top edge of the shower opening. Cut the header to the appropriate length using your hacksaw. Smooth the edge with a cut file.
Lift the header to the upper edge of the door and slide it into place. On hinged doors, the shorter arm of the header should face outward. Keep in mind that some headers have screw holes. If that’s the case, you’ll need to screw your header into the corresponding jamb. Before marking and drilling your 7/32-inch pilot holes, ensure the header is level.

Tackle one corner at a time. Find the area where your base track meets the vertical frame. Drill a pilot hole, then screw the pieces together. Do the same thing around all four corners of your frame.
Your shower door should come with a hardware kit that includes door handles, and there should be pre-drilled holes for the screws. Set your handles over the screw holes and tighten the screws until they’re firmly in place.
Your drip rail should match the width of your door. Remove the vinyl strip, measure the rail, and cut it to the appropriate length using your hacksaw. Smooth the rough edge with a cut file, then slip the vinyl strip back in place. Crimp the edges of the drip rail with pliers to secure the vinyl, then trim the excess with a utility knife.
Your drip rail should have mounting holes where you screw it into the bottom of the door frame. Line up your drip rail along the bottom of your door (the vinyl should face down), and drill a 7/32-inch pilot hole through the mounting hole and into the door frame. Take care to stay low enough to avoid drilling into the glass. Use screws to secure your drip rail in the door frame.
The final step is waterproofing your shower. You’ll need to seal the edges with silicone caulk. Take your gun and apply caulk along the inside and outside edges of the base track and the inside edges of each jamb. Smooth out the caulk, wait for it to dry, and your shower is ready to go.
Shower door installation is a challenging project, and these common mistakes can lead to leaks, damage, or a door that doesn’t function properly:
Skipping Accurate Measurements: Measuring in only one spot or rounding measurements can result in gaps or a door that doesn't fit. Always measure width in multiple locations since walls are rarely perfectly straight.
Installing the Base Track Off-Center: An uncentered base track throws off the entire installation. Double-check your measurements and use tape or pencil marks to position everything properly before sealing.
Rushing the Plumb and Level Checks: A door that's not perfectly plumb will swing open or closed on its own and may not seal properly.
Using the Wrong Drill Bit: Standard drill bits can crack tile. To avoid causing damage, use a masonry bit when drilling into tile or stone surfaces.
Inadequate Sealing: Skipping caulk or applying it poorly can lead to water damage. Seal all inside and outside edges of the base track and jambs thoroughly.
These mistakes can be costly to fix. Some problems require tearing out the entire installation and starting over, which is why hiring a pro is worth the investment.
For most homeowners, installing a glass shower door costs $550 to $1,400. You can save on labor costs by doing the work yourself, but this isn’t a simple DIY project. Glass panels are heavy, can shatter if not properly installed, and require different installation steps depending on the door type. You may not save significantly (or at all) if a shoddy job requires shower repairs.
Unless you have experience, it’s better to let a shower door installer near you handle this job.
Some frameless shower doors weigh up to 170 pounds, potentially making DIY projects dangerous. A pro can safely adjust or replace your shower door so you can return to your morning routine.
Jason has helped me with multiple household projects, with the most recent being new door installation. He has always showed up on time and organized and has done an incredible job! Jason is very professional and he's now my go-to for anything around my house that needs to be fixed or...
Cole has been handling plumbing and general contracting for our four properties over the past three years, and he’s always done a great job. Most recently, he installed a sink and countertop in our retail store where none existed before, and it turned out exactly how we needed. He’s...
 ANB Renovations LLC
1st Choice Renew is simply the best! We hired them for a complete home renovation, and they transformed our space into something truly amazing. The team attention to detail and commitment to quality were evident throughout the project. They were easy to work with, very responsive, and always...
This company went above and beyond with their work, chimney sweeps are usually pretty messy, but the clean up was spot on.!! Josh explained every thing that he was doing, and the things that he was checking to make sure the chimney was safe for me and my family. He was very professional,...
 Supreme brick & chimney
Custom Paint Jobs LLC transformed our outdated kitchen into a modern masterpiece.
Excellent customer service and knowledge. I was recommend to him from my neighbour. My front door and window came in great and were installed beautifully perfectly, I m very satisfied with their excellent work, so decided to order one more big bow window for my living room. I cant wait for...
If I could give 10 stars for Kitchen Tune Up, I would. I cannot say enough good things about my experience with Kitchen Tune Up and the entire team involved in the process of my kitchen project. They went above and beyond as far as service and quality with my cabinets, paint, countertops, and...
It was wonderful working with Yordy and his team. They were very professional and are experts in what they do. They have completed the work on time, with better quality and with in fairly reasonable price. We just started with backsplash work , but liking his work, we went on to provide...
We were having 2”x 2” tile installed . There was a small installation error and the new additional replacement tile was from a different lot and the colors didn’t match. Joe assured us that he would rectify everything , which he did without hesitation. We decided to go with the 18” x 36” tile...
 CarifaTile
They work that 360 did on my kitchen cabinets is nothing short of amazing. I still cannot believe the difference from before and after. Jon and Jeff were both so incredibly professional throughout the whole process and their communications with me were constant and consistent. These guys...
 360 Painting Columbus
From average costs to expert advice, get all the answers you need to get your job done.
Discover the average shower door installation cost, including labor and materials, plus tips to save on your bathroom upgrade.

Discover frameless shower door costs, including average prices, installation factors, and ways to save on your bathroom upgrade.
Find out the average shower door repair cost, key price factors, and ways to save. Get estimates to plan your shower door repair project confidently.
Learn how to hire a qualified shower door installer for your bathroom project. Find tips on vetting pros, questions to ask, and what to expect.
Not sure who to hire for shower door installation? See which pros to call, compare options, and choose the right installer for your home.

Knowing how to install a shower requires some skill and experience, but a shower enclosure installation is a doable DIY project if you follow some basic steps.