
Installing trim can give your home a finished, polished appearance. Learn how much it costs to install trim and what factors affect how much you’ll pay.
All the details you need to finish your tiles in style

Choosing tile edging for your home means deciding on material, color, and profile shape to match your tile design and protect exposed edges.
Aluminum and PVC trim options offer budget-friendly protection for your tile edges, while ceramic and porcelain trim provide a seamless finish that matches your tiles.
Measure your tile depth and add one-sixteenth to one-eighth of an inch to account for adhesive, ensuring your trim sits flush against the tile surface.
Hiring a local tile professional removes guesswork from trim selection and installation, ensuring your edges stay protected and your design looks polished for years.
When you are shopping for tiles, it can be easy to overlook the importance of what is usually the last decision you make before getting to work—picking out the right trim or edging style. Tile trims and edging finish your tile design, whether it is a floor, countertop, backsplash, fireplace, or wall. Below, we take a look at some major factors to consider to ensure your trim suits your tile for years to come.
When taking on this project, expect questions only a pro can answer. With our network of local pros, you'll get the job done and your questions answered—without the hassle and stress of doing it yourself.
Before you determine what type of trim you want, it is vital that you understand its function. A kind of molding, trim serves to cover exposed edges, especially in places like corners where mitering is not an option. It offers a clean visual transition and a measure of safety against the hazards posed by sharp tile edges.
Selecting the right trim or edging is a major decision, since removing and replacing it after installation is painstaking work. In some cases, you may want the trim to be as unobtrusive as possible, providing a clean and professional frame for your tiles. In others, the trim or edging creates an opportunity to get creative, adding visual interest or highlighting different parts of a space.
Tile trim has practical and aesthetic uses. Without it, a tiling job looks unfinished and even sloppy. So, one important way you can use tile trim is to create a clean, finished look. And since there are so many different design options available, this is an opportunity for you to put together a tile and trim combo to fit your unique vision. You might choose a simple trim for a modern look or a decorative trim for an eye-catching, luxurious vibe.
Additionally, you can use tile trim to help protect your tiling. It prevents chipping and other damage along the edges. And in high-moisture areas, the trim seals the tile against moisture. So, using backsplash edge trim or trim for your showers is a must.
Tile trim is produced in a wide variety of different metal, plastic, and ceramic materials. The right choice depends on how the different options complement the appearance of your tiles, the availability of your preferred trim style, and the purpose of the space. If the trim is going to be exposed to water in the bathroom or kitchen, a rustproof material like aluminum or ceramic is necessary. If it is in a commonly used area of the house where it must stand up to abrasion, durable materials like stainless steel are your best bet. The most common materials include:
Aluminum
PVC
Porcelain and other ceramics
Stainless steel
Stone
Aluminum and PVC are the lowest-cost options. Brass and stainless steel edgings are significantly more expensive and typically reserved for professional applications in which they provide particular benefits. (Ultra-hygienic stainless steel is most common in pools, while the ability of brass to stand up to stress makes it ideal for industrial flooring.) Porcelain and ceramic are the closest to tile itself, providing a clean and seamless finish, but they crack easily, making them unsuitable for some higher-use spaces.
Every material and profile shape is available in an array of different colors, but some materials offer fewer options than others. Coated aluminum trim, for example, trades color potential for durability. Porcelain and ceramic trims offer the widest selection of colors and design possibilities.
Most frequently, homeowners match the color and material to the tile, but trim also creates the possibility for striking accents. For a classic look, select the option that will unobtrusively complement the tile. If you want to get more creative, you can combine different materials to add visual detail and a greater sense of depth to the room.

Likely the most significant choice when it comes to your tiles, the profile denotes the shape and style of trim. Some of the most widely available options include:
The rounded edges of bullnose are probably the most familiar form of tile trim, in part because this style is suitable for an array of different applications. The curvature allows it to bridge seamlessly the edge of the tile and the wall. It also provides an added buffer against sharp edges and water leakage when used at the joint where the floor meets the wall in a bathroom or kitchen.
Another popular rounded trimming tile is quarter round trim. It is particularly suitable in bathrooms and other settings where you want to minimize sharp edges.
As the name suggests, chair rails were initially designed as baseboard trims to stop chairs from damaging walls. In recent years, they have become a popular choice for backsplashes and mosaic tiles, providing a thick frame and dramatic sense of depth.
The standard choice for kitchen and bathroom countertops, V-caps establish a totally clean 90-degree corner on any edge, protecting against water damage and offering a softer appearance.
Thin glazed cylinders, pencil liners establish borders between tile and other material or provide a transition between different kinds of tile in a mosaic. This style is perfect for a clean, minimalist look.
Like pencil liners, flatliners are transition pieces. They are perfect for floors, where the rounding of the pencil liner can be a hazard, as well as mosaic designs that would benefit from unobtrusive trim.
Concave in shape, cove base trim bridges tiled walls and floors, especially in bathrooms and showers, protecting the floor joint from moisture.
An alternative to cove base, baseboard trims give a straight edge between the floor and the wall.
Instead of manufactured tiling, you can also use polished granite, marble, travertine, and other natural stones for tile edge trim.
In some cases, you can forgo tiling altogether, finishing your tile with edge glazing and establishing a natural transition between the tile and other materials. This approach is most easily incorporated into smaller pieces, like backsplashes and mosaics, but can be achieved on floors by an experienced local tile installer.

Tile trim is sold in different shapes to fit different kinds of corners and curvatures and different lengths that can be combined to cover all the exposed edges of your new tiling. Every style and shape of trim also comes in different sizes that indicate the thickness or depth of the liner and end cap pieces.
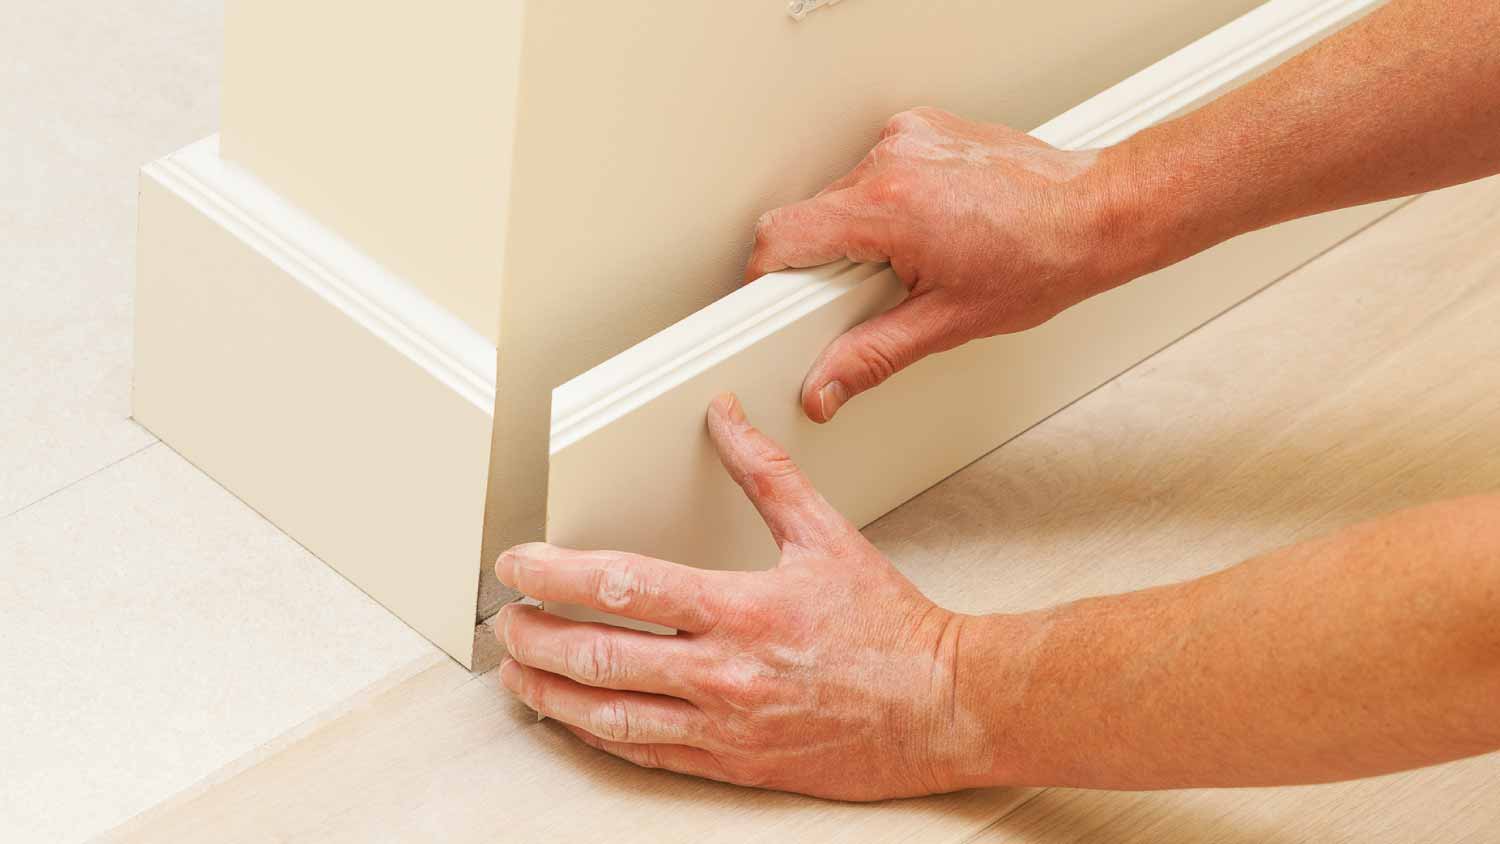
Tile trim should sit flush against your tile for a professional-looking installation. So, to choose the right size trim, you should first measure the depth of your tile. If you have not installed the tile yet, add an extra one-sixteenth to one-eighth of an inch to the measurement to account for the tile adhesive.
To ensure that you do not end up discovering at the last minute that you purchased way too much or too little tile trim, measure the edge of the tile surface. Divide the result by the width of your trim. The result is the amount required, but you should buy an additional 10% of the total length to give yourself room for error.
The time and effort required to install your trim will vary based on the material you select, the size of your tiled space, and the intricacy of the design. On average, it should not take much longer than two to four hours. Just make sure to build this time into your calculations in advance, since it will be one of the final steps of your tile project, and you do not want to rush this important finishing touch. If you prefer to hand this job off to a pro, you should hire a tile contractor near you.
Always wear eye protection when cutting tile trim. For plastic trim, you should use miter shears. Adjust the tool to the right angle you need, slide your trim between the blades, and then press down to cut.
To cut metal trim, you will need a miter block and hacksaw. Put your trim inside the miter block and choose from the different angles of cuts available. Once you have decided on the angle, hold down the block with one hand and use the other to saw the trim.
Another method to cut metal trim is using an angle grinder. For this option, you will need to apply masking tape to your trim and mark the exact cut with a pencil. Then, use the angle grinder to make the cut. You can use a file to smooth out the cut edges.
Instead of mitering two pieces of tile trim on corners, you can simply bend your metal trim to fit. This looks cleaner and prevents jagged metal edges that can be a safety issue as well as an eyesore.
First, place the trim along the edge of the tile to figure out where you need to bend it. Add an extra two-inch allowance and make a mark. Now, use a miter saw and cut away the excess material in a V-shape. The top of the V-shape should be around two to three inches. Next, place the trim along the tile edging and slowly bend the trim to fit. Make any extra cuts as needed for a flush installation.
Terrible experience. Walls/trim/floors/cabinets/doors all have drip marks, overspray, etc. Tiling at the fireplace had to be redone by another vendor due to incorrect and shoddy install by Profect. Contractor had his children in our house while he was on site without prior authorization or...
 Profect painting & exteriors
It was wonderful working with Yordy and his team. They were very professional and are experts in what they do. They have completed the work on time, with better quality and with in fairly reasonable price. We just started with backsplash work , but liking his work, we went on to provide...
We were having 2”x 2” tile installed . There was a small installation error and the new additional replacement tile was from a different lot and the colors didn’t match. Joe assured us that he would rectify everything , which he did without hesitation. We decided to go with the 18” x 36” tile...
 CarifaTile
For several months I was looking for somebody to tile a wall in my master bath and move lighting fixtures, and could not find anybody who was responsive. I contacted Rowe through Home Advisor and within days they came by to assess the job and provide an estimate. The cost was very...
It went very well! The end product was amazing and we keep getting a lot of compliments from friends! M&E were very professional and they made sure we were happy with the product before leaving. They met with us in our home and at the tile shop to make sure we were okay with our tile and...
 M&E Remodeling
Involved an extensive bathroom remodel, including removing tub & installing walk in shower, new drywall, custome tile work to ceiling, plumbing, etc. Overall, job was done on time and on budget. Nick & his team were very professional and had high attention to detail. Quality was great. Highly...
 Stamos Flooring and Remodeling LLC
Very pleased with the service and level of professionalism. Courteous and very unobtrusive in performing service. Unlike several other companies, Bradford Xteriors was willing to perform work on a three story home with a clay tile roof. <br />
 Bradford Xteriors
This company did a very good job on the brick wall and it looks just amazing. The staff was always professional and was practically OCD on how the bricks were stacked and how they were laid. Although it took longer than expected, I am willing to sacrifice time over perfection anyday. The...
 My Handy Mate LLC Improvement & Remodeling
He did the tile work and he was good at it. He used other subcontractors for the rest of the work (like putting in the cabinetry) and they were okay but not great. He was a great guy! He was easy to work with and had a good eye for the detail of his work. There were a couple of things that I...
 Brian Miller Custom Remodeling
I was very impressed with Miller Cantrell! I live in an old home in which the sewage line that runs from my home to the sewage system is a line of clay tile. These eventually collapse and need to be replaced - an expensive problem and sure to happen at the worst time. I told them that my...
From average costs to expert advice, get all the answers you need to get your job done.
Installing trim can give your home a finished, polished appearance. Learn how much it costs to install trim and what factors affect how much you’ll pay.
The cost to replace trim depends on factors such as style, material, and whether you hire a pro. Find out what your budget could look like for this project.
Discover the cost to install window trim. Learn about price factors, labor, materials, and tips to save on your window trim installation project.

Need to install a backsplash or repair that shower surround? Use this guide on how to cut tile using affordable tools that are easy to use.

Find the best trim painter for your project. Learn what to ask, qualifications to check, and how to hire a qualified professional for flawless results.
With the right tools and a few tips, cutting tile on your own is a relatively simple and cost-effective DIY home project that anyone can do.