

Pre-drywall inspection costs vary depending on the home size, build complexity, and reporting you receive. Estimate your budget with this cost guide.
This is one time it’s ok to put a hole in your drywall


Cutting outlet holes yourself can lead to accidental contact with live wires or hidden pipes, creating serious safety hazards.
A drywall installation pro costs about $2,000 but ensures precise cuts and proper alignment while avoiding crooked or uneven holes.
Homeowners may need a drywall saw, tape measure, level, and template for accurate outlet cuts.
Rushing measurements, freehanding cuts, or ignoring hidden obstacles often leads to misaligned holes and extra patchwork.
If all you have to do is hang drywall, the process goes pretty fast, even for beginners. Of course, installing drywall involves much more than just hanging it. You must tape and mud it, and cover screw holes. You also need to know how to cut outlet holes in drywall, so you have electricity in the room—obviously pretty important. If you have the skills to hang drywall, you almost certainly have the skills to cut the holes, too, but it does require following specific steps.
Before starting, make sure all the loose wiring is tucked deeply inside of the outlet box, reducing the chance of puncturing it with the drywall saw. The electrician should have done this for you, but it never hurts to double check. The wiring should not be live, either, just in case you puncture it.
When hanging drywall on a wall where there are outlet boxes installed, precise cutting is key for a smooth installation. But it’s not just about achieving a neat aesthetic. You must also ensure that the wall is installed safely and in compliance with local building code. It won’t take long to mark off where to make cuts for the outlet boxes, but don’t rush the process.
Here are two ways to mark off the location of an outlet box for cutting a hole.
You can use math and measurements to plan your outlet hole with these steps.
With a tape measure or yardstick, capture the measurements from the floor to the top and bottom of the outlet box. Then, measure the right and left sides of the box from the edges of the wall.
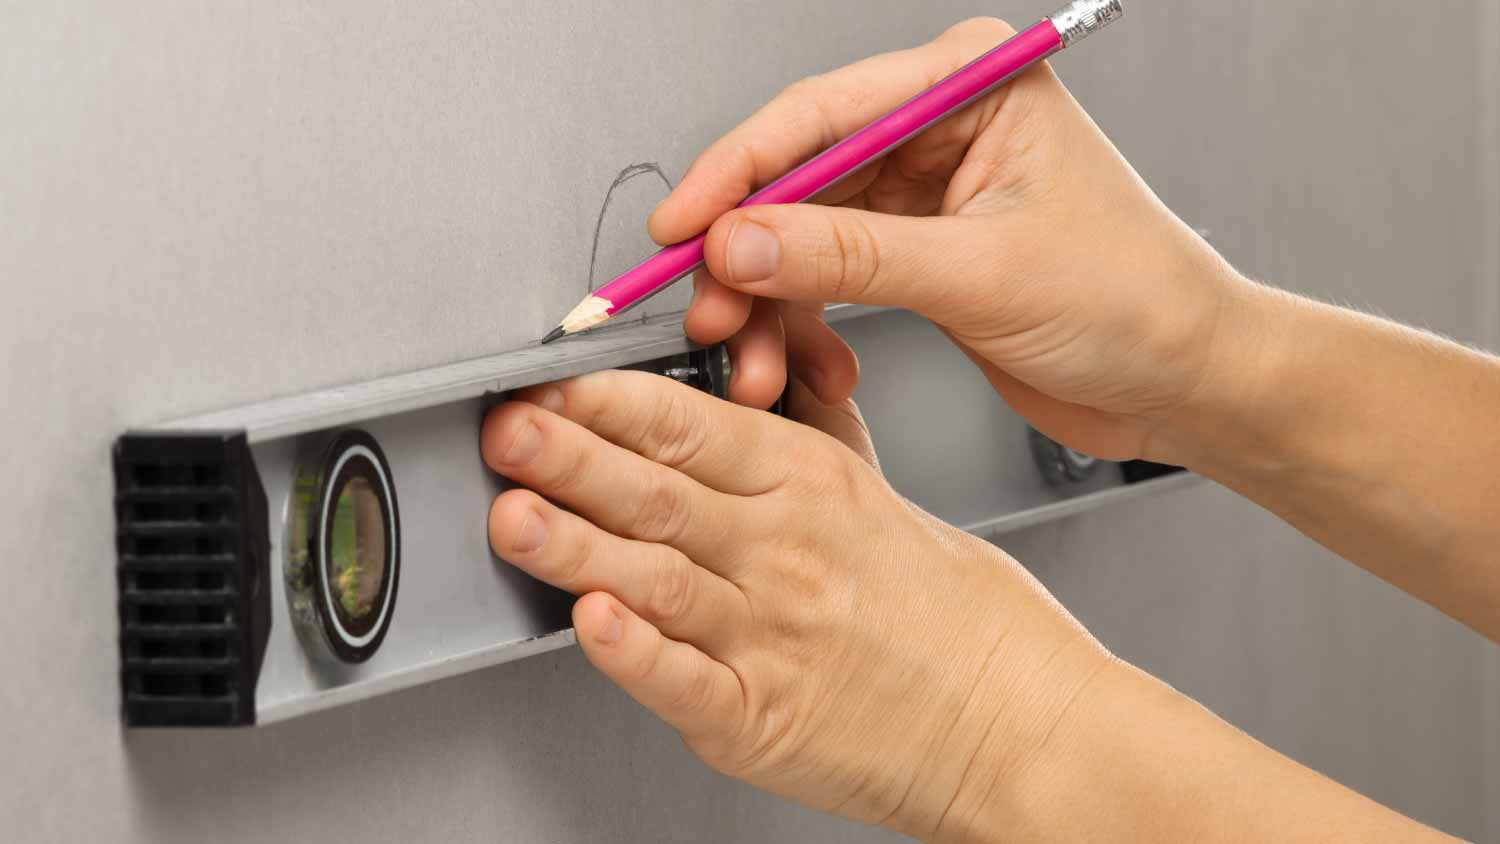
Use a pencil to draw the outline of the outlet box on the sheet of drywall based on your initial measurements.
Since you can’t go back once you’ve cut into drywall, make sure that the outline is correct. Double-check your initial measurements, and also take into account the dimensions of the outlet box itself.

Use a jab saw or drywall saw to cut the hole. Go slow and steady.
Place the drywall and ensure that the holes match up. Then, screw it into place.
You can also simplify things by just marking the outline of the outlet box to plan your drywall hole.
Run a piece of chalk (or even old lipstick if you have some) over the edges of the outlet box. You could also adhere transfer paper over the outlet box.
Line up the drywall exactly as if you were to hang it. Instead of screwing it in place, take a rubber mallet or the palm of your hand and tap the drywall where the outlet box touches it. This will trace the outline of the box onto the back of the drywall sheet.
Remove the drywall and inspect the back of it. You should see the outline of the box exactly where it needs to be.

Use a jab saw or drywall saw to cut the hole. Just like in the other method, go slow and steady to avoid an accidental injury.
Place the drywall and ensure that the holes match up. Then, screw it into place.
You are now ready to connect the outlet to the wiring inside the box, or you can call a local electrician to finish the connection. Once the outlet is in place and you’ve painted the drywall, you can secure the outlet cover, hiding the outlet hole you cut in the drywall.
Even seasoned DIYers need a reminder to work slowly and surely when cutting outlet holes in drywall. Here are some tips to avoid mistakes during your project.
Don’t forget to check behind the wall: Always check to see that there are no wires, pipes, or studs behind the wall on which you install the control box. It’s a safety measure and a time-saving one because it would take more work not only to patch the wall but also to find a new location for the outlet.
Measure correctly: Follow the rule of measuring twice before cutting to avoid the extra work necessary to patch up a misaligned hole, trim a hole that was cut too small, or find a workaround for a hole that was cut too big.
Choose the right cutting tool: A utility knife can make some small cuts, but be sure to use a drywall saw for larger, more precise cuts.
Don’t freehand the cut: If a template comes with the outlet box, use it for a smooth cut. Otherwise, measure and mark the outline of the box on the drywall for your guide.
Use a level: Unless you like the look of a crooked outlet and cover plate, use a level to finish installing the box.
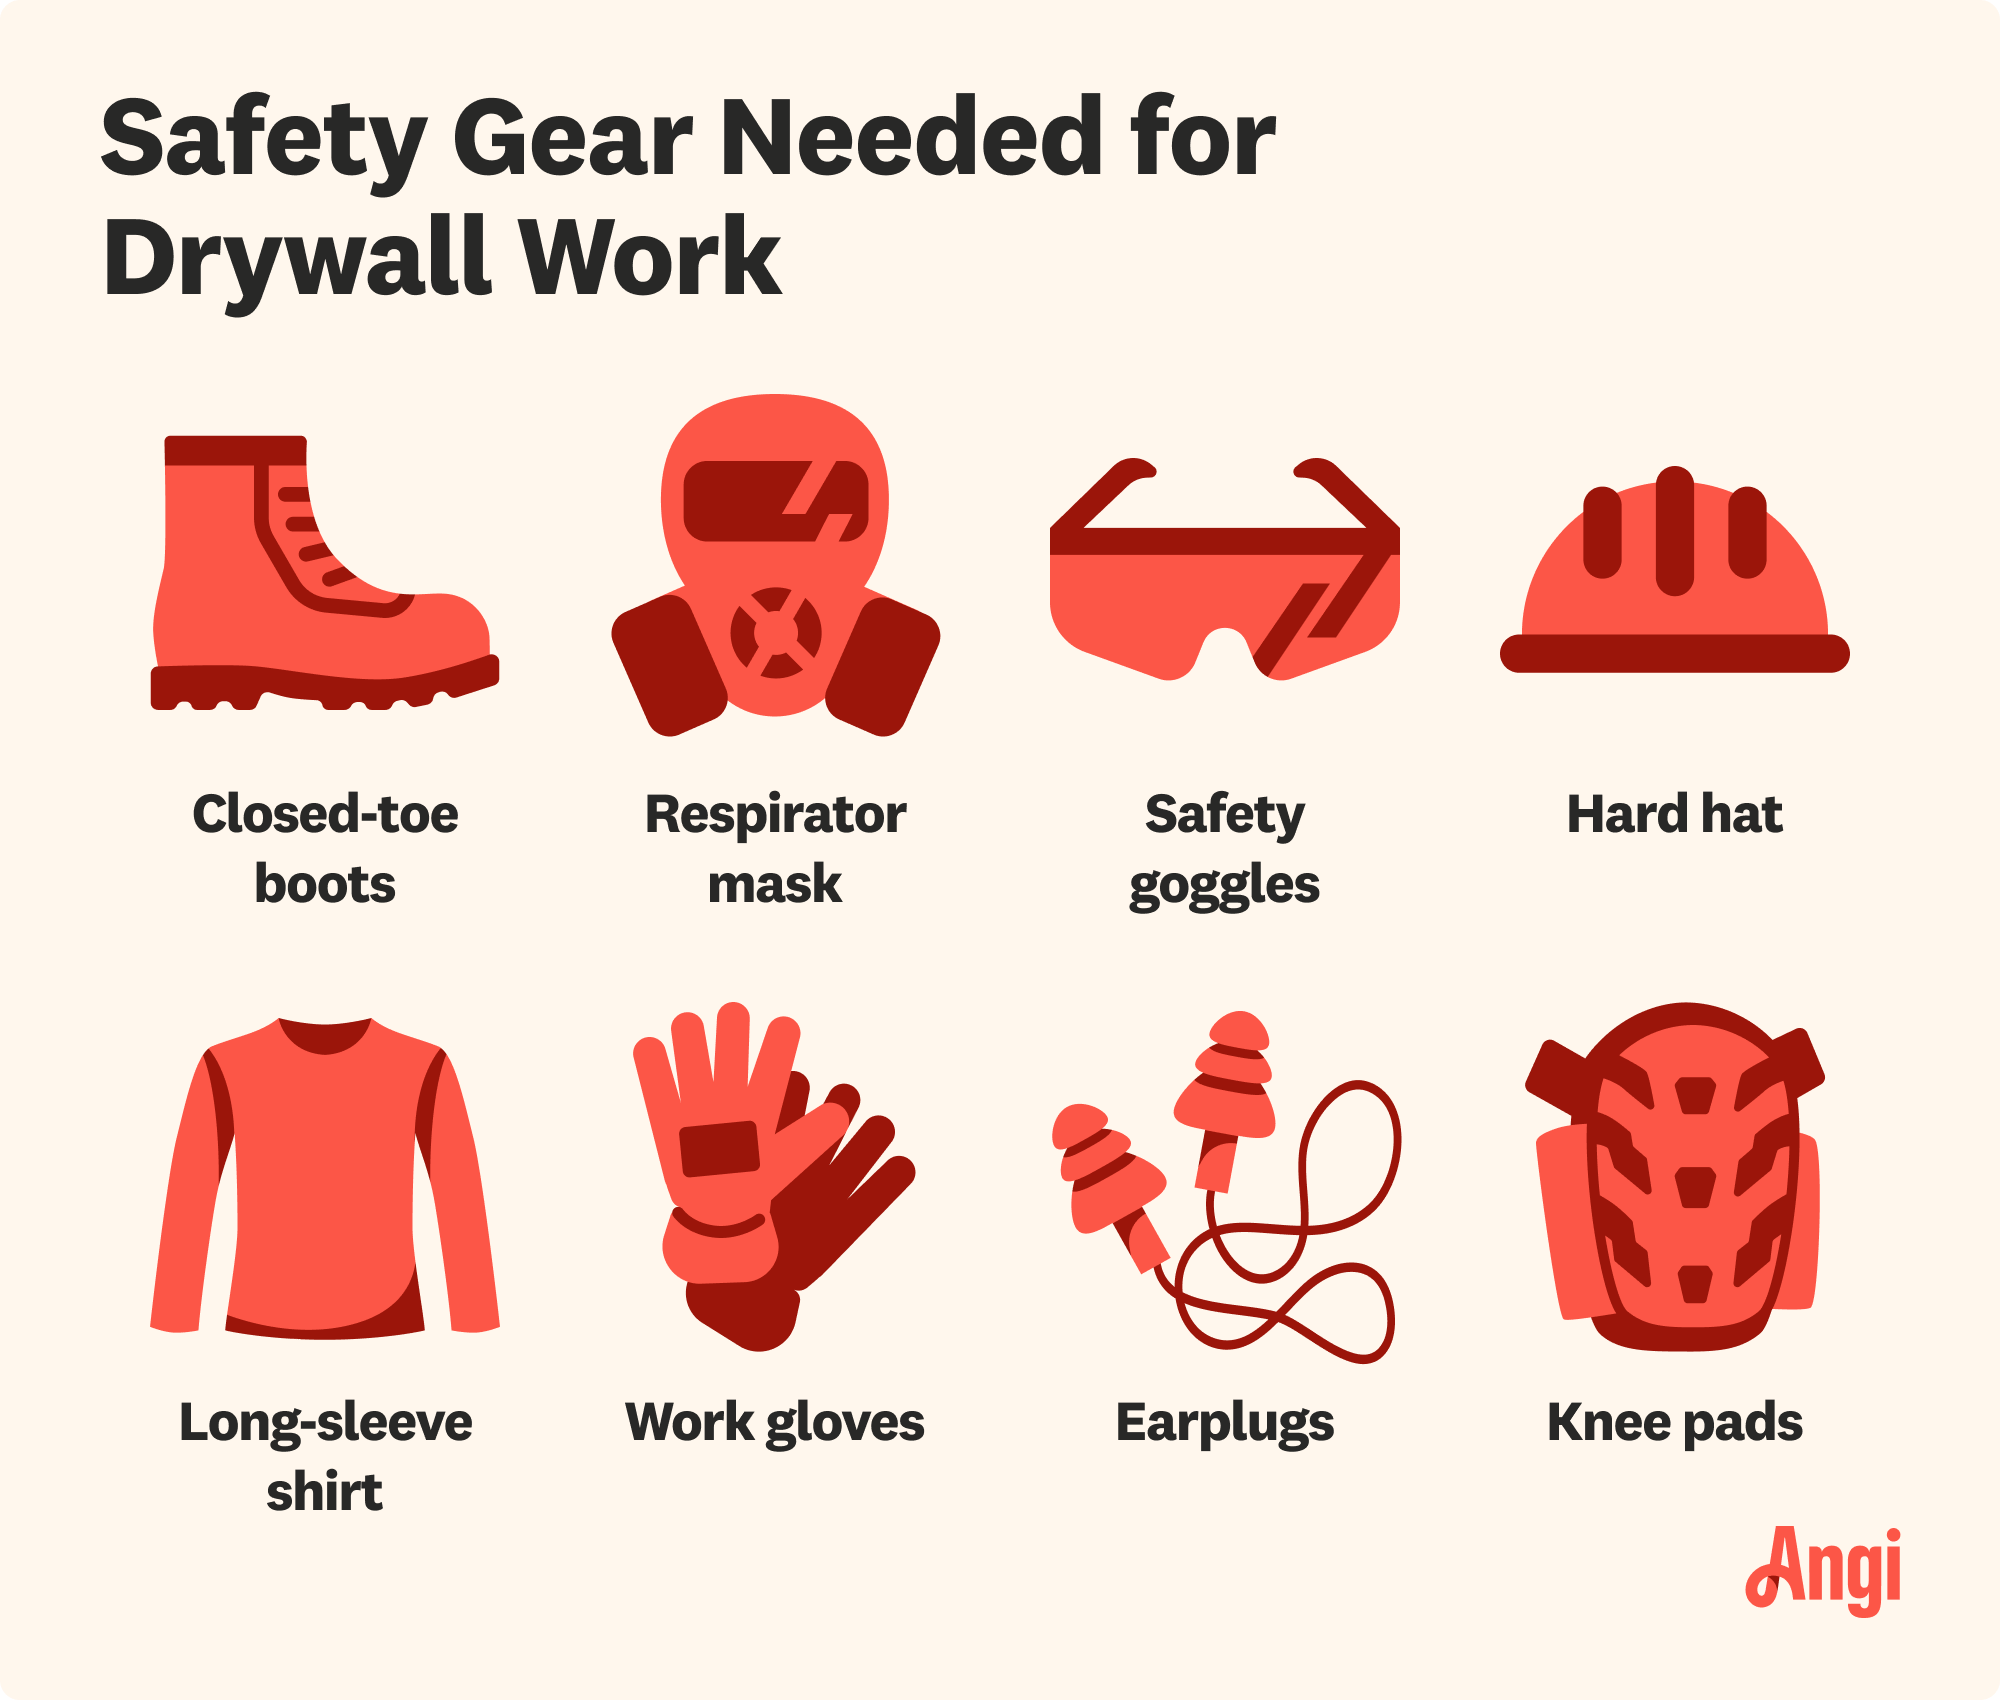
Crystalline silica is a toxic dust that's often generated during drywall installation, which can cause respiratory issues if exposed over time. A professional drywall installation company has the right tools to protect your home and ensure safe air quality after your project is completed.

Consequently, because of everything involved, hiring a local drywall installer may be the better option for you. The average cost to hire a pro is about $2,000, but the actual cost depends on the size of the job and the length of time required. Generally, this cost includes the process of cutting outlet holes in the drywall and any other required holes. It also should include mudding and taping.
The overall drywall installation cost for the majority of projects can range from $1,000 to $6,000, so you’ll save quite a bit of money doing the work yourself
To give yourself a better idea of the cost and of whether you want to do the work on your own, ask a few drywall contractors to give you a cost estimate.
From average costs to expert advice, get all the answers you need to get your job done.
Pre-drywall inspection costs vary depending on the home size, build complexity, and reporting you receive. Estimate your budget with this cost guide.

The cost to replace plaster with drywall can quickly add up. This guide will help you budget for this project and decide if it's worth the effort and cost.

Whether you’re trying to keep noise in or out, soundproofing materials are the way to go. Use this guide to see how much it costs to soundproof a room.

Can you put drywall over drywall to cover old, damaged or cracked plaster walls? Read our guide to determine if this is the right solution for your walls.

Got a hole in the wall? Learn how to spackle a hole in the wall and have it looking like new in almost no time.

Not sure what type of interior wall material to choose for your home? We’re breaking down the great debate between blueboard vs drywall. Read on to learn more.