
The cost to install a tongue and groove ceiling depends on the size of the space and the cost of labor. This guide can help you price out your remodel.
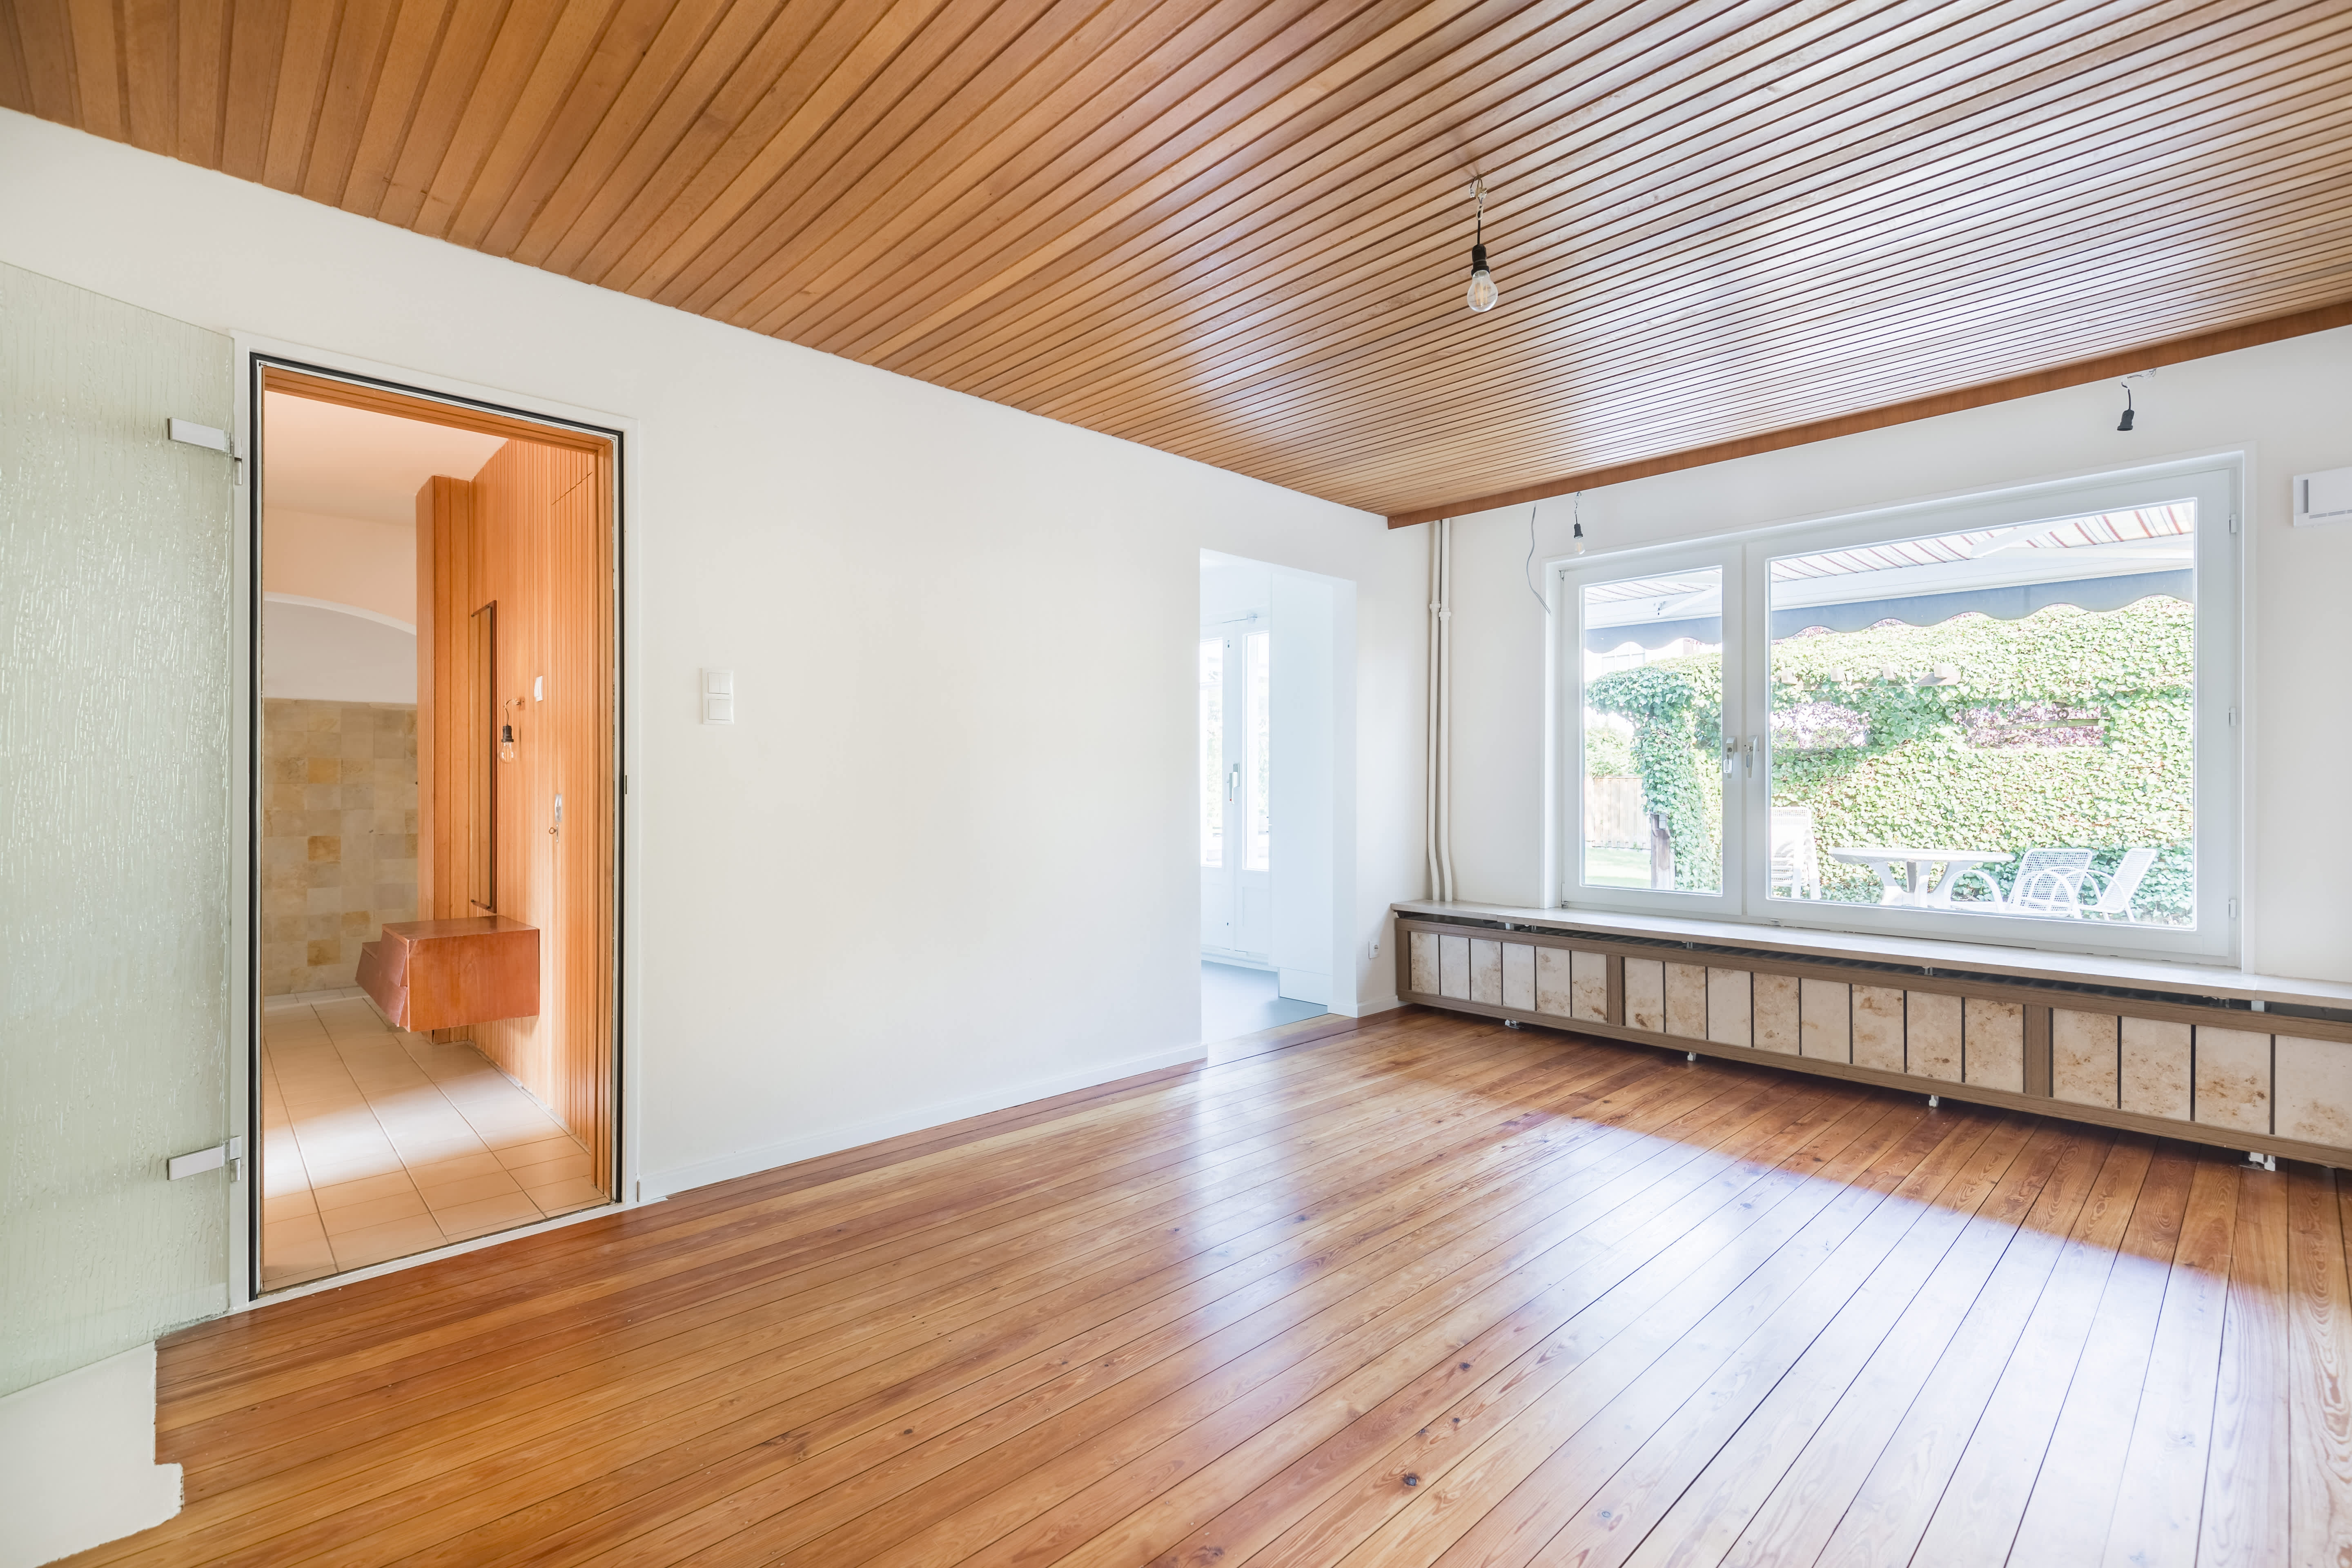
Tongue and groove panels lock into place like puzzle pieces

Tongue and groove ceiling panels fit together like puzzle pieces, with your boards locking securely through the tongue-and-groove joint for a tight, finished look.
Expect to pay $500 to $1,000 for materials when installing a tongue and groove ceiling yourself, including panels, battens, and finishing supplies.
You need to fasten battens to your existing ceiling first, then nail each panel through the tongue at a 45-degree angle to hide fasteners.
Hiring a local carpentry professional keeps your overhead installation level and secure, handling the precise cuts and nailing work that ensure lasting results.
A wood ceiling is a gorgeous addition to most homes, whether they be farmhouse chic or modern with an industrial flair, and in a time when product choices are seemingly limitless, making a decision on which ceiling type is best for your home interior can be overwhelming. Luckily, there are a few tried and true options that can make the decision process easier—such as the dependable tongue and groove ceiling.
Tongue and groove ceiling planks are unique in that one side has a groove and the other has a tongue sticking out, so the boards fit together like puzzle pieces. Tongue and groove ceiling installation can certainly be a lengthy process, but if you’ve got the time and the know-how, it can easily be turned into a long weekend DIY project. You can also source materials from a local store that sells lumber or home improvement supplies, and either purchase finished tongue and groove paneling boards, or finish them yourself as you work through the project.
Tongue and groove ceiling panels are most commonly made from wood such as pine, spruce, cedar, or even plywood if you’re on a tight budget. They can be whitewashed or painted—although for a beautiful natural wood look, opt for cedar panels without alterations. Some of the benefits of choosing tongue and groove for you ceiling include:
Their thin, lightweight composition makes for easier lifting and installation.
Unlike other materials, they can be installed over uneven or unsightly ceilings for a clean, finished look.
If installed properly, the finished result has a tighter appearance than that of shiplap.
If correctly installed, having tongue and groove ceilings can increase a home’s property value.
Alternatively, tongue and groove ceilings can be a pricier option compared to drywall or shiplap ceilings, but you’ll get what you pay for in the end aesthetically. Tongue and groove ceilings, while not overly difficult to install, can also ultimately take longer to finish because each panel needs to be installed individually.

Because you’ll be working overhead to join the tongue and groove boards, adding a finish or whitewash to the wood before installation will save you the hassle of applying the coats above your head. Unfinished wood tongue and groove ceilings have been known to fluctuate as temperatures change by expanding and shrinking. Adding a finish to the panels ahead of time can help combat that issue during summer and winter months.

When working with existing drywall or plaster ceilings, your best bet for installing the tongue and groove boards overtop of the current surface is to first install 1x2 battens to the framing. Doing so will ensure that you have a clear starting point to work off of—particularly if your existing ceiling is uneven. Once this is completed, you can get to work on the tongue and groove boards.
Cut the ends of each board to help eliminate any splitting in the wood. The goal is to get concise square edges on each board panel. In order to get a high-end look once installed, you’ll want to add a 45-degree bevel to each end by what is referred to as “V-grooving.” This method helps cover up inconsistencies in butt joints. If you’ve already applied finish to your boards, you’ll need to add more finish to the beveled groove you just made to the ends of the boards.
When you’re ready to begin nailing the boards to the battens, have each tongue face towards the direction of installation—meaning that the groove side will face the wall and the tongue side will face outwards.
Face-nail through the tongues at a 45-degree angle directly into the battens using your brad nail gun and 2-inch nails. This technique will hide the nails by the groove of the next board. When you’re ready to begin nailing the boards to the battens, have each tongue face towards the direction of installation—meaning that the groove side will face the wall and the tongue side will face outwards.

Begin joining the tongue and groove board together one at a time.
Using your rubber mallet, tap the groove side of the board onto the tongue of the board next to it, and repeat this process as you move across the ceiling.
As you proceed, be sure to account for areas where there may be a ceiling fan, light fixture, or other additions to the ceiling where you’ll need to leave space. Mark as much as you can on the ceiling so you can make proper cuts to the boards in order to fit them around the areas of the openings.
It can be difficult to marry each board together and can quickly become tiresome work. You may need to enlist the help of others to assist with this step.
Once you feel you have a board in the correct position, add a nail or two to hold it into place without permanently setting it. Check to ensure there’s no space between it and the board next to it. If there is any space between the joints, use the rubber mallet to tap the board, closing off the gap.
We have bought and sold numerous times over the past 50 years. Sherman Hall and Top Line are top notch. Thorough and detailed, he explains every possibility, probability, and eventuality. High class and pleasant. The best.
 Top Line Home Inspections, LLC
Supreme Brick & Chimney did a great job with a cleaning and inspection of the fireplace! He was efficient, on time, and very pleasant. The space was kept very clean, and the fireplace was spotless when he was done. He also performed a thorough inspection, and did a great job talking us...
 Supreme brick & chimney
Custom Paint Jobs LLC is the go-to choice for all your painting needs. They painted both the interior and exterior of my house flawlessly. Their work speaks for itself!
They were very helpful with design, very quick to respond, good quality work, and competitive pricing!
On time, clean and finished fast. Windows seem sturdy and the finish is good. Caulking was done with no smudges. Would recommend.
If I could give 10 stars for Kitchen Tune Up, I would. I cannot say enough good things about my experience with Kitchen Tune Up and the entire team involved in the process of my kitchen project. They went above and beyond as far as service and quality with my cabinets, paint, countertops, and...
Beginning with the estimate, Larry and Peyton were super helpful in getting my new condo's interior re-painted. Not only was the job well done, but also done in a super timely manner as promised.
 Five Star Painting of Plain City and Powell
Great job...edging and pre clean up went well with a great job with seal coat. Friendly, efficient and professional.
 All Star Paving and Sealing
We were having 2”x 2” tile installed . There was a small installation error and the new additional replacement tile was from a different lot and the colors didn’t match. Joe assured us that he would rectify everything , which he did without hesitation. We decided to go with the 18” x 36” tile...
 CarifaTile
We live in a condo and had space to add a tall cabinet. The problem was the space was already occupied by our catsâ litter box. We needed to still keep the litter box in that same corner. Beiler Custom Cabinets was able to work with our need and design request. What was created was an...
From average costs to expert advice, get all the answers you need to get your job done.
The cost to install a tongue and groove ceiling depends on the size of the space and the cost of labor. This guide can help you price out your remodel.

Discover the average cost of tin ceiling installation, including labor, materials, and key factors that impact your budget. Learn how to save and plan your project today.
Discover the average cost of stretch ceiling installation, key price factors, and ways to save. Get transparent pricing to plan your stretch ceiling project.
You may consider shiplap versus tongue and groove panels for your dream home. Learn the differences of these materials, from cost to installation and more.
Looking for a ceiling tile installation pro? Learn how to find qualified contractors, questions to ask, and what to expect for your project.

Wondering who to hire to install acoustic ceiling tiles? Learn which pro to call, how installation works, and what to expect. Get confident before you book.