

You may wonder, how much does a leaky roof cost to fix? Learn why waiting to fix even a small leak can considerably increase the final cost.
Don’t let your leaking window be a “pane” in the neck

Leaking windows during heavy rain show up as discoloration, peeling paint, bubbling, soft wood, or texture changes around your window frame and sill.
Window repair by a professional costs around $400, so catching water damage early helps you avoid more expensive repairs down the road.
Check your window caulking and sealant for cracks or gaps, and inspect the surrounding siding and roofing for damage that lets water reach your windows.
Hiring a local window repair professional provides reliable help with hidden leaks, mold growth, and structural damage that needs expert diagnosis and repair.
There’s nothing quite like the sound of rain tapping against your window—until the rain starts sneaking inside. A window leak can lead to all sorts of headaches: water damage, mold, and costly repairs. Before your cozy rainy day turns into a major problem, follow these nine tips to help you find that pesky water leak around your window.
When you’re trying to track down a leak around a window, checking for visible water damage should be at the top of your list. These early signs are often the most obvious clues and can help pinpoint the leak’s location to save you from more extensive and expensive repairs in the future.
Water has a way of leaving behind stains—often brown or yellowish—on your walls, ceilings, and window sills. These marks are usually most noticeable below or beside the window, where moisture tends to gather. The longer the water has been leaking, the darker and more pronounced the stains will be.
When moisture sneaks in, it can cause paint or wallpaper to lose its grip, resulting in bubbling, peeling, or flaking. This is particularly noticeable around the edges of the window frame or where the wall meets the frame. If you start seeing areas where the finish is lifting, it’s a clear sign that water is behind the damage.
If you see bubbles or raised blisters in the paint or wallpaper around your window, that’s a sign of trapped moisture. Water underneath the surface causes the material to swell and form these ugly spots. The presence of these bubbles means that leaking water isn’t a thing of the past but rather something actively affecting the area.
Wooden window frames and sills are particularly susceptible to water damage. Look for signs of rot, such as discoloration, soft or spongy texture, or warping. This could mean moisture has been lingering in the area for too long, weakening the wood. If you find wood damage, call a local window repair company immediately to avoid more extensive repairs.
When water seeps into your walls or ceilings, it can cause noticeable changes in texture. Drywall, in particular, will feel soft, spongy, or warped when it absorbs moisture. You may even notice that the surface becomes powdery or crumbly in places. If your wall or ceiling starts to feel different around the window, it’s a clear sign that the water damage is more than just surface-level.
A visual inspection won’t always reveal everything. This is where your sense of touch comes in handy. Run your hand along the window frame, paying special attention to the parts of the window, like the sill, corners, and edges where the frame meets the wall. Don’t forget the surrounding wall surfaces, both above and below. If you notice any cold spots, that’s a clue. Moisture causes temperature drops, and even small leaks can show up as subtle, damp areas before any visible damage appears.

It’s easy to overlook the caulking and sealant around your window when checking for leaks. Over time, these protective barriers can crack, shrink, or peel away, leaving the door—or window, in this case—wide open for water. Carefully inspect the caulking around the entire window frame—both inside and outside. Look for any signs of damage, like gaps, cracks, or missing sections. If the caulking appears brittle or uneven, it’s time for some window maintenance. A poorly sealed window is an easy entry point for moisture, so keeping your caulking intact is one of the best ways to prevent leaks before they happen.
Mold is a sneaky sign of moisture and a serious red flag of window leaks. Mold looks like dark green or black spots or fuzzy patches that often pop up in corners, around window sills, or behind window coverings like curtains or blinds. In some cases, mold can even grow behind walls if the leak is significant. If you spot mold, it’s a clear indication of water damage. And it’s important to tackle the problem first. While getting rid of mold is possible, dealing with mold infestations or hidden growth is best left to a professional. Don’t wait—mold can be hazardous and needs to be addressed before it spreads further.
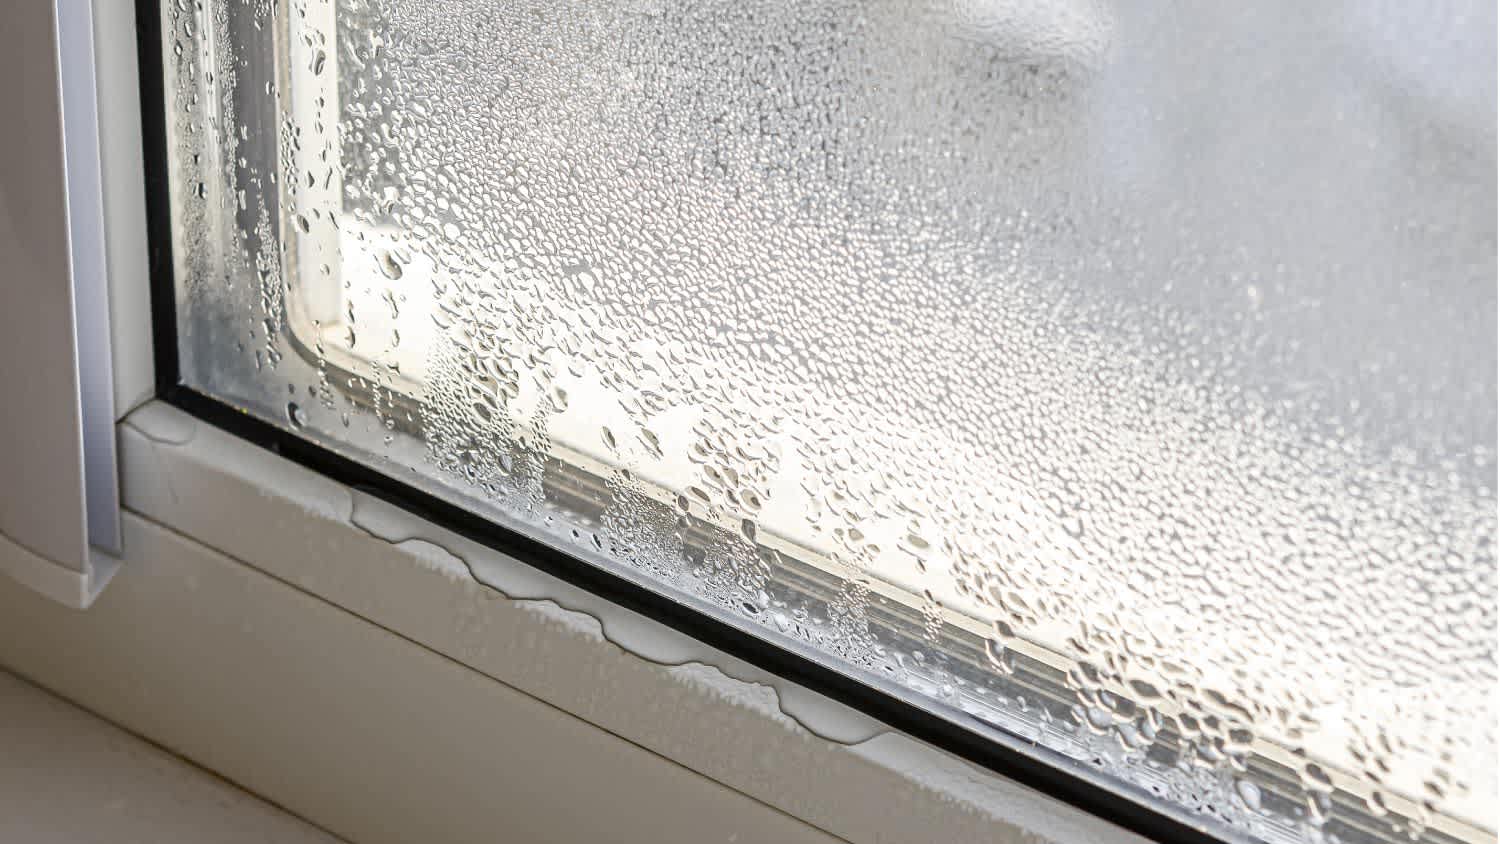
While a little fog on your windows isn’t unusual, excessive or persistent condensation can be a sign of trouble. Moisture buildup on the inside of the window or between panes usually means a temperature or humidity imbalance. If you spot condensation between double or triple-paned windows, it’s likely a broken seal, which could lead to water entering the frame and potentially causing leaks. Check the frame and sill for any moisture or damage, and if condensation is spilling onto surrounding walls, you’ll need to humidify the air in your home and address the leak.
Your siding does more than just look good. It’s meant to keep water away from your windows and walls. Start by inspecting the siding around your window for cracks, gaps, or warped panels—these are common entryways for water. For vinyl siding, check seams and overlaps. For wood, look for rot or soft spots. You should also inspect brick or stone for cracked mortar and stucco for cracks, especially around the window frame. Pay close attention to joints, seams, and corners, as these are the most vulnerable spots. Lastly, don’t forget to inspect the flashing—the metal or plastic strips installed around the window—and areas above and below the window to make sure water is being diverted away and not toward your windows.
Sometimes, the culprit behind a window leak isn’t the window itself, but a roofing issue. Damaged shingles, faulty flashing, or clogged gutters can cause water to run down the wall and seep into the window frame. Check for missing or damaged shingles and ensure the flashing around the roof joints is intact. Also, make sure your gutters are clear and direct water away from your home. And before you step on that ladder, consider calling a professional instead. A roofing expert can safely spot issues and prevent future leaks from reaching your windows.
When visual clues aren’t enough, a moisture meter can help you get to the bottom of a hidden leak. It measures moisture levels in materials like drywall, wood, and concrete. Scan the area around the window, including the frame, sill, and surrounding walls, then compare readings to find any moisture hotspots. Pay special attention to areas with unusually high readings, as they can lead you straight to the leak.
While DIY fixes can be great for minor leaks, some situations require an expert’s touch. If you can’t find the source of the leak or the damage is more extensive—like structural issues or mold growth—you need to know who to call for window leaks. Professionals have the tools and expertise to diagnose hidden problems and prevent further damage. If your windows are still under warranty, don’t risk voiding it by attempting repairs yourself. If not, keep in mind that the cost to repair windows averages around $400. This depends on the severity of the leak, but don’t risk more costly repairs down the line. It’s worth investing in the right help.
We have used Window Warriors many times with no issues. They arrived on time and were very professional . We have pets and Window Warrior team treated them very well, well trusted team.
I am highly satisfied with the window replacement service I received; the professionals from Savvy Exteriors were punctual and did an amazing job that exceeded my expectations.
I hired windows depot USA of central to install new windows in house in Oshawa. Ilya was very professional from the start, not only did he offered a great price, he also made sure the installation was on time. I am very satisfied with final outcome. The windows look great and the overall...
The team is awesome!! I can generally pick up and clean throughout the week, but they CLEAN! Windows, stair rails, microwave. All the things I can’t ever seem to get to regularly. The house looks and smells great after they leave.
Description says they handle window repair including rotten hardwood - they called me back right away but didnâ t leave a voicemail. I followed up 3 days later and they said they donâ t do that kind of work.
We had a gutter blockage that was causing water to sheet down the side of the house and ultimately it started to come in at a window (need mortar people next). Called around 7:30am, and he responded by 8am. He was able to come out the same morning and do a look over and clean out. He also...
From average costs to expert advice, get all the answers you need to get your job done.
You may wonder, how much does a leaky roof cost to fix? Learn why waiting to fix even a small leak can considerably increase the final cost.
There are many causes of leaky windows. A pro can fix it, but you can help by finding the source before they start on the window leak repair.

Exploring practical solutions for common window problems can significantly increase the comfort and livability of your home.

Rain can do a lot of damage to a home. If you live in an area prone to rain, read on to learn what to do about leaking windows during heavy rain.

If you notice your roof leaking, it is important to act fast. A new leaking roof could cause tremendous damage to your home if left unrepaired.

Water coming through the roof is an absolute no-no and needs to be remedied immediately. Finding a roof leak can be tricky, but our tips can help.