

Linoleum is a popular flooring material because it’s one of the most affordable—but linoleum flooring costs vary from project to project. Let’s break it down.
With linoleum back in style, it’s time to learn how to install it the right way

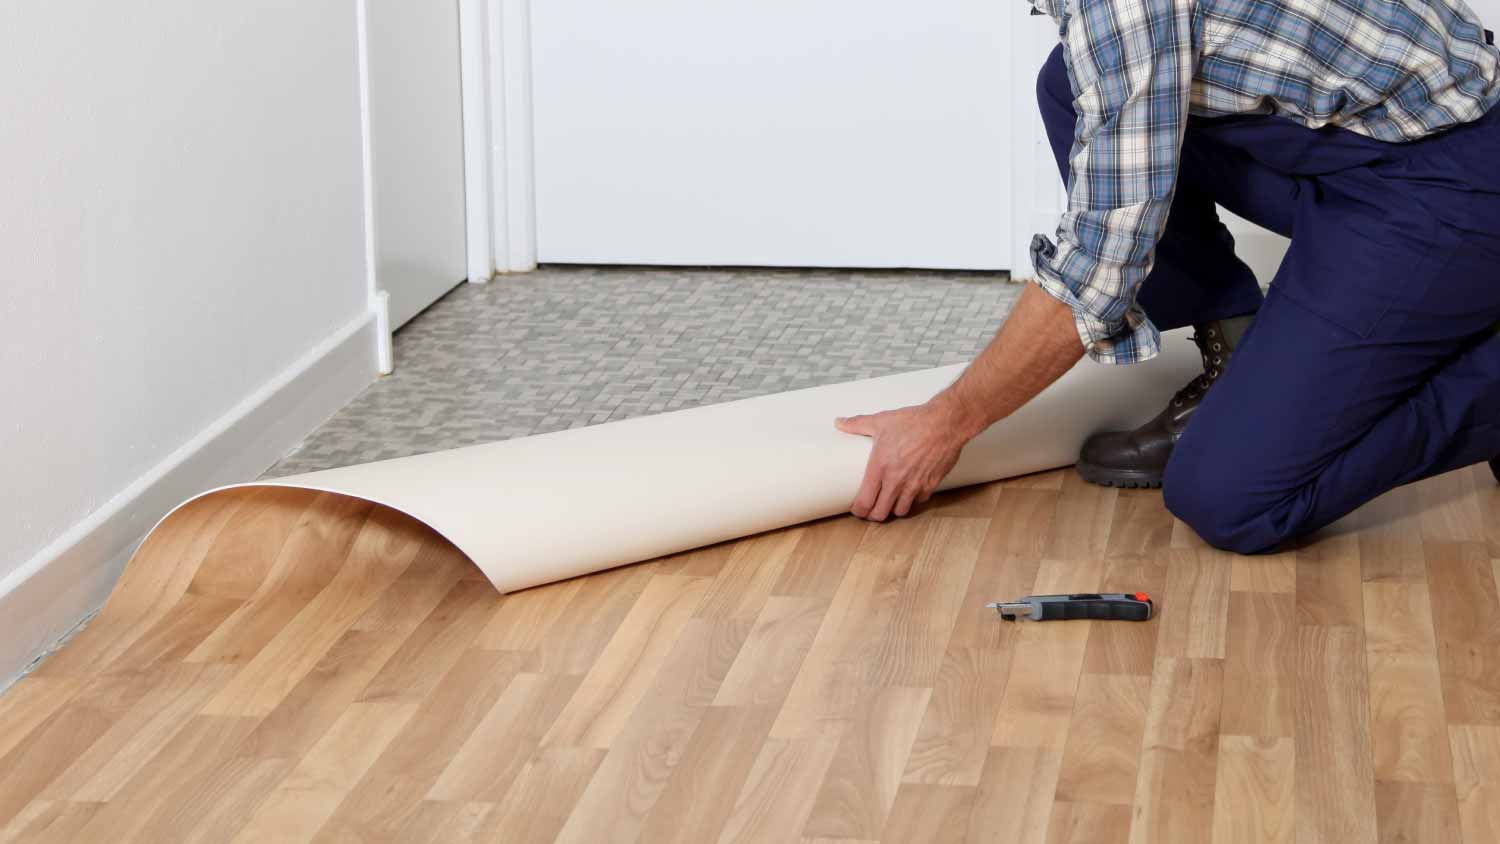
Installing linoleum flooring requires precise measuring and cutting of large sheets, plus careful adhesive application to ensure a smooth, long-lasting finish.
Linoleum needs 24 to 48 hours to acclimate in your room before installation, preventing shrinking or expansion that can cause gaps or buckling.
Proper floor preparation is essential for your linoleum installation, including leveling the subfloor and filling cracks to prevent bumps or damage over time.
Hiring a local flooring company provides reliable support with measuring, cutting, and adhesive work, helping ensure your linoleum floors look great and last.
Linoleum is coming back into style, so if you’ve been eyeing a bedroom or sunroom that could use a little facelift, this trendy floor material is a good option. It can last for about 40 years with proper installation, and there are many types of linoleum to choose from to fit your aesthetic without looking like your floors belong in your grandparents’ house.
But before you cover your existing floors in linoleum, find out how to install linoleum flooring, from proper prep work to a secure sealant.

Linoleum flooring is an affordable, durable, and long-lasting material made from canvas, linseed oil, powdered cork, pine resin, and mineral fillers. This material typically comes in sheets that a pro will need to cut to fit a room properly. Then, the flooring material attaches to the underlayment or existing flooring in a room with a flooring adhesive.
Real linoleum is a popular choice for upgrading a room because of its lower cost compared to some flooring materials and its anti-microbial and biodegradable properties.

Linoleum needs some extra TLC for it to lay smoothly on your floors. By taking the time to prep for linoleum installation, you can get the most life out of your new flooring.
Measure and write down the dimensions of each room to determine how much linoleum you’ll need. You may want to buy 10% to 20% more than your measurement to leave some room for error. You won’t want to find out you’re short by a few square feet when you’ve already applied the adhesive and started laying down the linoleum.
After buying the linoleum, hang on to your measurements. You’ll need them later when you prepare to cut the linoleum to fit the room.
To calculate how much linoleum you’ll need for your floor, start with the dimensions you measured. For each room, multiply the length by the width (in feet). The result is the total square footage. Do this for each room, add them together, and round up to the nearest square foot. Don’t forget to add an extra 10% to 20% to account for wastage during the installation. For example, if your room is 200 square feet, order 220 to 240 square feet of materials.
While linoleum is durable and long-lasting, it easily shows signs of improper installation. To keep your floors from looking bumpy or developing cracks, you’ll need to ensure the existing floor, whether it’s another flooring material, underlayment, or subfloors, is smooth and level.
Fill dents and cracks as needed to smooth out the base level. For example, you can even out hardwood floors and existing linoleum floors with an embossing leveler. For concrete floors, you can grind down raised spots or fill cracks and holes with more concrete.
Alternatively, you can also lay plywood as a smooth base for linoleum. To lay plywood, you can buy underlayment-grade plywood at a home improvement store. Lay the plywood over the existing floor or subfloor where you’ll install the linoleum, and staple the plywood sheet along the edges about every 8 inches.
Using plywood underlayment can save you time repairing the floors. Plus, if you have hardwood or tile floors, you can better preserve these materials if you change your mind about linoleum down the line. (Future generations will also thank you for not leaving sticky residue all over salvageable hardwood floors!)
If you didn’t already clear out the room to level the existing floor or underlayment, make sure to move out all of the furniture, plumbing fixtures, and appliances from the room. You’ll also need to pull out the baseboards and even the doors to clear away any possible obstacles.
Use a pry bar and/or hammer to remove baseboards and baseboard nails, and a standard screwdriver can help you take off any doors. Other obstacles, like toilets, also need to go before you can start laying linoleum. If you can’t remove the toilet, sinks, or other plumbing fixtures from the room yourself, consult a plumber near you for assistance.
Now that you’ve bought your materials and prepared the base floor, you can start acclimating, laying, and sealing your new linoleum flooring.
Linoleum sheets can actually respond to temperature and may shrink or expand slightly, especially when they arrive in a new environment. Your warm home will feel very different than a chilly warehouse. Unpack and store the linoleum in the room where you will install it for at least 24 hours (ideally about 48 hours) to give it time to adjust. Otherwise, its minor shrinking or expansion can lead to sheets that don’t quite fit the room even after measuring.
Let flooring like hardwood and laminate acclimate to your home's humidity before installation to ensure it won’t warp or shift. Your flooring pro can guide you on how long to let it adapt.

You don’t want to worry about cutting the linoleum while also trying to install it. Instead, after the linoleum has had time to acclimate to its new environment, you can use your room measurements to cut the linoleum sheets into tiles. Mark about 1 to 2 inches extra in your measurements, and you can trim off the excess as needed while you’re laying the flooring.
Use a straightedge and tape measure to outline straight lines across the linoleum sheets, then use a washable marker to mark the cut lines. These lines will guide you as you cut the linoleum with a sharp utility knife. Keep the straightedge nearby while cutting to ensure your lines are as straight and even as possible for a seamless fit.
Position the cut linoleum floor tiles around the room, working carefully along the edges of the room and into all four corners. Because you left some extra material when cutting, you’ll need a utility knife to trim away the excess so each tile fits perfectly against the other.
Pull up half of a tile and apply a thin coat of flooring adhesive to the underside of the tile using a notched trowel. Place the tile back down and repeat on the other half of the tile. If excess adhesive comes through the seams between tiles, use a damp cloth to wipe it away.
Once you’ve adhered all the linoleum tiles to the floor, use a floor roller over the linoleum. This step helps smooth out any air bubbles and adds pressure to better adhere the linoleum to the base floor. Again, use a clean, damp cloth to wipe away any extra adhesive that comes between tiles after rolling the floor.
Sealant helps protect your new linoleum floors and gives them a fresh, glossy finish, so don’t skip this important step. Apply linoleum sealant with a brush evenly, starting from the farthest corner of the room and working your way toward the door.
Once the sealant is on, leave the floors alone to dry and fully adhere to the base floor for at least 24 hours. Don’t replace any furniture, baseboards, appliances, doors, or other items in the room and don’t let anyone walk on the new floors during this time. Otherwise, the linoleum might not stick properly or dimple from heavy furniture items' pressure before it has time to dry.

Linoleum flooring can be tricky to install, even for a seasoned DIYer. Large sheets of linoleum can be harder to work with than something like small ceramic tiles or floating laminate flooring that clicks into place. Linoleum’s tendency to shrink or expand with temperature fluctuations can make it challenging to cut and lay. However, keeping some pro tips in mind during DIY linoleum installation can set you up for success.
Linoleum needs time to acclimate to the room and time for the adhesive to dry. You’ll need to practice patience if you want your new floors to look great and last several years.
Before you take the time to lay the flooring, you’ll need to wait 24 to 48 hours for it to acclimate and at least 24 more hours after sealing it before you can add the baseboards, doors, and furnishings back to the room. Your patience will pay off with smooth, durable linoleum floors that will last up to 40 years.
Because linoleum may shrink or expand, it’s wise to measure a little more than you need throughout the process, from purchasing the linoleum sheets to laying them out on the floor. You can always trim the excess, but you can’t lengthen a sheet of linoleum cut too short.
Again, patience is a virtue with linoleum, especially during the adhesive process. Apply it in a thin, even layer on the underside of the cut linoleum tiles, and let the adhesive sit for a few seconds before laying the linoleum back on the floor. Move carefully and work in small portions at a time for the most seamless look.
Linoleum flooring costs about $2 to $7 per square foot, with an average project ranging from $955 to $3,755 total. Materials can range from $1 per square foot for basic linoleum to over $14 per square foot for longer-lasting linoleum with unique or custom colors or designs. Labor costs an additional $3 to $10 per square foot or $36 per hour.
Hiring a flooring specialist near you costs $3 to $10 per square foot for the labor, plus the cost of materials. When you DIY, installing linoleum floors just involves the cost of the linoleum, about $3 to $7 per square foot.
Linoleum is not as easy to lay as other flooring types, like laminate, because it typically comes in large sheets that you need to carefully measure and cut to fit the room.
Then, you have to ensure the underlayment and adhesive on the back of the linoleum sheets are both as smooth as possible for the flooring to look its best and last as long as possible.
If you have experience with installing flooring—or the patience and confidence to do the project right—then installing linoleum flooring might be a good DIY project for you. If not, it’s best to leave it to the pros.
Joseph did a great job with the staircase and trim. Timely and efficient, clear communication about the work, very fair pricing. For the stairs in particular, done very skillfully in an old house (1893) in a tight spiral, and very creative with how to do the handrail. Did a nice job with...
This company does it right. Firstly, I want to say that Landan was a joy to work with. He was so kind, transparent, and had everything under control. His entire team showed up ready to work and they were all very respectful of the fact that we were in an office space. A little backstory – we...
Finished Basements Plus was wonderful from beginning to end! First, they came out quickly for an estimate. I had 4 estimates and theirs was by far the best. (2 of the estimates were more than $20K higher than for the exact same work). Beyond their fair pricing, the work was excellent. They...
 Finished Basements Plus Inc.
Very professional, knowledgeable and helpful! Completed the install on time and as expected.
Cole has been handling plumbing and general contracting for our four properties over the past three years, and he’s always done a great job. Most recently, he installed a sink and countertop in our retail store where none existed before, and it turned out exactly how we needed. He’s...
 ANB Renovations LLC
Excellent, Prompt, Courteous Service!!! They were super friendly and quite personable. I felt very comfortable with the gentlemen that did the installation. They installed it exactly where I asked them to and they did an excellent job!! I loved their service so much.
Window Depot did an amazing job installing the windows in my basement! The process from start to finish was by far more than what I expected. I would highly recommend Window Depot if you want professionalism from the the consultation to the installation. Dont settle for mediocre when you can...
AFS was excellent from start to finish. Jess, the sales associate, was fantastic...very knowledgeable and very professional. The installation crew was excellent. I couldn't be more pleased with the process. Best of all, my new floor looks fantastic!
 America's Floor Source
We were having 2”x 2” tile installed . There was a small installation error and the new additional replacement tile was from a different lot and the colors didn’t match. Joe assured us that he would rectify everything , which he did without hesitation. We decided to go with the 18” x 36” tile...
 CarifaTile
Did an amazing job transforming my yard. Also installed sod in places, would recommend to everyone.
From average costs to expert advice, get all the answers you need to get your job done.
Linoleum is a popular flooring material because it’s one of the most affordable—but linoleum flooring costs vary from project to project. Let’s break it down.

Discover the cost to repair a linoleum floor, including average prices, key cost factors, and tips to save money. Get expert insights to plan your linoleum floor repair.

Looking for a more eco-friendly flooring option? Learn how much Marmoleum® flooring costs and what factors can affect the price of installation.
Linoleum floors have been around for more than a century. This retro choice is now a modern alternative. Learn the pros and cons of linoleum flooring here.

We compare linoleum and laminate, unveiling a charismatic clash between classic resilience and modern versatility. Which flooring suits your style?
Linoleum flooring can be a pain to remove, but the process is simple. As long as you’ve determined it’s safe, use this guide for how to remove linoleum flooring.