
Skim coating drywall is a great alternative to replacement, and is often more affordable. Use this guide to estimate the cost to skim coat walls in your home.
Don’t skimp on applying a skim coat to drywall

When you see those flawlessly painted walls in the glossy pages of a home decor magazine, you may wonder why your own walls don’t seem to look that perfect. But the secret to magazine-worthy walls is skim coating. Knowing how to skim coat a wall can save you some money on drywall installation costs while also setting up your space for the smoothest paint job. Here’s how to achieve a seamless drywall finish with skim coating.

Before you start painting joint compound across the wall, be sure to seal off all nearby window and door frames and any other parts of the room with masking tape.
Joint compound, also known as drywall mud, helps smooth out any imperfections, like seams or drywall screw holes, on drywall. By applying it all over the drywall, you can achieve a perfectly smooth finish.
For a skim coat, add the joint compound to a mud pan or bucket, then apply 1 cup (8 ounces) of water at a time. Stir using a mixing attachment on a drill, and repeatedly add water and stir until the mixture has a consistency of peanut butter or a very thick cake batter.
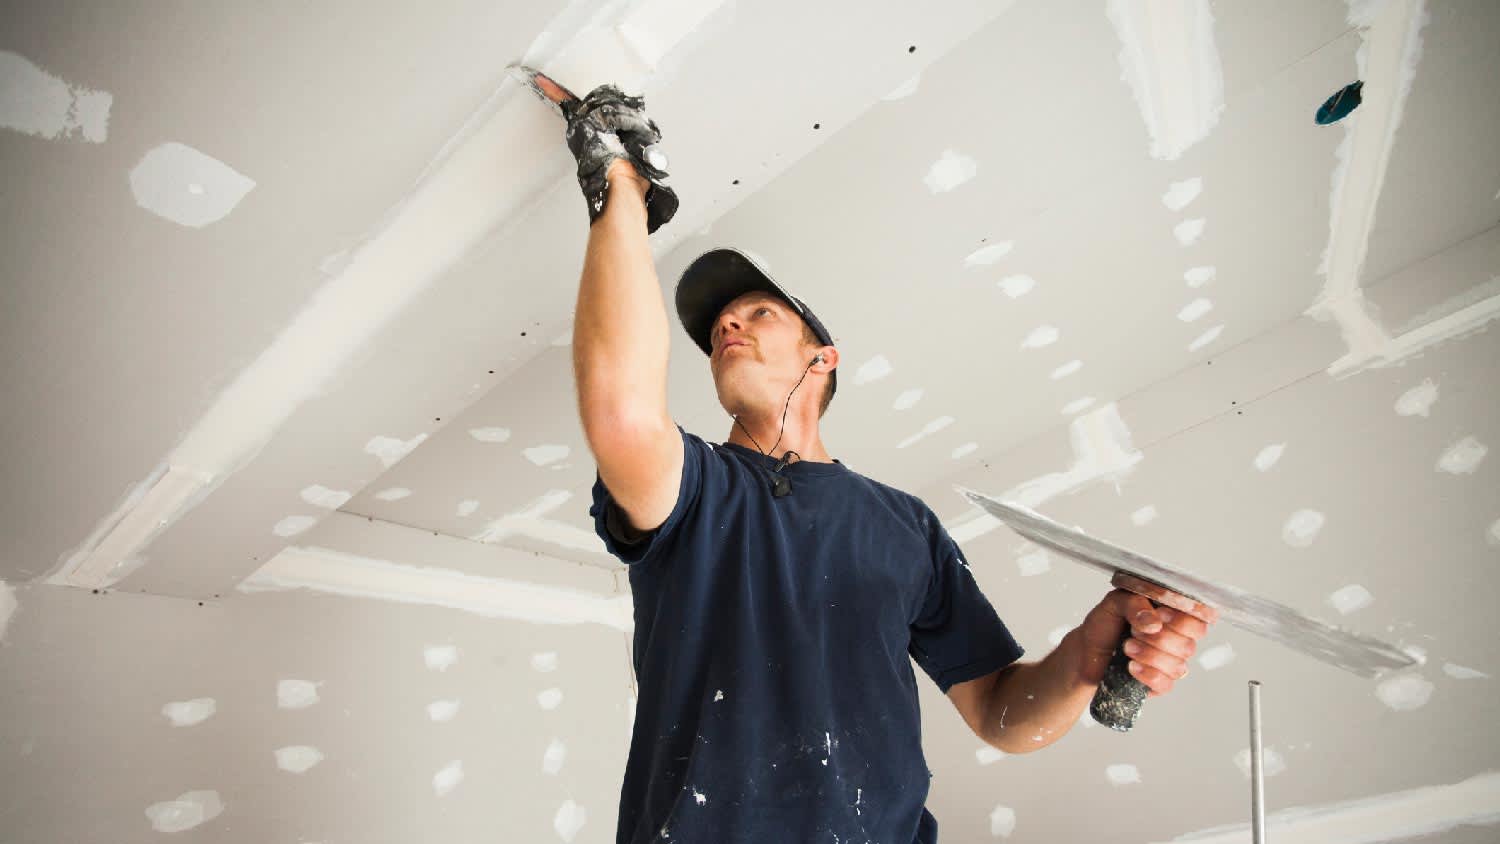
Using a paint roller, roll a thin layer of joint compound onto a section of drywall that’s about 4 feet by 4 feet. The joint compound will have a texture from the rolling sponge, but don’t worry. We’ll smooth that out right away in the next step. Consider working from one drywall corner to another to avoid leaving any lines behind.
Using the skim coating blade or a drywall knife, scrape along the joint compound from the bottom of the wall toward the top or from right to left. If moving from right to left, make sure to ever-so-slightly ease up the pressure on the right side to prevent any lines from being left behind. Continue until you finish smoothing out this section of joint compound.

Continue to work in sections of 4 feet by 4 feet since the mud can dry quickly. Keep rolling on a thin layer of joint compound and then smoothing it over with the skim coating blade around the entire room.
After you've finished the walls, be sure to seal up any remaining joint compound if you’re doing another layer of skim coat.
The drying time for drywall mud is 24 hours for rooms with 60% to 70% humidity. It’s important to be patient and let it dry fully before applying another layer. Otherwise, you risk undoing all of your hard work on the previous coat.
How many coats of drywall mud you need will depend on your preferences. After one coat, can you still see some texture underneath? Repeat the process of rolling on mud, smoothing it out, and allowing it to dry. You may need between one and three layers for a smooth finish.
When applying another coat, work in the direction opposite of the previous coat. For example, if you applied and smoothed out the joint compound by moving bottom to top on the wall for one layer, move from right to left when applying the next layer. Let each skim coat layer dry for at least 24 hours before applying a new coat—we promise the wait is worth it.

Finally, use 120-grit sandpaper to sand down the entire drywall. Now, you have a smooth, seamless canvas to start painting on.
Once you get into a rhythm, skim coating a wall is a straightforward process. However, it can be harder than it looks. Here are some mistakes to avoid when learning how to skim coat a wall.
Adding too much water to joint compound: If the joint compound is too thin, the drywall will absorb the water and prevent paint from sticking properly. Aim for a thick texture that’s similar to peanut butter or mayonnaise.
Going wide: If you roll joint compound onto a really large section of drywall, it could start drying before you have time to smooth it out.
Applying too much mud: Make sure to only dip the roller into a small amount of joint compound at a time. If the layer is too thick, it will turn out lumpy instead of smooth.
Rushing through dry time: While getting to the painting stage is exciting, you have to let the mud dry fully before applying a new skim coat or painting. Otherwise, there won’t be a smooth finish.
Maybe you don’t have the patience to smooth and sand an entire room worth of drywall, or perhaps you’re concerned about making a noticeable mistake along the way. If you want smooth walls, consider leaving this project to a drywall installer near you.
If you decide to DIY the skim coat, you can expect to spend around $50 on the joint compound, tape, and sandpaper. The more layers you apply, the more you’ll spend on joint compound, which costs $25 per 4.5-gallon bucket.
If you need to purchase the tools for this project, expect to spend $20 to $75 for a skim coating blade, $10 to $30 for a drill mixing attachment, and $10 to $20 for a paint roller and mud pan.
Professional skim coating costs $300 to $1,200, but by hiring a pro, you’ll avoid some back strain and free up your weekend. After all, time is money.
Cancelled appointment two hours after they were supposed to come for drywall work.
I would recommend this company to anyone! He showed up on time, was friendly, completed a very difficult repair on our dryer vent cover, was responsive, and pricing was extremely fair and competitive. I would have him back to do any of our repairs or cleanings without hesitation!
I cant stop admiring my newly painted walls. Custom Paint Jobs LLC made my house feel brand new.
Excellent experience with hiring Tether House to Mount our 77’ Samsung TV in our bedroom. Fast, friendly, and knowledgeable. Highly recommend.
Excellent customer service and knowledge. I was recommend to him from my neighbour. My front door and window came in great and were installed beautifully perfectly, I m very satisfied with their excellent work, so decided to order one more big bow window for my living room. I cant wait for...
Manuel Calvillo is the best option in the area for roofing and you won't be disappointed.
Would hire again. Wall looks great. Happy with job.
 Central Paving
Involved an extensive bathroom remodel, including removing tub & installing walk in shower, new drywall, custome tile work to ceiling, plumbing, etc. Overall, job was done on time and on budget. Nick & his team were very professional and had high attention to detail. Quality was great. Highly...
 Stamos Flooring and Remodeling LLC
We have had a great experience with Rising Height for the past five years on a number of miscellaneous renovation projects. They laid flooring for us and had a very good sub do the finish. Installed drywall for a vaulted ceiling, finished an attic/loft with new subfloor, framing and drywall,...
 Rising Height Unlimited
Mr. Lopez was super nice and professional. He repaired our drywall just as he described during the estimate phase. Our dining room wall looks great again! Thanks Mr. Lopez!
From average costs to expert advice, get all the answers you need to get your job done.
Skim coating drywall is a great alternative to replacement, and is often more affordable. Use this guide to estimate the cost to skim coat walls in your home.
Skim coats and primer are both ways to prepare drywall, but they function very differently. Here’s what you need to know.
Sick of staring at popcorn walls or faux stucco? This guide will show you how to remove texture from walls like a pro. Here’s what you need to know.
Wondering how many coats of mud on drywall you need? Learn what affects the number and how to get a smooth, professional finish for any space.
When looking to alter a room's appearance, you may ask: Can you sand texture on a painted wall? You can, but there are some key things to know.
Drywall finish levels range from 0 to 5, with 0 being no finish and 5 being the most polished. Read on to learn all about drywall finishing.