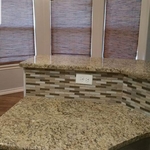
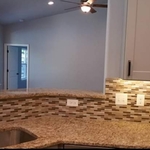
Get matched with top backsplash installation pros in Winters, TX
Top-rated backsplash installation pros.

Need a pro for your backsplash installation project in Winters, TX?

Select your specific project to find the pro for you.

Find Backsplash installation pros in Winters

Avatar for Rafter B Home Services
Rafter B Home Services
4.8(
8
)

Serving Winters, TX and surrounding areas

In business since 2021

Free estimates

"We found Chase Bedell to be very helpful and attentive. The general handyman work he completed required a broad range of required skills. We've been happy with the work he completed and feel confident using him again."
Remodeling - General Project
Additional Photos
Additional Photos
Additional Photos
Additional Photos

+2

Recommended by100%of homeowners
E-Z Home and Lawn
5.0(
3
)

Serving Winters, TX and surrounding areas

In business since 2019

Free estimates

"Jim did an extensive remodel on a rent house for us. He gave good advice and was talented enough to handle all the projects including plumbing, electrical, ceiling fans, window install, door and jam replacement, new shower where used to be a tub, painting and texturing. Always responded to calls or texts and asked questions when something popped up we hadn t discussed. Worked hard and had some workers who were similarly diligent. It was a good experience for us and that isn t always the case with everyone you hire."
Kitchen update
Kitchen New home
Kitchen
Kitchen
Kitchen

+37

Response time2 days
Recommended by100%of homeowners
Showing 1-10 of 47
Backsplash Installation questions, answered by experts

The process takes two to four days, depending on the size of the area and your experience level. The first day involves assessing and prepping the existing tile, while the second day is for laying the new tile. This may take longer in complex areas. After letting the adhesive dry for 24 hours, grouting and sealing can be completed on day three. For larger projects or intricate tile patterns, expect the timeline to stretch a bit longer. Also, proper drying time between steps is essential for long-lasting results, which extends the project’s time.

When considering the types of grout for your project, unsanded grout is the best choice for penny tile. Unsanded grout can fit better into narrow spaces, like those between the small penny tiles, and it’s easier to smooth out for a seamless finish. However, if you’re unsure, check with a tile installation pro to determine which grout is best for your specific project.

Travertine is a natural stone, while porcelain is ceramic. You can enjoy the best of both worlds with porcelain travertine tiles. Some people prefer porcelain to travertine because it doesn’t require regular maintenance and it’s easier to clean. Porcelain travertine looks like the real thing but only costs $3 to $6 per square foot.

Grout lines should typically be between 1/8 to 3/16 inch thick. This ensures enough room for the grout to dry properly and makes them wide enough to look clean and professional. If grout lines are too small, it can be easier to see imperfections in the spacing. 

Many homeowners have successfully retiled a bathroom themselves. It can be a challenging but rewarding process, but it’s best for someone who already has at least intermediate DIY skills.

The Winters, TX homeowners’ guide to backsplash installation services

From average costs to expert advice, get all the answers you need to get your job done.