

The cost to paint the interior of a house in Denver, CO depends on size, layout, type of surface, and more. Learn what factors can influence your total in this guide.
Bring your wood-paneled walls into the modern age with these techniques


Wood paneling was once one of the hottest design trends around, but these days, it may feel dated or out of place. Fortunately, if you’re looking to update your decor but don’t want the hassle of removing paneling from your walls, you can cover your wood paneling for a fresh new look. Options for covering wood paneling include spackle and paint, shellac-based primer and paint, caulk and wallpaper, and wall liner.
Wood paneling is made up of sheets or panels of solid wood, engineered wood, wood veneer, or imitation wood. These sheets or panels are then installed on walls to give the look of wood even on drywall or plaster walls. Wood paneling was a popular design trend from the 1950s to the 1970s, but has been in use in various forms since even before colonial times.
The cost to cover wood paneling depends on what method you use to cover it. If you choose to paint over the paneling, hiring a painting professional costs an average of $1,100 for labor and materials for one room. If you choose to DIY, the cost is around $150 for materials.
The average cost of installing wallpaper for one room is $560, depending on the height of your ceilings, room size, and wallpaper selection.
If you’ve grown tired of your wood paneling and are ready for a new look without the hassle of removing the paneling, you have options for covering it up to match your design style and your home’s decor.
This four-step process takes a bit longer than some of the options on this list, but painting wall paneling produces the most consistent results.
Drop cloth
Painter’s tape
Paintbrush
Roller brush
Spackle
Putty knife
Sandpaper
Acrylic paint
Wipe down the panels to remove dust and debris before doing anything else. This will ensure a smooth, uniform finish. Let dry completely before moving on to the next step.
Use the putty knife to apply evenly spackle over the grooves. Take this opportunity to also cover up any scratches or holes from wear and tear. Let the spackle dry completely before sanding. For a bit more texture, coat the walls in a layer of plaster in between this step and the next to create a fabulous faux finish.
The amount of sanding that you do depends entirely on your preference. The smoother you want the finish, the more you’ll need to sand. If you’re trying to achieve a textured, gritty appearance, you may not even need to sand at all.
Use a vacuum to suck up any remaining dust from sanding. Use a roller brush to apply primer all over. Let dry, then apply the paint color of your choice.
Using a shellac-based primer to cover wood paneling eliminates the need for any spackling or sanding. Though a bit more expensive than traditional primers, you get what you pay for because it does a better job of hiding the grooves and dries in less than an hour.
If your walls have come in contact with any kind of dirt and grime, then your first step should be to wash your walls. Use a mixture of dish soap and water or a heavy-duty cleaner specifically for removing grime, smoke, or other types of deposits.
Once the walls are clean, apply the primer with up and down strokes and let it dry for at least an hour. Ensure it’s completely dry before painting. Shellac-based primer will speed up your project because you won’t need as many coats of paint to cover the faux wood.

If you’d rather avoid doing any extra painting, wallpaper is another great alternative for covering up wood paneling.
The catch is that wallpaper on its own is not thick enough to fully conceal the grooves underneath. Using caulk to fill the grooves is a quick fix for this problem. A putty knife will help you easily apply caulk to the numerous grooves.
When the caulk has dried, sand it down to add enough texture for the wallpaper to adhere to.
Once you’ve sanded, hang the wallpaper as you normally would in your home, either DIY or by hiring a local wallpaper pro to speed up the project.
Wall liner is a thicker, more adhesive alternative to wallpaper that will cover the grooves in your paneling, so you can skip the caulk entirely.
Follow the manufacturer’s instructions and adhere the liner to the wall. Think of it as applying a smooth canvas that will let you start fresh with the decorating.
Once the liner is in place, add a coat of paint for color or a layer of thin, decorative wallpaper. There are plenty of great styles and textures to choose from.
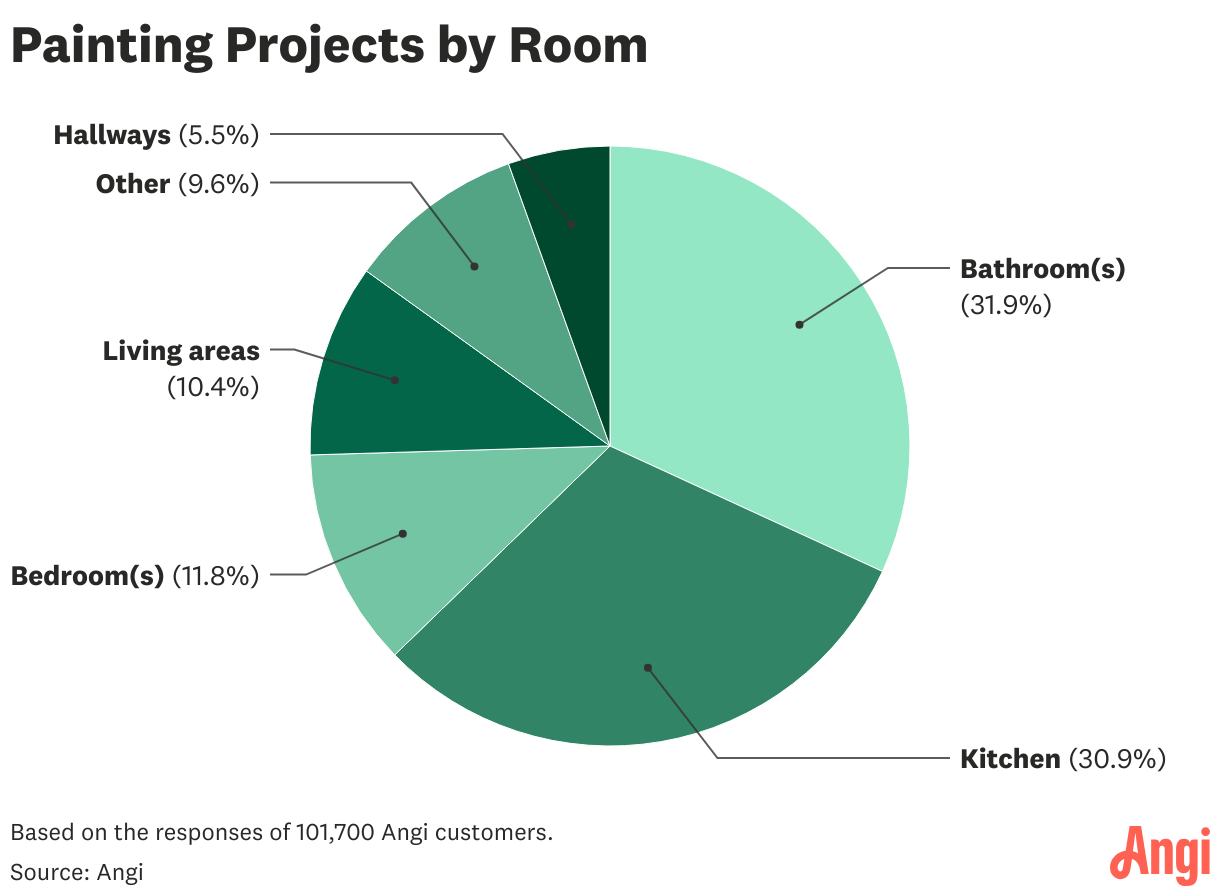
When homeowners are ready to tackle a painting project, there are some rooms in the house that get a bit more attention than others. According to Angi data, kitchens and bathrooms are the most commonly requested rooms to paint, at about 31% each. Bedrooms and living rooms are requested 11% and 10% of the time, respectively. But whichever room has wood paneling that you want to cover up, a pro can help update the space with new paint.
You can save a substantial amount of money by choosing the DIY route for any of the methods mentioned above. Instead of paying for the labor costs of a professional to either paint or hang wallpaper, you would only have to cover the cost of your materials.
However, depending on the size of your room, the ceiling height, and how much prep work is involved, hiring a professional can save you an enormous amount of time and deliver quality results. A local interior painter can give your wood paneling a fresh look with a professional finish.
From average costs to expert advice, get all the answers you need to get your job done.
The cost to paint the interior of a house in Denver, CO depends on size, layout, type of surface, and more. Learn what factors can influence your total in this guide.
The cost to paint the interior of a house in Dallas, TX depends on size, layout, type of surface, and more. Learn what factors can influence your total in this guide.
The cost to paint the interior of a house in Minneapolis, MN depends on size, layout, type of surface, and more. Learn what factors can influence your total in this guide.

The German schmear technique can revitalize the look of your brickwork. Learn what German schmear is and what you should know before you get started.

Sick of staring at popcorn walls or faux stucco? This guide will show you how to remove texture from walls like a pro. Here’s what you need to know.

Changing the color of brick, plaster, or stucco is a big decision. Learn about the difference between limewash, from its appearance to its toxicity.