
The cost to paint trim on a house depends on several factors. This informative cost guide will help you budget for your upcoming paint project.
Get it right without giving yourself a headache

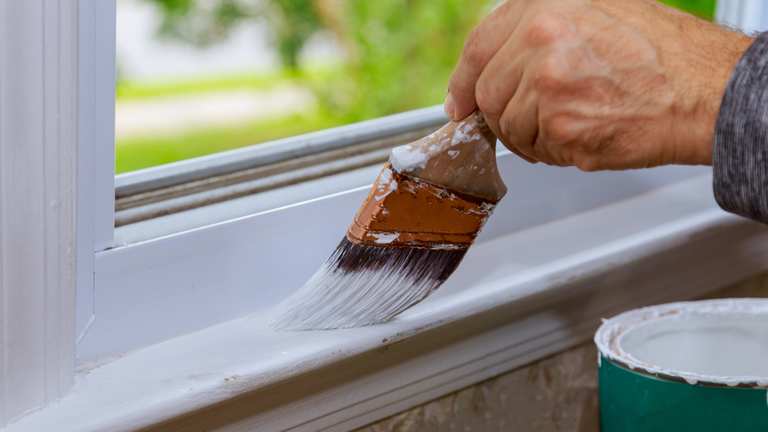
An edge brush for molding work helps you reach narrow trim areas cleanly, especially when painting baseboards, crown molding, or window frames without overloading the surface.
Hiring a local interior painting professional costs $2 to $6 per square foot, so you can budget confidently for trim painting and other interior work.
Sanding your trim with 220-grit sandpaper smooths out inconsistencies and helps paint adhere properly, creating a professional finish that lasts longer in your home.
Hiring a local interior painting professional provides expert guidance on paint selection and brush techniques, helping you achieve smooth, durable results on all your trim work.
Walls take center stage when painting, but those huge blank canvases are nearly impossible to mess up. Trim, on the other hand, has been frustrating amateur painters since the dawn of time. One false move can lead to multiple redos and plenty of headaches. Don't fret. Here are some tips for painting trim to achieve pro-level results without too much fuss.
Before breaking out the paint brush, take some time to clean and sand the trim.
Wash the area to remove anything icky.
Clean with a cloth and a gentle solution—either a store-bought wood cleaner or a simple mixture of warm water, vinegar, and dish soap.
Sand the trim, rubbing out any inconsistencies.
We recommend 220-grit sandpaper for this job, but trim that's in rough shape could benefit from 100-grit sandpaper.
An oil-based primer will help the paint stick. Work slowly and let it dry for a couple of hours. Finish up the prep work by filling in any holes and dents.
For large dents and gouges, use a wood filler. Go at smaller dents with a spackling compound and use caulk for actual holes. Shine a light on the trim to ensure everything is even before moving on to the next step. If necessary, grab the sandpaper again and give the prepped trim a quick pass.

Most pros recommend oil-based paint for trim, as it doesn't dry as quickly as water-based paint and tends to leave a smoother surface with fewer brush marks. However, DIYers should look into water-based paint. It's environmentally friendly, easier to clean, and smells a whole lot better.
At the end of the day, total amateurs should probably choose water-based paint, while people with some experience should go for oil-based paint. Semi-gloss and high-gloss paints are great for trim because they’re the most durable and easy to clean.

This largely depends on the type of paint you went with, but there are some good tips for choosing a paint brush for trim.
For water-based paint, choose a synthetic brush made from nylon, polyester, or both. This will prevent the bristles from losing strength during the job. If you choose oil-based paint, go with a natural-fiber brush. These contain various types of animal hair that hold onto oil paint well.
The size of the brush depends on the size of the trim.
| Trim Width | Paint Brush Size |
|---|---|
| Small (<2 inches) | 1 to 1 1/2 inches |
| Moderate | 2 to 2 1/2 inches |
| Wide | 3 inches |
If you're not painting the walls along with the trim, tape off any areas you don't want paint to splash onto. Don't overload the brush with paint. Remember, trim is thin and it doesn't take a lot of paint to cover an area.
There are two techniques worth considering:
Cutting-in involves pulling the brush along the edge of the trim, moving closer to the center with each stroke.
The lay-on lay-off technique involves quick back-and-forth brushstrokes, followed by dragging the tips of the bristles over the wet paint to spread it around.
Once finished, let everything dry before moving on to another coat if required.
It's extremely important to air out the area between coats. This will minimize the tell-tale smell of paint throughout the area and dissipate any VOCs. It also lets the paint dry properly and tells you whether another coat is necessary.
Open the windows to let air in for about an hour. If the room has no windows or no breeze comes in, introduce a fan or two.
Painting trim is an exacting and occasionally frustrating project. The best way to avoid complications is to contact a local interior painter. There are several benefits to going with a pro, including a better end result and expert advice on the best paint type for the job. Pros can also handle other painting projects around the home beyond trim. Hiring a local interior painter costs $2 to $6 per square foot.
Custom Paint Jobs LLC is the go-to choice for all your painting needs. They painted both the interior and exterior of my house flawlessly. Their work speaks for itself!
Beginning with the estimate, Larry and Peyton were super helpful in getting my new condo's interior re-painted. Not only was the job well done, but also done in a super timely manner as promised.
 Five Star Painting of Plain City and Powell
From average costs to expert advice, get all the answers you need to get your job done.
The cost to paint trim on a house depends on several factors. This informative cost guide will help you budget for your upcoming paint project.
Discover the cost to install window trim. Learn about price factors, labor, materials, and tips to save on your window trim installation project.
Adding color to the walls of your home is a fun way to transform your space, so learn how to paint trim on your walls as a wow-worthy DIY project.
Interior trim creates cohesion and a refined finish in any room. Learn what finish works best in your home with this guide to the best paint for trim.

Is there a huge difference between stained trim vs. painted trim? The right choice for your molding and baseboards depends on your home.

Do you paint trim or walls first when you start a new painting project? See which method is best for your situation using our in-depth guide.