
•
Find out the cost to replace an outdoor spigot. Get a detailed breakdown of prices, labor, and tips to save on your next outdoor faucet replacement.
An upgrade that’ll last you a decade or two

Replacing an outdoor spigot yourself requires identifying your plumbing type first, as copper and galvanized pipes need soldering while PEX is more DIY-friendly.
Expect to pay $150 to $300 for professional spigot replacement, while DIY costs range from $30 to $70 for the valve itself if you have tools.
Turn off your water supply before cutting the interior pipe, and test the new frost-proof spigot for fit before securing all connections inside and out.
Hiring a local plumbing professional keeps soldering safe and ensures your new frost-proof spigot connects properly to prevent leaks and freezing damage.
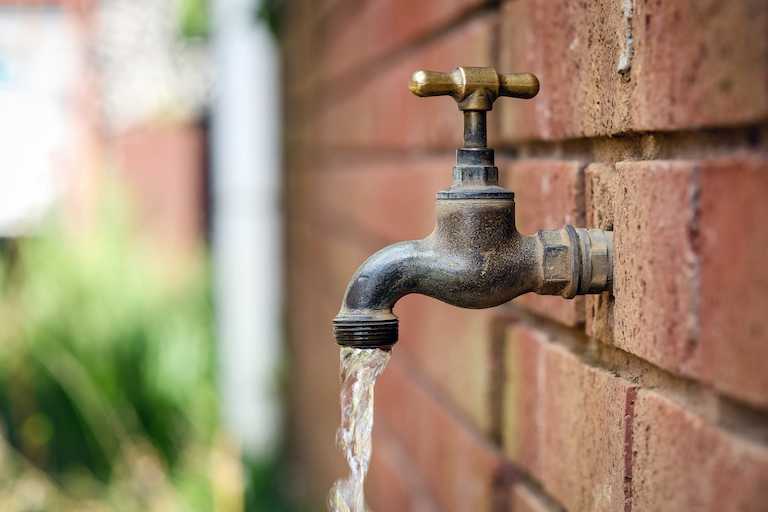
A leaky outdoor faucet can waste thousands of gallons of water per year. A spigot that sprays water in unusual directions or has low water pressure can be a hassle. Sometimes, all you need to do is repair your spigot to solve these problems. Other times, you need to replace the entire spigot valve. Learn how to replace a spigot valve no matter your plumbing type.
An outdoor spigot that leaks, has uneven water pressure, an unusual spray, or doesn’t work at all can be a huge hassle. You might be unable to water your lawn and garden properly and leaks and drips can lead to higher water bills. If you notice inconsistent water pressure, rust, corrosion, or dripping, it’s likely time to repair or replace your outdoor spigot. If you live in a climate that experiences below-freezing temperatures, replace your spigot with a frost-proof model. The long stem ensures the rubber washer sits inside the home to protect it from freezing temperatures.
If you do the work yourself and already have the tools, you can replace a spigot valve for $30 to $70, depending on the brand and model. Hiring a professional to replace your spigot costs between $150 to $300, depending on how complex the project is.
Check out your plumbing type and gather your tools and supplies before digging into this DIY.
Look in your basement or crawl space to determine what type of water line leads to the outdoor faucet. Determine if you have copper, galvanized, or PEX pipe. You’ll need to purchase the materials compatible with your plumbing. Copper and galvanized pipes are more difficult to work with, while PEX is much more DIY-friendly.
Depending on the issue, you may not need to replace the entire spigot. You may only need to replace a washer or bonnet inside the valve. Take apart your outdoor spigot to see if the washer is worn or torn. Without this critical piece, your faucet might leak. You may also need to tighten or replace the bonnet. Simple fixes and part replacement projects are easier than replacing the whole fixture. However, you may want to upgrade to a frost-proof spigot if you live in an area with below-freezing temperatures.
When replacing an outdoor faucet, getting the correct spigot to fit your current plumbing is important. If you're unsure, talk with an expert at a hardware or home improvement store and bring photos of your plumbing. Depending on the complexity of your replacement and the type of pipe you have, you may need:
Tools
Pipe cutter or PEX cutter
Phillips screwdriver
Drill and masonry bit
Tape measure
Emery cloth
Solder torch
PEX crimper or expander tool
Crescent wrench
Bucket
Protective gloves
Construction glasses
Supplies
Frost-proof outdoor spigot
Concrete screws
3/4-inch coupling or PEX connector
Plumbing pipe
Flux
Plumber’s tape

Once you have your tools and supplies ready to go, it’s time to dive into replacing your outdoor faucet with a frost-proof spigot and sillcock. If you feel uncomfortable during the project, take a step back to do further research or hire a plumber to replace your outdoor spigot.
Turn off the water supply that leads to the outdoor spigot or turn off the water supply to the whole home. The lever is usually located on the house's front wall in the basement or crawl space. Turn on the water spigot outside and let the water drain out.
Since you’re replacing the entire spigot and sillcock, you'll need to cut the interior pipe leading to the outdoor faucet. Using a pipe cutter or PEX cutter, cut the pipe a few inches from the wall. Have a bucket ready to catch the water that’s left in the pipe.
Remove the screws holding the faucet to the house with a screwdriver. Slide the sillcock out of the hole. Insert the new outdoor spigot to check for fit.
Add a coupling to the end of the new outdoor faucet piping to attach to your home’s plumbing. The coupler type depends on the type of plumbing you have. One end of the coupler should screw or insert into the sillcock, while the other end will fit into a new piece of pipe that you’ll cut in the next step.
When securing the coupler into the new sillcock, wrap the coupler’s threads in the plumber’s tape first if you have copper or galvanized plumbing. The tape helps ensure a watertight connection.
Measure the distance from the sillcock's end to the original pipe you pulled out. Cut a piece of new pipe to that length. You want to ensure that the new sillcock can reach the interior pipe and be connected. You must secure the pieces together by soldering them if they are copper or galvanized. If using PEX, use a crimp ring to connect them.
Place the new sillcock inside the hole. Caulk around the hole and press the mounting plate into the caulk. The caulk should seal the gap between the sillcock and the concrete. Secure the faucet to the foundation or side of the home with screws. You may need to use a drill with a masonry bit if drilling new screws into a foundation.
Before you go inside to secure the new sillock to the interior water pipe, remove the faucet stem by unscrewing it from the faucet and setting it aside. You want to ensure the rubber washer inside the new sillcock does not melt when soldering the pipes.
Clean the cut ends of the existing and new pipes with an emery cloth to ensure a tight connection when you solder the pieces.
Add flux to the pipes and coupling to remove oxidation. Connect the sillock to the interior pipe. Put on construction glasses and protective gloves before using a soldering torch. Light the torch and solder the pieces together. Guide the torch over the pieces back and forth to ensure even heating. Once the metal is hot, hold the solder to the pipe to melt the entire joint.
If securing PEX pipes, use a crimper or an expander tool to ensure a tight connection between all pieces.
After securing the inside pipe and fittings, insert the stem from the outside. Use a pipe wrench or crescent wrench to tighten the stem if needed. Be careful not to overtighten the joint to avoid damaging the rubber gasket.
Turn back on the water supply. Test the new faucet by turning it on. Look for leaks at the joints, stem, and spout, both inside and out.

Regular maintenance on your outdoor faucet can prevent leaks, freezing, and other issues. Here are the best tips for maintaining an outdoor spigot.
Turn off the water supply to your outdoor faucet before freezing temperatures arrive for the season. Turn on the faucet and allow the water to drain out. Leave the outdoor faucet in the open position during the cold months.
Check and maintain parts like bonnets and washers. Clean and replace them as necessary.
Switch to a frost-free sillcock to prevent washer damage and leaking.
Check the water flow on your faucet once a year to ensure that the flow is regular and doesn’t spray. Reduced flow can indicate debris, clogs, or a cracked pipe.
You can replace an outdoor spigot yourself with a few tools and about an hour of your time. If you’re unfamiliar with your plumbing system, it may be best to hire a pro, especially if you have copper or galvanized piping. In most cases, soldering is necessary, and you want to ensure the connections are watertight. The cost to replace an outdoor spigot with a local plumber ranges from $100 to $300, with $175 being the average.
Positive experience. As previously stated, the replacement/repair could not be completed (no fault of the plumbing tech) b/c misinformation was rec?d by property management maintenance. Thanks to the plumbing tech for your efforts. Appreciate you!
 The Waterworks
If you want to pay the most exorbitant prices possible for your job, this is the company for you. “By the job” pricing is a rip-off, at least how these people use it. Every job is plugged into a category and prices are set by category. You might have a job that takes half an hour or one that...
 Benjamin Franklin Plumbing
Cole has been handling plumbing and general contracting for our four properties over the past three years, and he’s always done a great job. Most recently, he installed a sink and countertop in our retail store where none existed before, and it turned out exactly how we needed. He’s...
 ANB Renovations LLC
Matt is a consummate professional. The work turned out to be far more difficult than expected and rather than turn the job down, Matt rose to the occasion and completed a near impossible task. I can not recommend Greene's Plumbing Service more highly. On a scale of 1-5 I would give Matt a...
Involved an extensive bathroom remodel, including removing tub & installing walk in shower, new drywall, custome tile work to ceiling, plumbing, etc. Overall, job was done on time and on budget. Nick & his team were very professional and had high attention to detail. Quality was great. Highly...
 Stamos Flooring and Remodeling LLC
Awesome company. Had a jacuzzi tub taken out and replaced with huge walk in shower with partial glass enclosure. Onyx to the ceiling with a decorative border, moved plumbing and installed hand held shower, new ceiling, flooring, and paint. Replaced window with glass block. Everything was done...
 Columbus Bath Design
The initial quoted price from a walk-through seemed high, but we discussed that the quote represented worst case scenario (re-wiring to two floors) and we were excited about the opportunity to have the work done in a timely manner with closing for fire safety reasons, etc. When the job was...
Initially, I called the Service People to have a leaking garbage disposal replaced. I had purchased a special deal through Angie's List: $79 for $200-worth of plumbing services. <br /> When I went to schedule the work, the earliest date I could get through Angie's List was after the upcoming...
This company did a very good job on the brick wall and it looks just amazing. The staff was always professional and was practically OCD on how the bricks were stacked and how they were laid. Although it took longer than expected, I am willing to sacrifice time over perfection anyday. The...
 My Handy Mate LLC Improvement & Remodeling
<p>I am so glad we called Rotor-Rooter. I was hesitant to call them because we usually prefer to give business to local providers. But when we had sewage back up in our basement on a Saturday evening, I had a hard time getting a hold of someone, not to mention the high weekend/evening rate...
From average costs to expert advice, get all the answers you need to get your job done.
Find out the cost to replace an outdoor spigot. Get a detailed breakdown of prices, labor, and tips to save on your next outdoor faucet replacement.

Learn about the different factors that go into water heater gas valve replacement costs to see if you should DIY the project or call a pro.

A main water shut-off valve controls water flow for your entire home. Here we break down the cost to replace a main water shut-off valve.
Do you need a plumber to replace outdoor spigots? If you've got DIY chops, you might not. But if a broken spigot indicates a bigger problem, then yes, you do.

Is it time to get a new outdoor faucet? Here’s how to replace a spigot in five quick steps, so your outdoor water needs are met with ease.
Spigot handles on outdoor faucets can get stuck from age, harsh winter, or just plain finicky parts. Learn how to replace a spigot handle with this guide.