

Old and run-down porch railings can be an eyesore and pose a risk of falling. Find out how much it costs to replace your worn out porch railings with new materials.
It’s time for a safety and style upgrade

A worn-out deck railing isn’t just an eyesore—it can also be a safety hazard. Replacing it yourself can be a rewarding weekend project that adds aesthetics and peace of mind to your outdoor space. With the right tools, materials, and a careful approach, you can remove your old railing and install a new one that’s sturdy, stylish, and up to code. Learn how to replace a deck railing on your own so you can enjoy your outdoor space in no time.
Many carpentry projects come with some risk to personal safety. Always wear eye and ear protection and don a dust mask or respirator when cutting, sanding, or working with natural or treated wood. Steel-toe boots and sturdy work gloves can prevent splinters and cuts from stray pieces of wood and sharp power tools.
Before you start tearing down your existing deck railing, take some time to plan your project. Research your local railing height requirements, post-spacing codes, and other safety requirements.
Next, decide on the railing design and material that best suits your climate, maintenance preferences, and budget.
Then, take all necessary measurements to ensure you purchase the right materials and supplies.
Finally, rent or buy any tools you don’t already have—renting more expensive tools, such as a circular saw, from a local home improvement store can save money, especially if you only plan to use them once.

Start by unscrewing or prying off the existing railing panels, balusters, and posts. Use a drill or socket wrench to remove fasteners and a pry bar for stubborn sections. Be careful not to go into full-on demolition mode and damage your deck boards during removal, especially if they’ll remain in use. If any pieces are rusted or warped, use a reciprocating saw to cut them free. Keep a trash bin nearby for easy disposal, and remember to wear gloves and goggles to protect yourself from splinters and debris.

With the railing removed, inspect the exposed deck edges, joists, and framing for signs of rot, water damage, or insect infestation. Use a screwdriver to probe suspect areas—if it sinks in easily, the wood may need to be replaced. Sand any rough patches and fill small cracks with wood filler. Clean off sawdust and debris to give yourself a clear, safe surface to work on. This is also a good time to reseal exposed wood or apply a fresh coat of paint or stain to match your new railing.
Accurate measurements are essential for both safety and aesthetics. Use your tape measure and pencil to mark the locations of each post, following the manufacturer's instructions and local codes. Typical post spacing ranges from 4 to 8 feet, depending on the type of railing and load requirements. Make sure your marks align visually and structurally—your posts should sit squarely above joists or be bolted through blocking to ensure strong support. Double-check all measurements before drilling pilot holes to ensure accuracy.
Position your new posts on the deck surface or attached to the outer rim joist, depending on your setup. Secure each one using lag bolts, post anchors, or mounting brackets recommended by your railing system. Tighten hardware with a socket wrench and use a level to confirm each post is perfectly plumb. For additional stability, consider using two bolts per side at the base of each post.
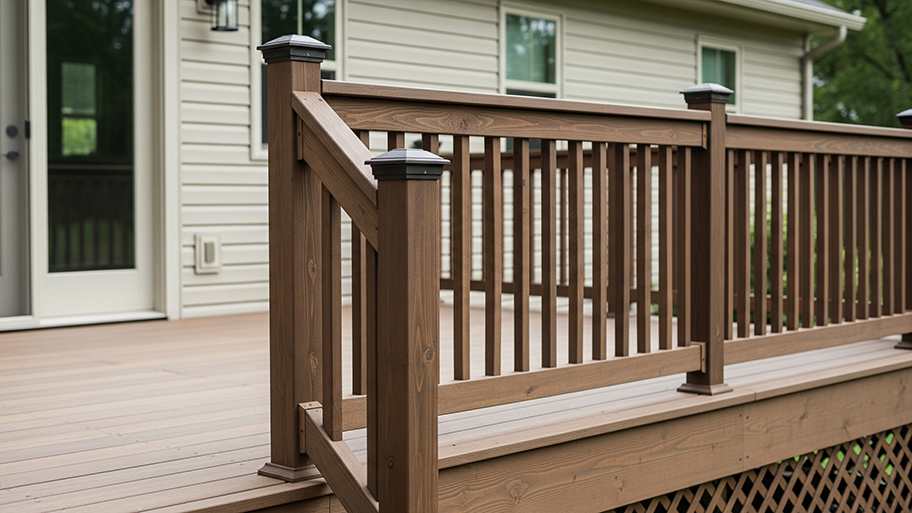
Start with the bottom rail, aligning it with the pre-marked height or bracket locations on the posts. Use a spacer or measuring guide to ensure consistent height along the entire run. Secure the rail to the posts using screws or the fasteners provided in your kit. Then, attach the top rail, making sure it mirrors the same angle and height, especially on stairs or multi-level sections. Reinforce all connections with brackets or corner blocks as needed to prevent movement over time.

Depending on your railing type, you’ll either install individual balusters or slide pre-assembled infill panels into place. Measure the spacing between balusters to ensure code compliance (typically no more than 4 inches apart to prevent falls). Use a template or jig to speed up installation and maintain consistency. Secure each baluster or panel according to the directions in your kit—this may involve using top and bottom brackets, screws, or locking clips. Periodically step back to check visual alignment and spacing.
Go back over each connection point to tighten screws, bolts, and brackets. Add any decorative post caps or trim. If you’re using wood, apply a high-quality sealant, paint, or stain to protect against weather damage. Wipe down vinyl or metal railings with a damp cloth to remove fingerprints and debris. Now, you’re ready to host your backyard BBQ.
Replacing a deck railing seems straightforward, but several common mistakes can lead to poor results or safety risks:
Ignoring local code requirements: Always check railing height and spacing rules.
Skipping prep work: Incorrect measurements can lead to botched results.
Placing uneven posts: Failure to level posts can lead to instability and visual issues.
Using the wrong fasteners: Always use weather-resistant hardware to prevent rust.
Installing a new deck railing yourself can cost between $150 to $6,000, depending on materials. For example, a composite railing starts at $15 per linear foot, while a glass railing costs $200 to $500 per linear foot. The labor cost for installing a new deck railing averages $30 per linear foot on top of materials, depending on complexity and local rates. If you’re unsure about structural stability, safety compliance, or your carpentry skills, it’s worth it to hire a deck repair pro near you.
One of my old tall evergreen trees was suddenly leaning toward the busy street in front of my house. I submitted a request for an emergency tree inspection, and Alejandro, owner of Cajete Tree Service, contacted me immediately and arrived to look at it just 20 minutes later. We agreed the...
Mitchell and the crew were top tier i am so happy with my new roof
1 tree was cut down and 5 others including a large willow tree were trimmed. The Grant Tree Service men were professional and cleaned up afterwards. The cost of the 6 trees were affordable. I am very happy with the results. I would hire them again.
Archie did a good job cleaning up the driveway before he laid down the sealer. It looks good. He was gracious and even helped me bring up my groceries. His rate was comparable to another company who came out to give me a quote and he talked to me personally rather than just text me a quote...
We have bought and sold numerous times over the past 50 years. Sherman Hall and Top Line are top notch. Thorough and detailed, he explains every possibility, probability, and eventuality. High class and pleasant. The best.
 Top Line Home Inspections, LLC
D1 Roofing delivers outstanding service from beginning to end, backed by a strong warranty and expert teams. I highly recommend them for their excellence in meeting and surpassing expectations with unmatched communication. Choosing D1 Roofing was flawless decision
Couldn't ask for a better company. Josh and Dee were Very professional, efficient, courteous and takes major pride in their work. They will travel to come to your home and will still give you a fair price. They are honest and trust worthy. Their focus is on their work and their work is...
 Supreme brick & chimney
Window Depot did an amazing job on my deck. I wasnt sure what I wanted to do, but their composite decking was affordable and will last a long time. I am excited to have family over, and I am no longer embarrassed by my backyard. Jeff and the ground crew were polite, respectful, and caring for...
We were having 2”x 2” tile installed . There was a small installation error and the new additional replacement tile was from a different lot and the colors didn’t match. Joe assured us that he would rectify everything , which he did without hesitation. We decided to go with the 18” x 36” tile...
 CarifaTile
Maple Tree Service should serve as a mentor for other business! Customer service was superior and beyond expectation. Response to request was prompt. The representative was very courteous and proud of the company. Quote was given during initial visit and work date established. A follow up...
 Maplewood Tree Service
From average costs to expert advice, get all the answers you need to get your job done.
Old and run-down porch railings can be an eyesore and pose a risk of falling. Find out how much it costs to replace your worn out porch railings with new materials.
The average cost of a deck railing depends on size, type, material, and labor in your area. Check out this guide to determine what works for your budget.
Deck replacement costs depend on materials, any structural damage you need to fix, and more. This guide explores how much it costs to replace or repair a deck.

Your deck railings help prevent injuries, but only if they’re the proper height. Discover the ideal deck railing height to ensure your safety and compliance with building codes.

Deck repair is a great way to stretch your DIY muscles while keeping your deck safe and stylish. Here are the common repairs and how to tackle them.
Choosing from all the types of deck railing can be overwhelming. Check out the pros and cons of each so you can pinpoint the best option for you.