Installing new baseboards can totally refresh the look of your walls. Learn about the cost to install baseboards in your home.
Take the mystery out of taking off baseboards

Removing baseboards requires scoring painted edges first, as paint and caulk seal the trim to your wall and prevent clean removal without damage.
Expect to pay $200 to $250 for a carpenter to remove all the baseboards in your home if you prefer professional help.
Pulling off baseboards works best when you loosen the trim gradually with putty knives before using a pry bar to create gaps along the length.
Hiring a local interior painting professional keeps your walls and floors protected during baseboard removal and ensures trim stays intact for reinstallation or reuse.
Baseboard trim hides the rough edges where the wall meets the floor while providing an attractive design element. But sometimes it needs to come off when you are performing a remodel or renovation—trim repair or painting, floor repair or refinishing, and reflooring are examples of times you may need to remove the baseboards.
If you’re planning to reuse the trim pieces, removing them without damaging them, the walls, or the floors is essential. A few basic tools, elbow grease, and patience are all you need to get the job done efficiently.

You’ll only need this first step for painted baseboards. It’s likely that paint, caulk, or both conceal the edge between the trim and the wall.
Start at a corner and score the trim’s top edge to cut through the paint and caulk.
It’s also helpful to trim the paint at corner junctions with heavy paint buildup.

If your baseboard trim includes a base shoe or quarter round, separate the additional trim piece from the main part first, using the same procedure.
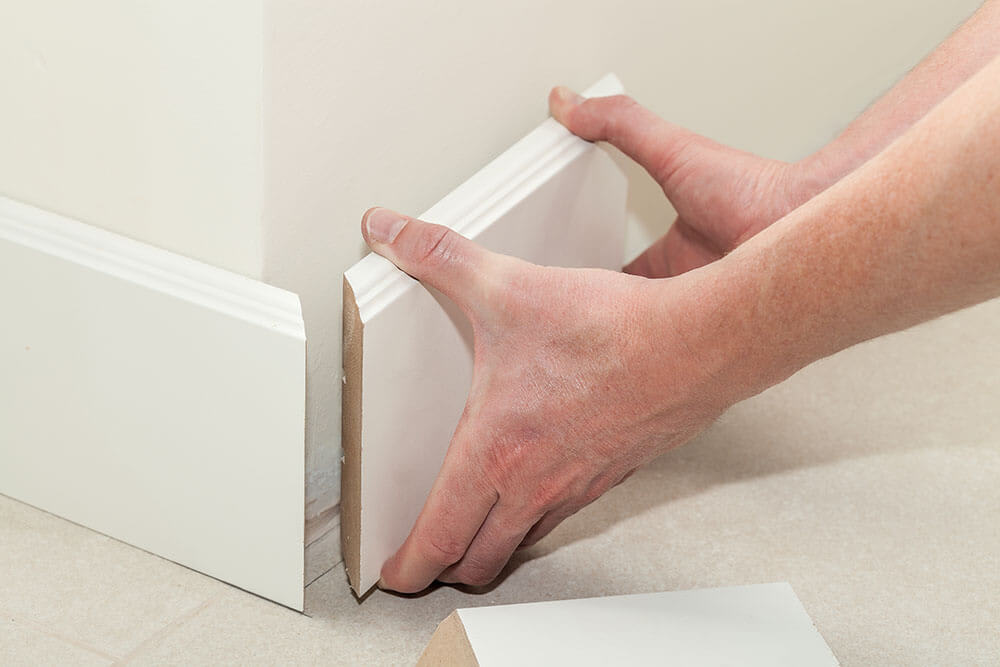
Starting a few inches from a corner, slide the 2-inch putty knife between the trim and the wall. You can gently use your hammer to help by tapping the top of the knife’s handle. Insert the blade as deeply as possible.
Gently pull the putty knife forward until you create a small gap between the trim and the wall.
Remove the knife, move about one foot down the baseboard’s length and repeat.
Continue creating a small gap on all of the trim you plan to remove.

Take your time with this step to avoid accidentally marring the wall paint or floor finish.
Near a corner, insert the 6-inch putty knife behind the trim.
Insert the pry bar in front of the knife and behind the baseboard. You may need to tap the pry bar with a hammer.
Lever the pry bar gently until you create about an inch-wide gap between the wall and trim.
If you have one, you can replace the putty knife and pry bar with a baseboard puller or trim puller tool.
Continue this process down the length of the trim board.
Return to the starting corner and repeat these steps until the trim is free from the wall.
Move to the next trim piece and repeat until the room is complete.

If you want to reinstall the trim or save it for a different project, you should remove all the old nails.
Support the baseboard on a block of wood, sawhorse, or workbench.
Grasp any nails sticking out of the back of the trim piece with tongue-and-groove pliers, which are less likely to break the nail than nipper pliers.
With the nail firmly grasped, rock the pliers to one side until the nail comes loose.
Although there isn’t a material cost for removing baseboard trim, some tools are necessary to complete the work. A time commitment and crawling around the room on your knees are also required. So, it’s understandable if it’s a job you’d instead have taken care of by a professional.
Your local painting contractor or floor refinisher will include baseboard removal in their price quote if they need to remove them to complete their work. A local carpenter will charge $200 to $250 to pull a houseful of baseboards. A baseboard trim carpenter near you can install baseboards when it’s time to put them back.
Joseph did a great job with the staircase and trim. Timely and efficient, clear communication about the work, very fair pricing. For the stairs in particular, done very skillfully in an old house (1893) in a tight spiral, and very creative with how to do the handrail. Did a nice job with...
This company does it right. Firstly, I want to say that Landan was a joy to work with. He was so kind, transparent, and had everything under control. His entire team showed up ready to work and they were all very respectful of the fact that we were in an office space. A little backstory – we...
Finished Basements Plus was wonderful from beginning to end! First, they came out quickly for an estimate. I had 4 estimates and theirs was by far the best. (2 of the estimates were more than $20K higher than for the exact same work). Beyond their fair pricing, the work was excellent. They...
 Finished Basements Plus Inc.
Very professional, knowledgeable and helpful! Completed the install on time and as expected.
Cole has been handling plumbing and general contracting for our four properties over the past three years, and he’s always done a great job. Most recently, he installed a sink and countertop in our retail store where none existed before, and it turned out exactly how we needed. He’s...
 ANB Renovations LLC
Excellent, Prompt, Courteous Service!!! They were super friendly and quite personable. I felt very comfortable with the gentlemen that did the installation. They installed it exactly where I asked them to and they did an excellent job!! I loved their service so much.
Window Depot did an amazing job installing the windows in my basement! The process from start to finish was by far more than what I expected. I would highly recommend Window Depot if you want professionalism from the the consultation to the installation. Dont settle for mediocre when you can...
AFS was excellent from start to finish. Jess, the sales associate, was fantastic...very knowledgeable and very professional. The installation crew was excellent. I couldn't be more pleased with the process. Best of all, my new floor looks fantastic!
 America's Floor Source
We were having 2”x 2” tile installed . There was a small installation error and the new additional replacement tile was from a different lot and the colors didn’t match. Joe assured us that he would rectify everything , which he did without hesitation. We decided to go with the 18” x 36” tile...
 CarifaTile
Did an amazing job transforming my yard. Also installed sod in places, would recommend to everyone.
From average costs to expert advice, get all the answers you need to get your job done.
Installing new baseboards can totally refresh the look of your walls. Learn about the cost to install baseboards in your home.
The price to paint your home’s baseboards depends on the square footage and whether you DIY the project. Learn more to budget for baseboard painting.

The holiday parties are on the horizon, so it's time to start deep cleaning. Check out these 9 methods to learn how to clean baseboards like a pro.
Outdated, dingy baseboards can make your home look drab and dull. This guide will help you choose who to hire to replace your baseboards for a refreshed look.
Baseboard heater covers can endure a lot of wear and tear, but eventually you’ll want to replace them. Here’s the best way to switch out baseboard heater covers.
Whether you’re replacing an old heater or upgrading to a new system, it helps to understand how to remove a baseboard heater. Get step-by-step instructions.