

•
Find out the cost to replace weatherstripping. Learn about material and labor costs, cost-saving tips, and what impacts your total price.
Don’t be draft—installing new weather stripping is a simple project with big rewards

Have things been getting a little drafty in your home? It may be time to replace the weather stripping on your doors. This type of exterior door maintenance won’t just make your living space more comfortable—it’ll also save you cash. Fewer drafts equal lower energy bills, and you don’t need to be a pro to get it done. Here’s how to replace worn weather stripping around doors in just 60 minutes.
Sealing gaps and weatherstripping can save up to 20% in annual energy bills according to the U.S. Department of Energy.

Before you start your project, you’ll want to inspect your weather stripping and tighten the hinges on your door. The goal is to make sure that your weather stripping—rather than a loose hinge—is actually what’s causing a draft. If you can lift your door up by the knob, your hinges may be to blame.
Once you rule out the hinges, measure your space. Close the door and measure the areas where you want to install your replacement weather stripping along the door jambs. Both width and length are important. For example, you’ll often need a thicker type of weather stripping for garage doors.
When in doubt, you can measure your existing weather stripping for reference as long as it’s not significantly degraded. Door sweeps, which go on the bottom of the door, come in standard sizes. After you take your measurements, add 10 inches to the length to give yourself some leeway.
Remove your old weather stripping either by hand (if it’s peel-and-stick) or by removing the screws and nails that hold it in place. If you’re having trouble pulling it away from your door, use a putty knife to get under the adhesive.

Weather stripping has a tendency to trap dirt and grime. Once you remove the old weather stripping, clean the area with a sponge and soapy water. Then, dry the area completely using a rag or towel.

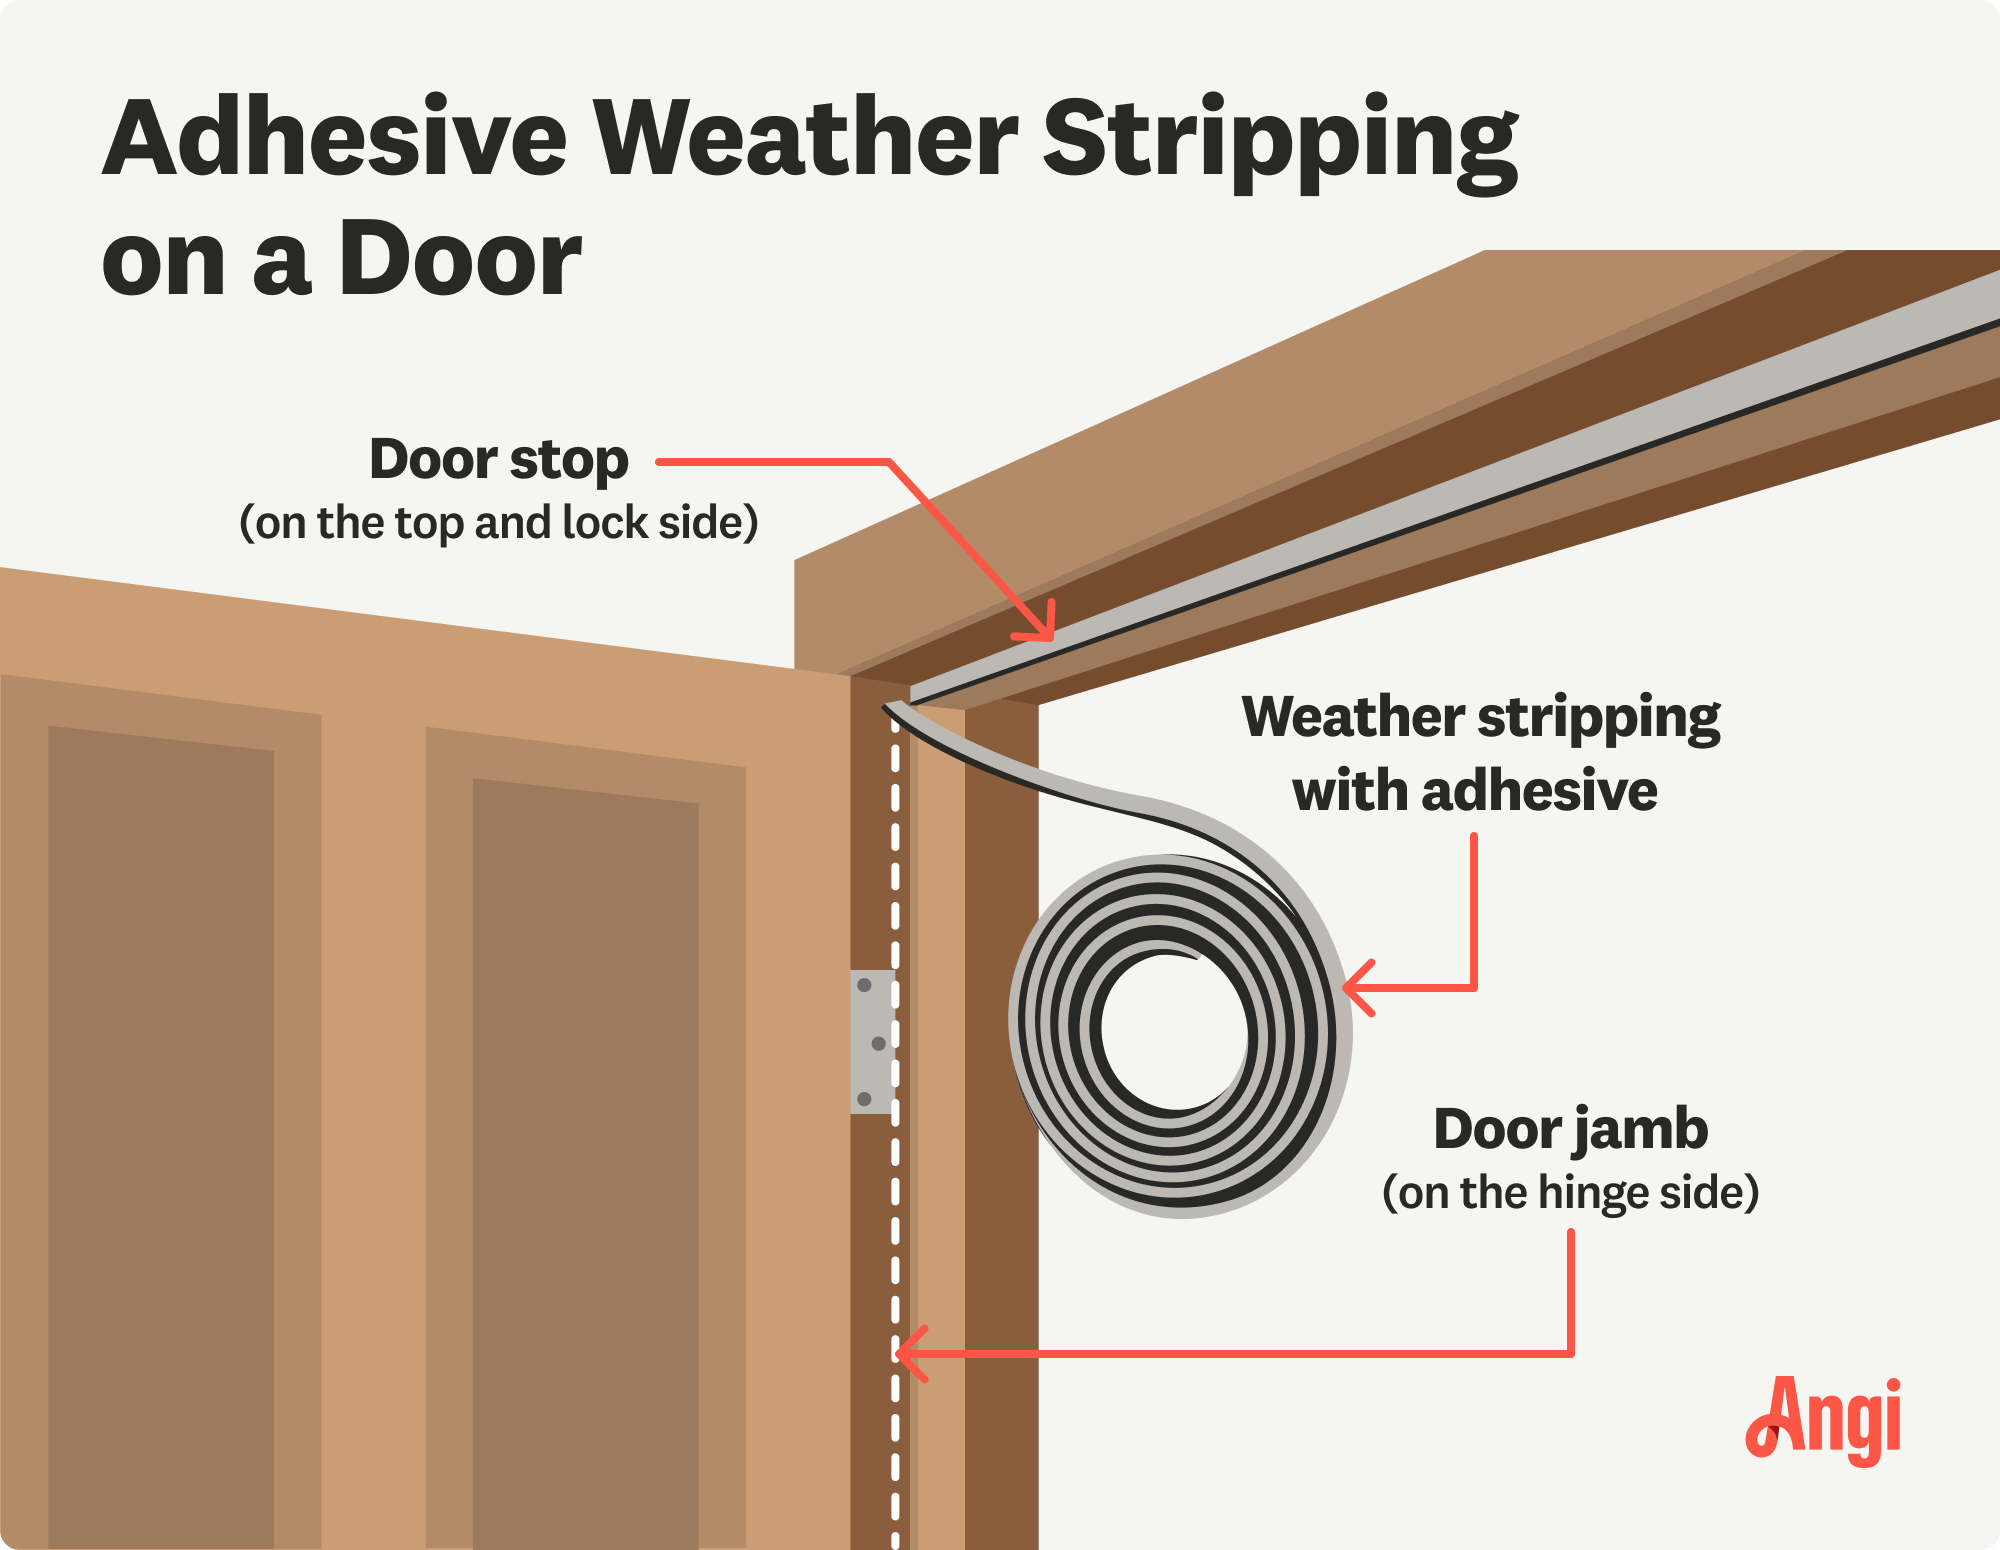
You’ll need to cut three pieces of weather stripping to fit around your door:
One for the horizontal jamb (the interior top of your door frame)
One for each vertical jamb (the interior sides of your door frame)
Use your tape measure to determine the right size, then use scissors to make your cut. Keep the length a little longer than required to fine-tune it later. It’s better to have a piece that’s too big than too small. Hold your weather stripping segments up to the door frame to check the sizing.

Peel the adhesive back off your weather stripping, and install it on the corresponding door jamb. If needed, cut the excess weather stripping to get a perfect fit. Press it down firmly to ensure adhesion, and—if you want added security—tack it in place using a staple gun or small nails.
Door sweep weather stripping goes on the bottom of your door rather than the door frame. Some varieties are adhesive. Others need to be screwed into the bottom of your door. Either way, when you install the door sweep, make sure there’s a tight seal along the threshold (bottom of your door frame). This prevents draft.
There are different types of weather stripping, but most homeowners choose a self-adhesive variety because it’s simple to install. However, the material you choose matters.
Felt or foam varieties, like foam tape, are some of the most popular kinds of self-adhesive weather stripping. These can lack durability, despite their ease. If you’re installing weather stripping on an exterior, you may want to choose something stronger like a self-adhesive v-seal or tension seal weather strip made from vinyl, bronze, aluminum, or stainless steel. Rubber is one of the most durable options, but installation is tricky because you’ll need to nail it in place, so you may want to hire a local handyperson.
When purchasing new weather stripping, consider:
Where it’s going on your door
How much durability you’ll need
Your overall budget
Your climate
You can save more than $100 on the cost of weather stripping if you install it yourself. This is no problem for most DIYers—especially if you’re using self-adhesive weather stripping. Some varieties, like tubular rubber, are more difficult to install because they need to be nailed into place. In that case, you may want to enlist a local handyperson service. If the project extends to more than just a single door, you may want to have a handyperson weatherize your whole home.
The average cost to replace the weather stripping on a door is $280, but it can range from $60 to $930, depending on the size and type of your door. The cost to have weather stripping replaced can range from $1.45 to $25 per linear foot. However, about 80% of the cost to replace weather stripping is labor, so you can save a considerable amount by tackling this project yourself.
Terrible experience. Walls/trim/floors/cabinets/doors all have drip marks, overspray, etc. Tiling at the fireplace had to be redone by another vendor due to incorrect and shoddy install by Profect. Contractor had his children in our house while he was on site without prior authorization or...
 Profect painting & exteriors
Jason has helped me with multiple household projects, with the most recent being new door installation. He has always showed up on time and organized and has done an incredible job! Jason is very professional and he's now my go-to for anything around my house that needs to be fixed or...
Company came to look at my garage door that was off track. They also said I needed a brace on the other garage door. They put the door back on track, and I paid to install the brace. The technician told me I needed a new garage door opener, and it would cost $1000. Red flags went off in...
 Precision Overhead Garage Door Service
On Sunday 2/26 I requested quotes via Angi from 4 refrigerator repair businesses. Northwest Appliance responded to me Monday morning (2/27) and my refrigerator was repaired by noon the same day. Great communication, they did everything they said they would. The technician had the parts on...
Excellent customer service and knowledge. I was recommend to him from my neighbour. My front door and window came in great and were installed beautifully perfectly, I m very satisfied with their excellent work, so decided to order one more big bow window for my living room. I cant wait for...
Called ahead and worked quickly to install keyless locks on vintage wooden doors.
Scott did not get appropriate access to the property prior to the scheduled inspection which required us to come back later in the day to complete it. He also, unprofessionally, knocked on a neighbor?s door in his attempts to reach someone with access. His overall report was fine though the...
Door Depot was very responsive - they came out the day after my call to assess my needs, then returned at my convenience to complete the work. They arrived early, and the work was completed in a shorter period of time than estimated. Very pleased with the results. I would definitely use them...
 Door Depot LLC
Replace garage doors: Fast response, competitive estimate, timely work done well.
Jeremiah did an awesome job cleaning 28 windows inside and out! He was fast, efficient and now I have a beautiful view again. This was a Groupon for $139 for 20 windows, but I had 28 windows/doors cleaned, so there was an extra $6 per window. Totally worth it.
 Complete Home Services
From average costs to expert advice, get all the answers you need to get your job done.
Find out the cost to replace weatherstripping. Learn about material and labor costs, cost-saving tips, and what impacts your total price.
When it's finally time for an upgrade, how much does patio door replacement cost? We'll break patio door prices by size, style, installation, and more.

Garage door tune-ups aren’t too expensive, and most of the fixes are simple. That being said, simple doesn’t always mean safe, so it’s best to hire a pro for this project.
Weather stripping can boost your home’s efficiency and make your living space more comfortable. Learn about the types of door weather stripping in this guide.

Here are eight helpful tips for improving your sliding glass door insulation, including installing plastic film, caulking, and replacing weather stripping.
If you are wondering who to hire to install weather stripping on your door, we share the best experts for fixing those pesky air gaps.