
Under-deck drainage costs can be pricey. Your final quote will depend on labor, materials, and the size of your deck. Start budgeting with this guide.
Keep your deck dry down below

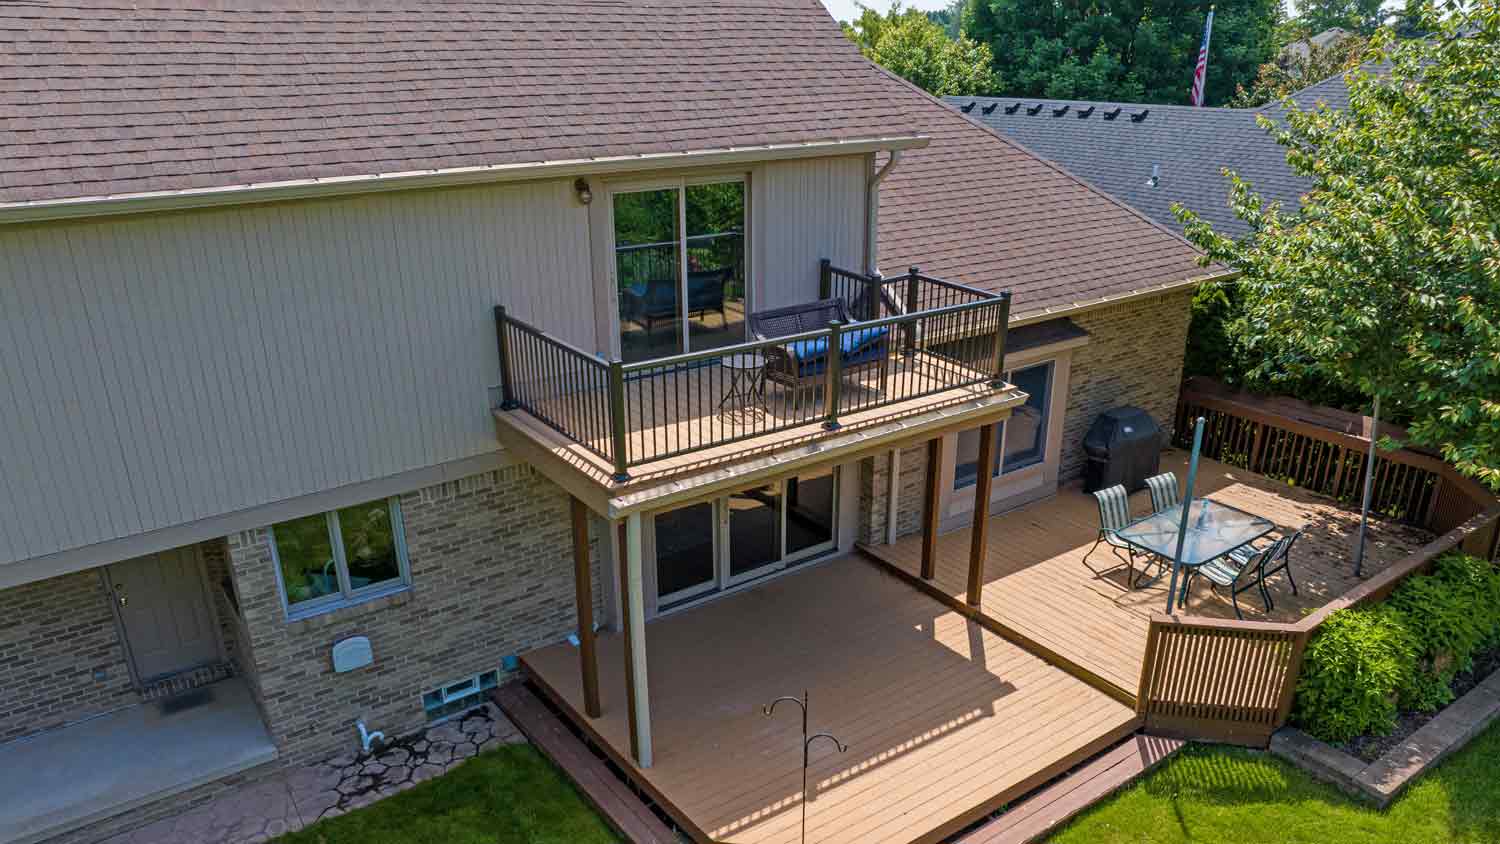
Installing an under-deck drainage system protects your deck from moisture damage and transforms the space below into usable storage or living area.
Expect to pay $21 to $43 per square foot for professional installation, with total costs ranging from $5,100 to $8,000 depending on your deck size.
You can choose from DIY kits with aluminum or vinyl panels, HDPE trough systems, or fiberglass panels based on your budget and installation comfort level.
Hiring a local deck building professional keeps your installation watertight and on schedule, handling framing, panel attachment, and gutter setup with reliable expertise.
Building and installing an under-deck drainage system may seem intimidating until you learn the various methods to get it done. This process creates a moisture-free haven below the deck, freeing up that space for anything you can imagine. It’s also a great way to protect your investment, as building a deck costs an average of $8,220. Keep reading to learn how to DIY an under-deck drainage system.

The benefits of adding a drainage system below your deck, otherwise called an under-deck ceiling, are numerous. First, the drainage system prevents water from building up on the deck itself, protecting the space from moisture damage, mold, and pesky critters like wasps. This type of drainage system also protects the parts of your home near or adjacent to the deck, as these systems transport excess water somewhere safe.
Finally, there is underneath the deck. Wood slats are not exactly airtight, so any space below the deck is typically a waterlogged mess. Installing a drainage system underneath the deck protects the space below it, allowing it to transform into a storage space, a home office, or even a sunroom.
The most important prep step for a do-it-yourself under-deck drainage system is to measure the size of your deck, with special care taken to the area underneath the deck. These measurements come in handy later when purchasing the required materials.
Deck drainage systems differ with regard to materials and overall designs, but they fall into two major categories: above-joist drainage systems and below-joist drainage systems. For the average DIYer, an above-the-joist system is the better bet. Below the joist systems lead to wood rot over time and can hasten moisture-related issues.
Beyond that, many drainage kits are available, sourced from various primary materials, and each solves the issue in a unique way. These kits include the required materials but not tools, so have your preferred tools ready to go and don’t forget a heavy-duty ladder and plenty of safety gear.

Remember, use an above-joist system for the best results. Below are the various above-joist options available to DIYers.
If it’s your first time staring down the undercarriage of a deck, try an all-in-one kit to complete this project. These kits typically include aluminum or vinyl components, as these materials are budget-friendly, easy to clean, and long-lasting.
However, the kits may not include wood boards to frame out the structure. If this is the case, purchase a number of treated 2x4s to act as stabilizing purlins directly underneath the deck. As a note, some kits instruct you to place the support beams underneath the vinyl or aluminum panels, so read the instructions before starting.
Mark the purlin locations on the deck joists by installing an initial beam along the exterior of the house. Then, stretch a string from this beam across to each joist underneath the deck, ensuring a straight line across.
Mark the location for each spacer block using the string as a guide. For the remaining beams, measure 3 feet in either direction from each spacer block until the space is complete. Mark each location.
Affix small spacer blocks underneath each joist at the locations marked.
Screw each beam horizontally to the spacer blocks. Ensure the beams slope toward the outside of the deck at a rate of around ¼ inch per foot. This angle helps with drainage.
Attach the aluminum or vinyl panels to the purlin with dedicated roofing screws, which likely came with the kit.
Overlap the panels according to the instructions. If the final panels extend beyond the space, move it in a bit to overlap the previous panel (or cut it down to size.)
Install gutters and downspouts. The sloping beams do a lot of the heavy lifting for drainage, but a downspout is never a bad idea. Nail vertical 2x4s to every other joist to provide an attachment for the gutters, sloping the gutters to a downspout at the edge of the space.
HDPE (high-density polyethylene plastic) makes for a great under-deck drainage system, as this material is durable, easy to work with, and readily available. There are prefabricated HDPE trough panels available that run parallel to the deck beams directly underneath.
This under-deck drainage system is a popular option for waterproofing a deck during a deck installation. In that case, the panels are set above the framing beams and bridging planks but below the decking.
Cut the trough panels into the appropriate length using a utility knife. Roll out each panel until it extends beyond the deck space and cut each one to size.
Arrange each trough panel parallel to the support beams and affix using staples at regular intervals. Keep the trough taught while stapling. Use caulk and flashing tape for any difficult-to-staple areas.
If there are angles or cantilevered sections, cut short pieces of the trough and cover up any exposed areas, ensuring that the water flows from this smaller area to a longer trough.
Use long lengths of butyl tape to cover every seam between each panel and along each cross-beam. This step creates a watertight seal.
Install an under-deck gutter and any required downspouts. Align the gutter with the downspouts and ensure each downspout outlet extends around 1 inch into the gutter. As always, the gutter needs to be slightly sloped to assist with drainage.
Fiberglass panels are another option, with an installation process similar to the aforementioned aluminum or vinyl drainage kits.
Frame the structure underneath the deck with spacer blocks and treated 2x4 beams.
Affix the fiberglass panels to the support beams with roofing screws, overlapping as necessary to meet the demands of the space.
Install gutters and downspouts at the appropriate locations. Find more information regarding this part of the job via the above DIY options.
The most important part of this step is ensuring the gutters are sloped correctly to assist with drainage.

Now that the under-deck drainage system is humming along, you want to do everything you can to avoid breaking out the ladder again. Maintain your deck and the drainage system to protect your monetary and time investments.
Add ventilation: If you live in an area with high humidity, add some ventilation to help release hot air and mitigate nasty temperature extremes. A simple option is to add strip vents directly underneath the soffits.
Place flashing tape: Affix flashing tape over the joists and beams to help prevent rot and wood decay over time. A wide variety of tape types are available for use and installation is a breeze.
Keep everything clean: Routine cleaning is extremely important to protect the various components of your deck and the drainage system. Sweep away debris before mold forms and use an appropriate wood deck cleaner once per year. Avoid pressure washing wood decks, as this leads to damage.
Stain and seal: Staining and sealing your deck help protect the drainage system as it reduces the chances of debris and moisture coming in contact with the system. Avoid staining and sealing the under-deck components as this traps water and leads to wood rot.
Several factors can impact the cost of installing an under-deck drainage system. These variables include the size of your deck, labor costs, and the cost of materials. On average, this type of upgrade costs $21 to $43 per square foot. Based on your deck size, plan to budget $5,100 to $8,000 to add this system.
To reduce costs, consider doing some of the work yourself, which can save you a few thousand dollars versus hiring a professional. If you can, try to do this work in the off-season—after summer ends.
This is not the easiest DIY job on the block, and it requires plenty of dedicated tools and materials, in addition to setting aside plenty of time to get the project done. If this is your first under-deck rodeo, hire a local deck builder to tackle this task. Deck contractors perform this kind of work daily, increasing the efficiency and quality of the outcome. A pro will also suss out any lingering issues impacting your deck, solving two issues with one visit.
One of my old tall evergreen trees was suddenly leaning toward the busy street in front of my house. I submitted a request for an emergency tree inspection, and Alejandro, owner of Cajete Tree Service, contacted me immediately and arrived to look at it just 20 minutes later. We agreed the...
1 tree was cut down and 5 others including a large willow tree were trimmed. The Grant Tree Service men were professional and cleaned up afterwards. The cost of the 6 trees were affordable. I am very happy with the results. I would hire them again.
Archie did a good job cleaning up the driveway before he laid down the sealer. It looks good. He was gracious and even helped me bring up my groceries. His rate was comparable to another company who came out to give me a quote and he talked to me personally rather than just text me a quote...
We have bought and sold numerous times over the past 50 years. Sherman Hall and Top Line are top notch. Thorough and detailed, he explains every possibility, probability, and eventuality. High class and pleasant. The best.
 Top Line Home Inspections, LLC
D1 Roofing delivers outstanding service from beginning to end, backed by a strong warranty and expert teams. I highly recommend them for their excellence in meeting and surpassing expectations with unmatched communication. Choosing D1 Roofing was flawless decision
Couldn't ask for a better company. Josh and Dee were Very professional, efficient, courteous and takes major pride in their work. They will travel to come to your home and will still give you a fair price. They are honest and trust worthy. Their focus is on their work and their work is...
 Supreme brick & chimney
Window Depot did an amazing job on my deck. I wasnt sure what I wanted to do, but their composite decking was affordable and will last a long time. I am excited to have family over, and I am no longer embarrassed by my backyard. Jeff and the ground crew were polite, respectful, and caring for...
Wonderful. I am going to have them remove and replace my driveway in the spring.
 All Star Paving and Sealing
We were having 2”x 2” tile installed . There was a small installation error and the new additional replacement tile was from a different lot and the colors didn’t match. Joe assured us that he would rectify everything , which he did without hesitation. We decided to go with the 18” x 36” tile...
 CarifaTile
Maple Tree Service should serve as a mentor for other business! Customer service was superior and beyond expectation. Response to request was prompt. The representative was very courteous and proud of the company. Quote was given during initial visit and work date established. A follow up...
 Maplewood Tree Service
From average costs to expert advice, get all the answers you need to get your job done.
Under-deck drainage costs can be pricey. Your final quote will depend on labor, materials, and the size of your deck. Start budgeting with this guide.

Discover yard drainage cost estimates, including average prices, key cost factors, and tips to help you budget for your yard drainage project.
A deck skirt can improve the form and function of a deck. Find out what it could cost to install deck skirting in your backyard with this guide.
Keep your yard from flooding by choosing the right piping and drainage. Learn what type of piping is used for the drainage system in a yard with this guide.

A poorly draining patio can cause lasting damage. Learn how to fix patio drainage problems the right way, depending on the cause.
Learn how to install composite decking with some power tools and basic DIY carpentry skills. Find steps, tips, and more in this guide.