

Notice leaks and corrosion around your chimney? You might need new flashing or some careful repairs. Here are some common chimney flashing repair costs.
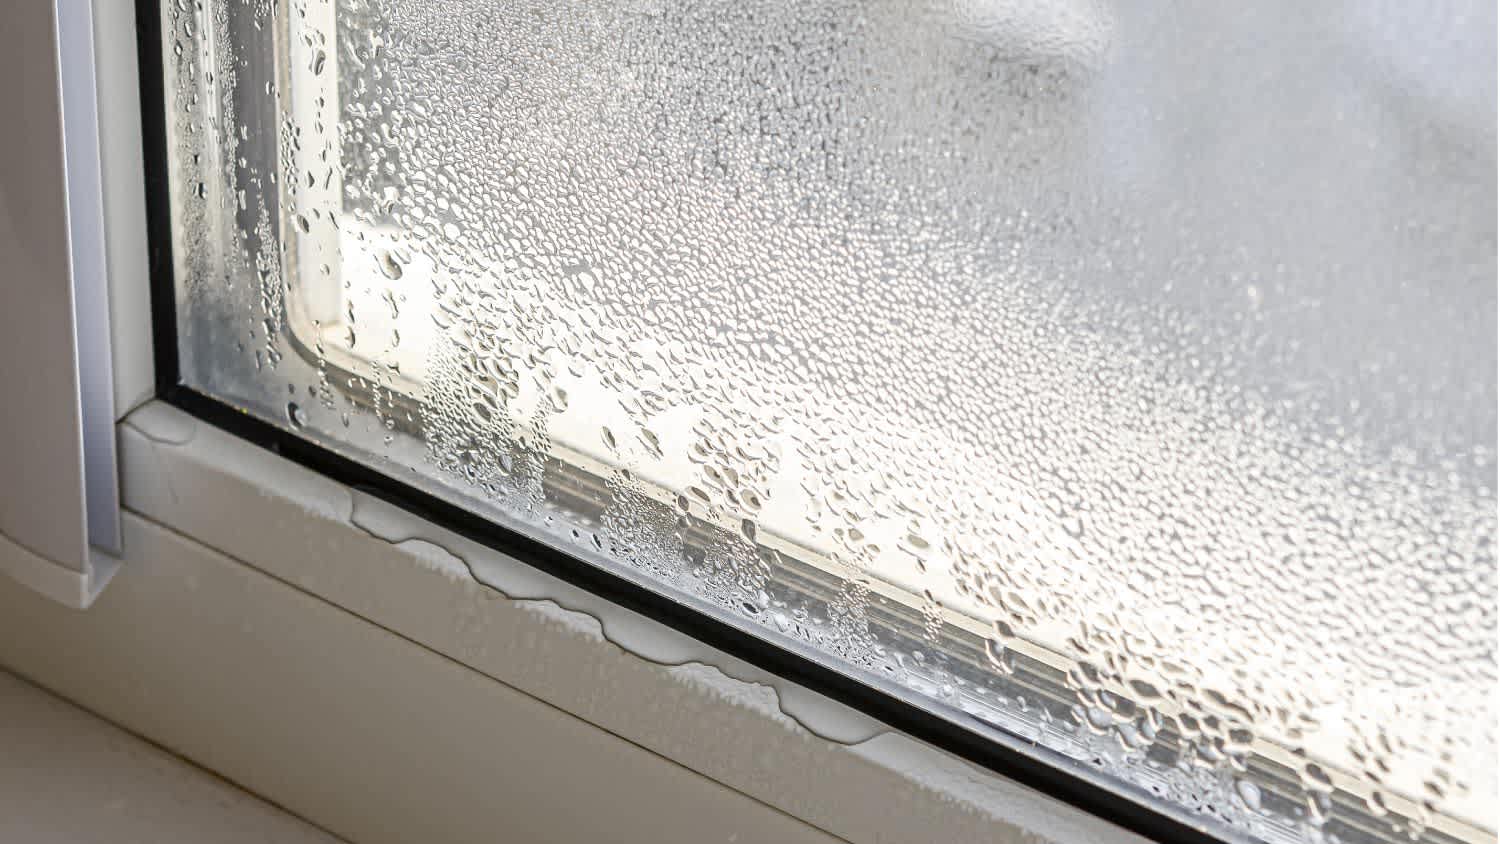
Window flashing is crucial for a water-tight home

Window flashing is a waterproof barrier around your windows that redirects moisture away from vulnerable joints between the frame and wall.
Window flashing comes in three main types: tape flashing resists extreme temperatures, metal flashing creates rigid drip edges, and liquid flashing seals corners.
Water leaks around your windows signal flashing failure and require prompt attention to prevent mold growth, wood rot, and long-term structural damage.
Hiring a local window company provides reliable help with flashing inspection and replacement, especially when accessing the flashing requires removing siding around your windows.
It’s plumb. It’s level. It’s square. But is it flashed? If not, you can have the most efficient window in the world, and water will still get into your home or walls. Window flashing is professionally installed behind your siding during the construction of the house. It’s typically not replaced during a window replacement project, so it’s often a step contractors skip unless there is a known problem.
You may expect windows to leak during heavy rain or serious weather events. But if your windows leak frequently or face other common window problems, such as drafts or condensation, your flashing (or lack of it) could be to blame. Improperly installed, damaged, or missing window flashing can lead to long-term moisture problems and costly window repairs for your home.

Window flashing is a thin, waterproof material installed around windows and layered with the building's weather-resistant barrier to ensure a watertight seal. It acts as a protective barrier, redirecting rain or moisture away from the window assembly and the vulnerable joints between the window frame and the wall. It’s especially critical in preventing common window problems such as rot, mold, and structural damage caused by trapped moisture in walls.

There are several types of window flashing used to seal a window from top to bottom. A window contractor might use the following:
Sill flashing: Installed at the bottom of the window opening beneath the sill to catch and divert water away from the home.
Pan flashing (sill pan): Also used at the window’s base, sill flashing (or a sill pan) is a three-sided pan that acts as the home’s last line of defense, directing water away from the window.
Jamb flashing: Applied along the sides of a window to create a continuous shield when integrated with the building’s weather-resistant barrier.
Head flashing (drip cap): Positioned along the top to prevent water from seeping in above the frame.
Flashing is typically made from aluminum, tape, or flexible membranes. It’s essential to select a flashing material that complements the materials used in adjacent parts of the window. Flashing a copper window frame with an aluminum drip cap, for example, invites corrosion that can degrade the window’s watertight seal.
Tape flashing: Water-tight, resistant to extreme temperatures, and available in a variety of widths to suit various installations. A similar product, called stretch tape, stretches and molds to the corners of windows, further protecting these vulnerable joints from moisture.
Metal flashing: Also known as Z flashing, metal flashing creates a rigid drip edge around the window opening. It's commonly made from aluminum and used for a drip cap at the head of the window frame.
Liquid flashing: A calk-like adhesive material that binds to the home’s framing and dries in about four hours. It can be used all the way around a window, but is more commonly used for extra protection in the corners after flashing tape has been applied.
Window flashing is installed during the construction of new buildings and can last decades. It’s not typically replaced during routine window replacements unless visible damage is present, since accessing window flashing requires removing some of the home’s siding. That means no amount of regular window maintenance, while still highly beneficial, will solve or prevent a leak caused by missing or improperly installed flashing.
If you notice water leaks around your windows, the flashing is often the culprit. Flashing is designed to keep water out, so when it fails, moisture can seep into your home. Common signs of water intrusion include damp or stained areas around windows and warped or damaged wood on ceilings or walls. If you spot these issues, it’s essential to contact a mold specialist and a window contractor near you to inspect the damage before initiating any repairs.
If you’re undertaking a complex remodel or replacing windows in weather-prone areas—and want to install window flashing yourself—carefully weigh the pros and cons. DIYing can save on labor costs and give you complete control over the project. However, achieving a proper, watertight seal requires close attention to detail.
Installing flashing involves layering materials in the correct sequence: Start with the sill, then the jambs, and finish with head or drip-cap flashing. Care must be taken when integrating flashing with existing housewrap, siding, and corner pockets. Any mistakes in overlapping, material compatibility, or sealing can lead to water intrusion, hidden damage, and costly repairs down the line. Failing in even one of these areas can result in a compromised seal and a redo of the project.
Hiring a professional window contractor brings expertise and peace of mind. Contractors are trained to handle nuances such as preparing the surface, selecting compatible materials, and adhering to local building codes. For the same reasons, we don’t advise hiring a handyman for window repair jobs of this complexity.
We have used Window Warriors many times with no issues. They arrived on time and were very professional . We have pets and Window Warrior team treated them very well, well trusted team.
I am highly satisfied with the window replacement service I received; the professionals from Savvy Exteriors were punctual and did an amazing job that exceeded my expectations.
I hired windows depot USA of central to install new windows in house in Oshawa. Ilya was very professional from the start, not only did he offered a great price, he also made sure the installation was on time. I am very satisfied with final outcome. The windows look great and the overall...
The team is awesome!! I can generally pick up and clean throughout the week, but they CLEAN! Windows, stair rails, microwave. All the things I can’t ever seem to get to regularly. The house looks and smells great after they leave.
Description says they handle window repair including rotten hardwood - they called me back right away but didnâ t leave a voicemail. I followed up 3 days later and they said they donâ t do that kind of work.
We had a gutter blockage that was causing water to sheet down the side of the house and ultimately it started to come in at a window (need mortar people next). Called around 7:30am, and he responded by 8am. He was able to come out the same morning and do a look over and clean out. He also...
From average costs to expert advice, get all the answers you need to get your job done.
Notice leaks and corrosion around your chimney? You might need new flashing or some careful repairs. Here are some common chimney flashing repair costs.

Your new deck will be a welcomed outdoor living space. But what is deck flashing, and why do you need it? We discuss this important aspect of deck building.
There are many causes of leaky windows. A pro can fix it, but you can help by finding the source before they start on the window leak repair.
You might think you know how your chimney works, but what is chimney flashing? Learn about the roofing element that keeps your fireplace dry.

Rain can do a lot of damage to a home. If you live in an area prone to rain, read on to learn what to do about leaking windows during heavy rain.

Roof flashing directs water away from vulnerable areas of your roof. Knowing how to spot issues is essential to keeping your roof in good condition.