

New insulation can make your home more comfortable and boost energy efficiency. Use this insulation cost guide to get an accurate estimate for the installation.
Grab your safety glasses and get to work

Replacing or installing new insulation is a great way to increase your home’s efficiency and is an effective method for soundproofing a room. But it’s not exactly an easy process and requires some safety training to ensure the job is done correctly.
Learn more about how to install insulation and whether or not it’s something you should do yourself in this guide.
Correctly installing insulation can be difficult. Health and safety risks are involved; therefore, we highly recommend contacting a pro to ensure the job is completed safely and correctly.

From your climate to your budget, there are a lot of factors to consider when it comes to choosing the right insulation for your home. The most common type of insulation is fiberglass insulation, but fiberglass can be dangerous if installed incorrectly or without safety gear.
Cellulose and spray foam insulation are also popular but have a few drawbacks. Cellulose is a bit trickier to install on your own, while the cost of spray foam insulation could be a hindrance for the average homeowner.
Take some time to review your options. If you’re not sure which is best, reach out to a pro sooner rather than later.
This article will cover the process of installing unfaced fiberglass insulation, as it’s the most popular.

To estimate the amount and type of insulation you need to snag from the hardware store, measure the inside perimeter and height of the walls of each room that needs insulation. Then, subtract the dimensions of any doors, windows, or walls that don’t require it.
Divide that number by 144 to get the square footage you need to purchase.
Because there will be studs in the wall that don’t require insulation, you’ll end up with a little bit leftover based on this math. But don’t worry, because having a bit of extra wiggle room will help you in the next steps.
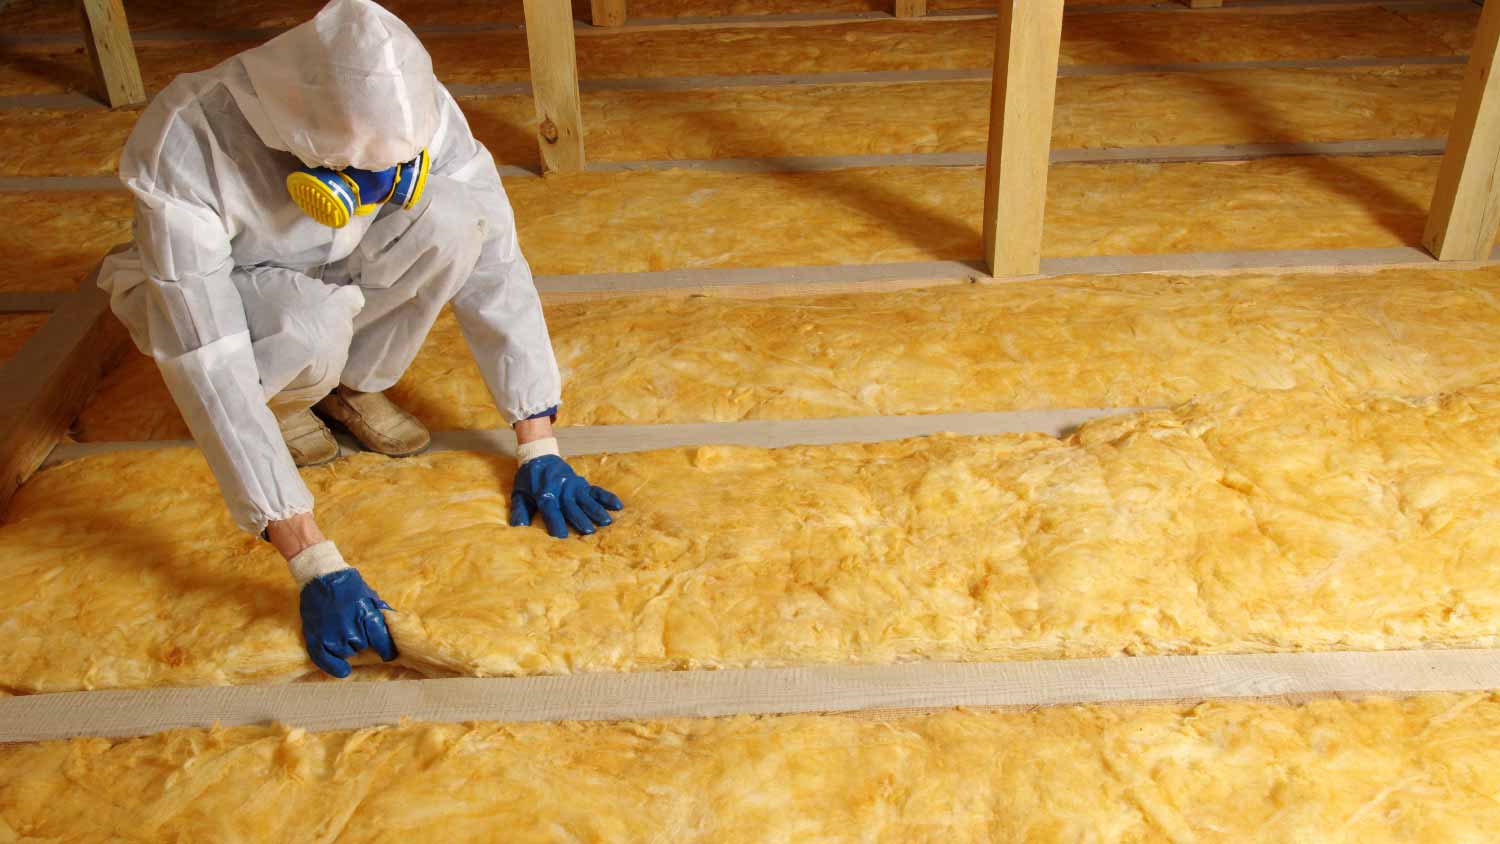
Fiberglass can irritate your skin and eyes. While you’re cutting and fitting it, pieces of fiberglass will get into the air, which can irritate your skin and eyes.
Before you get too far, don your face mask, gloves, and eye protection. If possible, wear long sleeves and a hat as well.
Most fiberglass insulation comes in rolls or batts based on thickness. Make sure to purchase a thickness that fits the depth of your opening without needing to be cut.
There are two main methods for how to cut insulation:
Measure and cut: Measure how much space you have to fill between studs using a measuring tape. Then, lay your insulation on the floor and make your cuts with a utility knife. You can use a straight edge or an extra 2 x 4 to help ensure a straight line.
Cut in place: Place the insulation in the stud cavity, lining up the top edge. Then, use a utility knife to trim it to length while cutting against the stud.
The goal is to ensure a tight, seamless fit, so make sure to measure twice before you cut. Slightly oversized cuts (about ½ inch more than the space) are your best bet, as you can condense it and make it fit the space relatively easily.

Next up is putting in the insulation. But before you do that, check for any gaps around pipes or fixtures. If you see some, add caulking to help seal any air gaps and to make sure your insulation does the job to the best of its abilities.
Once your cavity is prepped, place the insulation directly into the stud cavity, making sure it’s flush with the face of the studs.
You’re likely going to have electric cables or boxes you need to fit the insulation around.
For wires, pull the batting in half width-wise and place half of it behind the wire and half of it in front of it.
For plumbing, compress all the insulation behind the pipe for added protection and to help prevent freezing.
For electrical boxes, simply cut around the box to shape using your utility knife.
To protect yourself, make sure the wires aren’t hot during this process in case you accidentally cut one.
A vapor barrier, also known as a vapor retarder, helps prevent condensation and helps increase the R-value (resistance-value) of your insulation. In most climates, you’ll need a vapor barrier to ensure the highest level of efficiency possible.
To add a vapor barrier, staple 4-mil plastic sheeting over the batts. If necessary, overlap any seams by about 12 inches and seal the seams with tape.
If you’re using faced insulation, skip this step, as it’s already included in the product.
According to Angi data, adding insulation to an existing home—whether that’s to a garage ceiling or the attic—accounts for over 80% of all batt and roll insulation projects. Often made of fiberglass, this type of insulation is easy to install since it comes in large sheets to fill large, open spaces.
Installing insulation yourself will cut your costs in half—if not more—simply by eliminating labor costs. Insulation itself isn’t that expensive, costing about $0.30 to $1.50 per square foot. For a 1,000-foot basement, that could be as low as just $300. But if you have to add on labor costs, that cost will likely double or triple pretty fast.
Most homeowners pay between $1,066 and $2,592 for professional installation, although it can be more depending on the size of the space. But, doing it yourself requires quite a bit of handyman knowledge outside of just making some cuts and stuffing some batting.
For example, you’ll also need to install the drywall and paint the walls. You also need to make sure the insulation is installed correctly, or else you’re wasting precious energy (and, in turn, precious money) in heat loss.
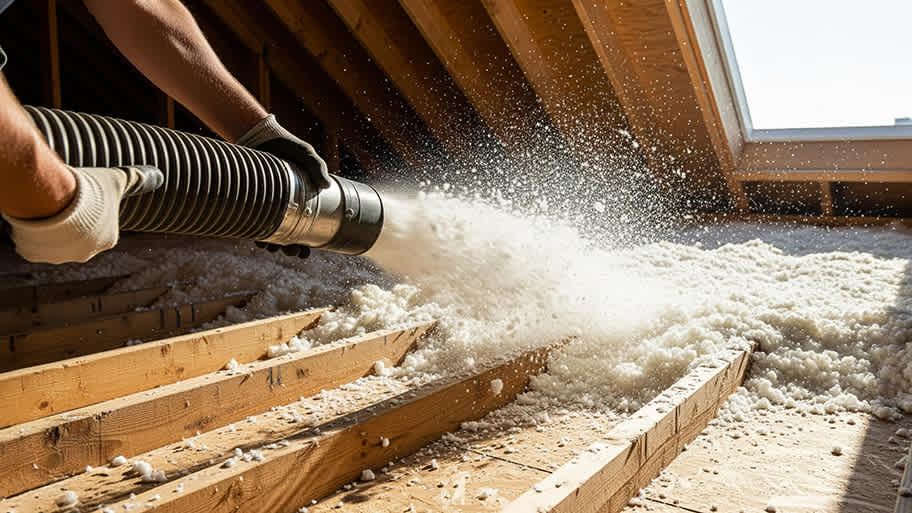
In some cases, you need to hire a professional regardless of your skills, like if you want to use blown-in insulation in your attic.
As you can see, this DIY doesn’t end at just cutting and installing insulation. It requires quite a bit of knowledge and follow-up to make sure the job is done right and completely. So unless you are knowledgeable in every step of the process, your best bet is likely to hire a professional insulation installer.
I would recommend this company to anyone! He showed up on time, was friendly, completed a very difficult repair on our dryer vent cover, was responsive, and pricing was extremely fair and competitive. I would have him back to do any of our repairs or cleanings without hesitation!
Best cleaning I've had at my property
I conferred with 2 other contractors before Armstrong Electric. Nick and his crew showed me that the project was not as convoluted as the other contractors made it appear to be. They completed the entire project on time. They were professional, friendly and cleaned up after at completion. I...
The technician was very professional and friendly. He answered all my questions and was very thorough. He left the fireplace area very clean . He inspected from the roof and advised me as to other work that might need to be done. There was no pressure there. I was very satisfied with the...
 Supreme brick & chimney
Our exterior looks brand new thanks to Custom Paint Jobs LLC. Theyre the best in town!
Excellent experience with hiring Tether House to Mount our 77’ Samsung TV in our bedroom. Fast, friendly, and knowledgeable. Highly recommend.
The techs on my project, Shawn and Cliff, were great. They were prompt, courteous, and efficient. I am very happy with the results and would definitely contact Mr. Electric for any future electrical projects.
We had our houses windows and back door replace this summer by Window Depot USA of Central. He gave us grate advise and saved my family lots money. The team did a fantastic job with installation. If you need help, they sure get job done right!
Beginning with the estimate, Larry and Peyton were super helpful in getting my new condo's interior re-painted. Not only was the job well done, but also done in a super timely manner as promised.
 Five Star Painting of Plain City and Powell
Great job...edging and pre clean up went well with a great job with seal coat. Friendly, efficient and professional.
 All Star Paving and Sealing
From average costs to expert advice, get all the answers you need to get your job done.
New insulation can make your home more comfortable and boost energy efficiency. Use this insulation cost guide to get an accurate estimate for the installation.
The cost of blown-in insulation costs varies depending on the type of insulation, labor, prep work, and more. Learn more about the cost factors in this guide.
The cost to insulate a basement varies based on materials, size, and other factors, as well as how much of the work you wish to perform yourself.
Home insulation has many benefits: it’s energy-efficient, environmentally friendly, and cost-effective. It’s worthwhile but requires planning. We’ve laid out the key things to know before installing home insulation.

We’ll walk you through how to install spray foam insulation in your home—and when it makes sense to call in a pro.

Looking for a qualified batt insulation installer? Learn how to find, vet, and hire the right pro to improve your home's energy efficiency.