
The average cost of a deck railing depends on size, type, material, and labor in your area. Check out this guide to determine what works for your budget.
Putting the finishing touches on your deck requires precision and skill

When refurbishing a deck or building a new one, a railing is a key part of the project. It creates a finished look and helps the deck adhere to safety codes, since a deck railing is required if your deck is at least 30 inches off the ground. Knowing how to build a deck railing gives you a project you can take pride in whenever you step outside. Let’s walk through the steps.

Deck railings require a stable foundation. If you're adding or replacing railings on an existing deck, thoroughly inspect the frame for common deck problems that require repair.
Your deck's ledger board, the horizontal board that attaches the deck to your home, should be securely bolted to the house. If not, tighten bolts and reinforce weak spots. With the frame attached, inspect the joists for sagging or warping. Add deck anchors and bracing as needed.
If you discover serious structural problems, stop your deck railing project here and call a pro to repair your deck frame before you continue.

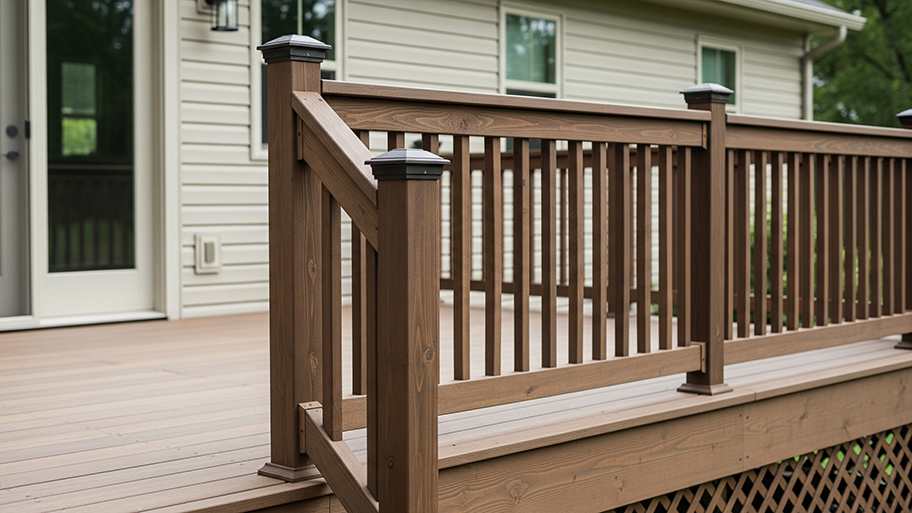
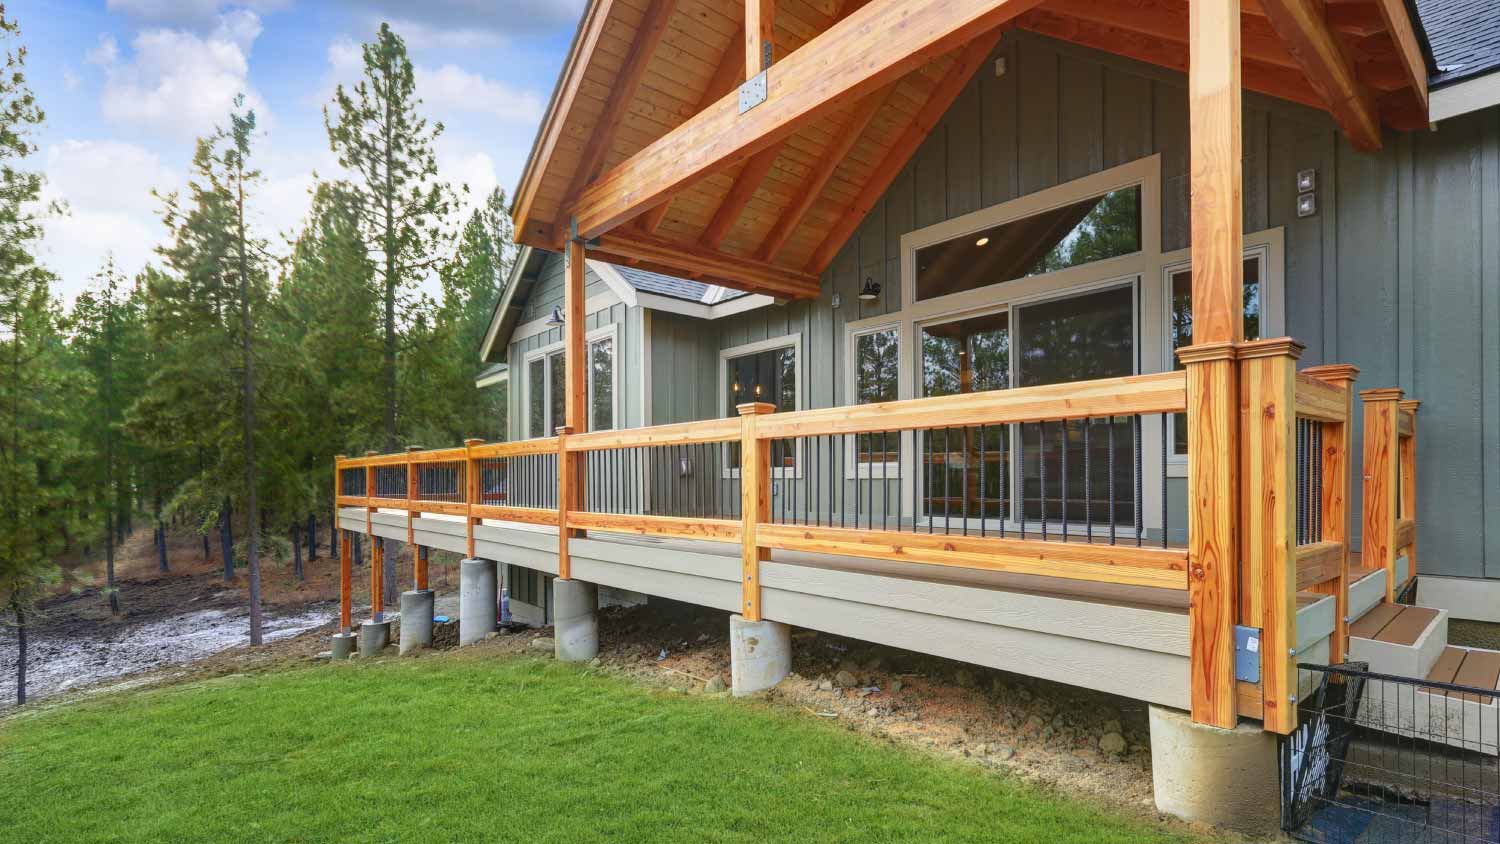
To build a deck railing, you can use 4x4 lumber for your deck posts, 2x4 lumber for your railings, and 2x2 lumber for your balusters. To determine optimal lengths and spacing for your posts and railings, keep the following in mind:
Most building codes regulate deck railing post spacing and height.
Most codes allow no more than six feet between posts, measured from the post’s center.
Most codes require deck railings to be at least three feet tall above the deck surface.
The bottom of each post should be flush with the bottom edge of the end joist.
Plan on having posts by the house, outside corners, and the tops of staircases.
Determine the number of posts you'll need between two corners by measuring the distance, dividing by your spacing, and subtracting one. For example, if the distance between corners is 18 feet with six feet between posts, divide 18 by six. The result is three. Minus one is two. This means you'll need two posts between the corners. Mark where each post will go using chalk.

With your measurements in hand, don your mask and safety glasses. Use your saw to cut each post to length, accounting for the full height of the post from the bottom of the end joist to the height above the surface, as required by your local building codes.
Place your first post in the location you marked with chalk and use clamps to keep it in position. Screw the post in place flush with the bottom of the end joist, making sure it's plumb.
Access the joists from below or by removing the decking boards around the post. Use a drill and deck screws to install extra bracing by the post between the end joist and floor joist if there isn’t a brace already.
Line up an anchor about two inches from the top of the joist and flush with the brace. Attach it to the bracing with screws.
Drill a hole through the anchor into the post. Run a carriage bolt through it to secure the post with a washer and nut. Use your wrench to secure the connection tightly.
Drill a second bolt hole through the post and joist about two inches from the bottom of the joist and run a second carriage bolt through, again securing it with a washer and nut.
Repeat the previous three steps until all of your posts are securely fastened to the end joist. Reinstall any decking boards you removed.

Clamp the lumber for the bottom rail to the posts at about 3.5 inches above the decking surface. Secure the rail to the posts with decking screws. Do the same with the top rail, making the top of the rail flush with the top of the post.
Refer to local codes to determine the required spacing for balusters. Many codes require a spacing of 3.5 inches, or about 3 balusters per foot. Drill pilot holes in the top and bottom of each baluster in alignment with the top and bottom rails, then secure them using nails.

Top your posts with post caps and add trim skirts at the bottom of each post to conceal gaps and add moisture protection.
Deck railing installation is an intensive project with a lot of steps. Even if you have the necessary tools and carpentry skills, you'll still want to look out for several mistakes that DIYers commonly make:
Using the wrong hardware: Ensure that your screws, nails, carriage bolts, washers, and nuts are all rated for pressure-treated lumber.
Ignoring building codes: To ensure that your railings are adequately supported and meet safety standards, follow local building codes.
Overlooking instructions: Many pre-made railings and infills include manufacturer recommendations—the instructions that come with your product should be your primary source of information over other guides.
The cost to replace deck railings as a DIY project varies by the size of your deck and the quality of the materials, but you can expect to spend at least $500 and about $950 on average. Compare that to the cost of hiring a pro for the job, which averages about $1,100 but can range anywhere from $650 to $3,400, and you can see the potential savings DIY can afford.
However, installing deck railings safely and properly requires specific carpentry skills, tools, and knowledge of local building codes. Mistakes can result in a finished project that doesn't last or compromises safety for you, your family, and your guests due to wobbly railings. Ensure the job gets done right the first time by contacting a few local deck builders for estimates.
One of my old tall evergreen trees was suddenly leaning toward the busy street in front of my house. I submitted a request for an emergency tree inspection, and Alejandro, owner of Cajete Tree Service, contacted me immediately and arrived to look at it just 20 minutes later. We agreed the...
Mitchell and the crew were top tier i am so happy with my new roof
1 tree was cut down and 5 others including a large willow tree were trimmed. The Grant Tree Service men were professional and cleaned up afterwards. The cost of the 6 trees were affordable. I am very happy with the results. I would hire them again.
Archie did a good job cleaning up the driveway before he laid down the sealer. It looks good. He was gracious and even helped me bring up my groceries. His rate was comparable to another company who came out to give me a quote and he talked to me personally rather than just text me a quote...
We have bought and sold numerous times over the past 50 years. Sherman Hall and Top Line are top notch. Thorough and detailed, he explains every possibility, probability, and eventuality. High class and pleasant. The best.
 Top Line Home Inspections, LLC
D1 Roofing delivers outstanding service from beginning to end, backed by a strong warranty and expert teams. I highly recommend them for their excellence in meeting and surpassing expectations with unmatched communication. Choosing D1 Roofing was flawless decision
Couldn't ask for a better company. Josh and Dee were Very professional, efficient, courteous and takes major pride in their work. They will travel to come to your home and will still give you a fair price. They are honest and trust worthy. Their focus is on their work and their work is...
 Supreme brick & chimney
Window Depot did an amazing job on my deck. I wasnt sure what I wanted to do, but their composite decking was affordable and will last a long time. I am excited to have family over, and I am no longer embarrassed by my backyard. Jeff and the ground crew were polite, respectful, and caring for...
We were having 2”x 2” tile installed . There was a small installation error and the new additional replacement tile was from a different lot and the colors didn’t match. Joe assured us that he would rectify everything , which he did without hesitation. We decided to go with the 18” x 36” tile...
 CarifaTile
Maple Tree Service should serve as a mentor for other business! Customer service was superior and beyond expectation. Response to request was prompt. The representative was very courteous and proud of the company. Quote was given during initial visit and work date established. A follow up...
 Maplewood Tree Service
From average costs to expert advice, get all the answers you need to get your job done.
The average cost of a deck railing depends on size, type, material, and labor in your area. Check out this guide to determine what works for your budget.
Old and run-down porch railings can be an eyesore and pose a risk of falling. Find out how much it costs to replace your worn out porch railings with new materials.

If you’re updating a deck or staircase with a modern railing, you may be wondering how much cable railing costs. We dive into the cost factors you need to know.
Your deck railings help prevent injuries, but only if they’re the proper height. Discover the ideal deck railing height to ensure your safety and compliance with building codes.
When you build a deck, you need to ensure it complies with local building codes. Here’s what you need to know about the most common deck building codes.
When is a railing required on a deck? If you’re not sure that your deck follows the law, explore these critical deck railing requirements.