
Find out how much it costs to install crown molding by type and size. Use our expert guide to figure out how much crown molding you need, how much crown molding costs near you, and whether you need to hire a pro.
Square up, and don’t let tight corners give you the big squeeze

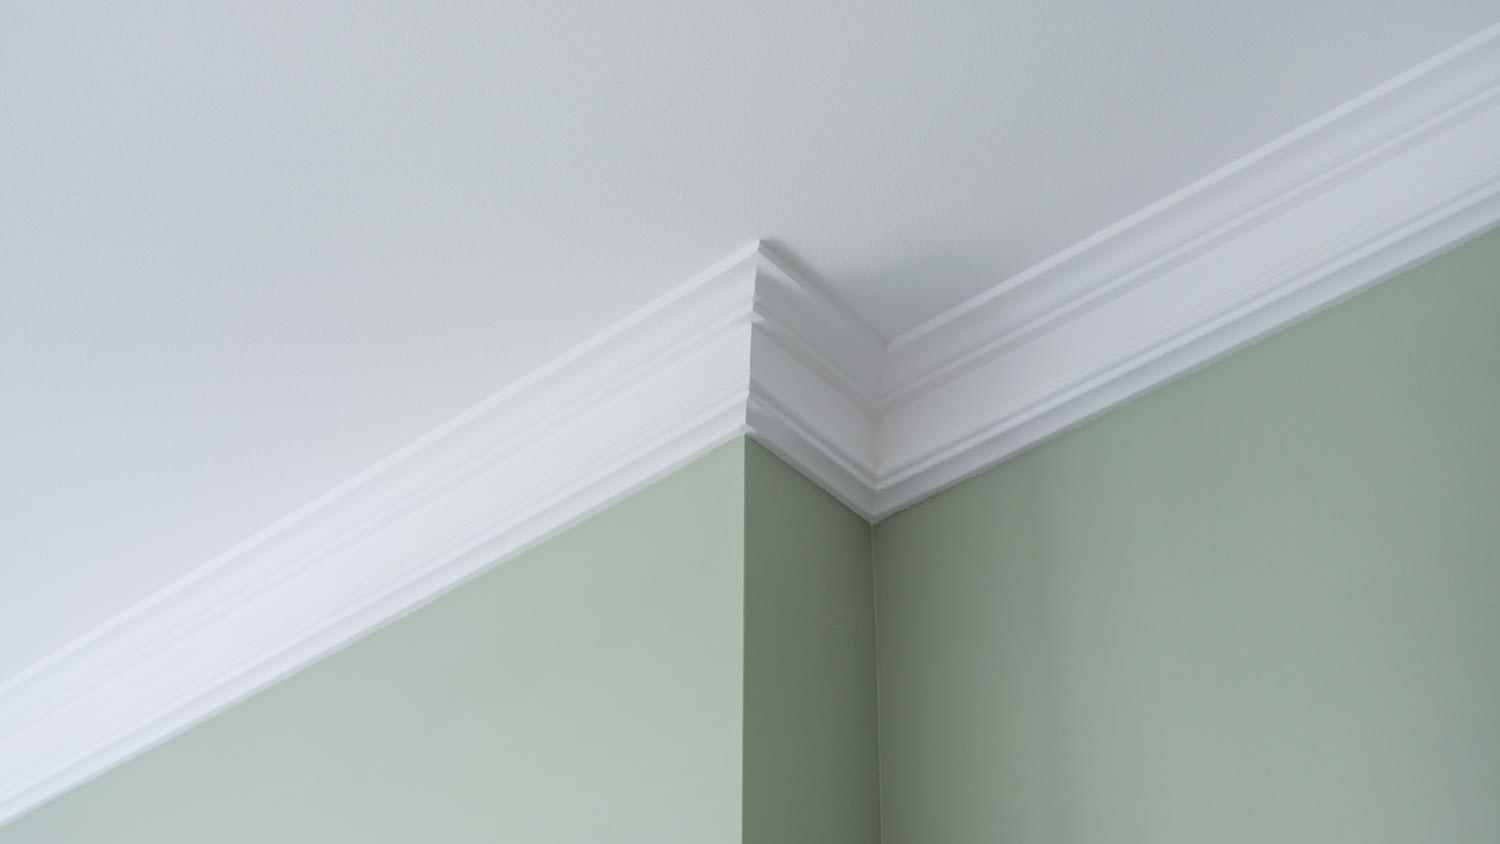
How do you cut crown molding for inside corners? The corners might be tight and the angles imperfect, but you can create tight seams with careful measurements and some basic skills with a coping saw. Keep reading for the step-by-step breakdown on upgrading your home’s finishing touches.
Unfortunately, perfect angles rarely exist for wall corners, making fitting crown molding challenging. You can use a miter saw to create a mitered joint, but measurements and cuts with this method need the precision of an experienced pro.
For most people, using the miter saw for part of the process—and the coping saw and coping joint for the rest—is a better, more forgiving choice. You can use this simple handsaw to remove material from the back of one piece of molding and file or sand to make minor fit adjustments. Hire a crown molding professional if you’d rather leave this project to a pro.
This method uses both a coping saw and a miter saw, with the coping saw giving you a more forgiving way to adjust the fit. If you haven’t worked with crown molding before, buy more pieces than you need so you can practice and have enough material for a few mistakes.
Cut a butt joint on one piece of crown molding using a miter saw. A butt joint is the most basic (and weakest) of joints, with two pieces of wood placed against each other. In this case, the crown molding is one part of the joint, and it’s placed flush against the wall in the inside corner. The wall makes up the other side of the joint.

Set the miter saw to a 45-degree angle. Make an inside miter cut on the second piece of crown molding. Place the crown molding in the miter saw so the material is removed from the back of the piece.
Use a pencil to darken the leading edge (aka the top edge) on the mitered end of the second piece of crown molding. This line should follow the decorative edge of the crown molding, making it more visible and guiding the cut in the next step.
Hold the crown molding on a work table as a brace when cutting with the coping saw. You can also use the bracing system on the miter saw to hold the crown molding steady while using the coping saw.

Angle the coping saw so you remove material from the back of the crown molding without marking the facing. The facing is the front of the crown molding, and you want to avoid damaging or marking the face so the crown molding looks clean and elegant. Cut along the pencil line as you undercut the crown molding. You’ll be trimming and removing material from the backside of the molding.
Coping saws have thin blades that are easily manipulated to follow the curves and angles of different types of crown molding. Cut slowly and methodically, being conservative in how much material you remove. You can always cut away more material if necessary.
Hold the crown molding with the butt joint in the corner. Place the coping joint in the corner over the top of the first piece. You’re looking for a tight seam. You’ll likely need to adjust the fit by cutting away more material with the coping saw, filing, or sanding the cut for a tighter fit.
If there’s still a decent gap between the two pieces, use the coping saw to cut additional material from the back of the crown molding.
To fine-tune the coping joint, use a file or sandpaper to smooth the edge.
If you have the time and patience, you can install crown molding at the inside corners. However, you might need extra molding if you’ve never done this kind of project before. There’s a good chance you’ll have some waste due to mistakes as you fine-tune your coping saw skills.
While you can save money DIYing this project, it can be frustrating and time-consuming for a beginner. A local crown molding pro can finish the installation faster and get a more professional finish with tight seams.
Incredible workers! Very skilled with the machinery, climbing, cutting, roping, and removal. Handled everything. Professionals!
 Hoffman Expert Tree Services
I m so impressed with Custom Paint Jobs LLC s craftsmanship. They truly care about quality.
Window Depot did an amazing job on my deck. I wasnt sure what I wanted to do, but their composite decking was affordable and will last a long time. I am excited to have family over, and I am no longer embarrassed by my backyard. Jeff and the ground crew were polite, respectful, and caring for...
Storms Mobile Welding was great to work with. They were prompt, professional and did an overall excellent job on the project. I highly recommend.
Great job...edging and pre clean up went well with a great job with seal coat. Friendly, efficient and professional.
 All Star Paving and Sealing
Great tree company, very professional and honest. Glad we found them, they had the best pricing
It was wonderful working with Yordy and his team. They were very professional and are experts in what they do. They have completed the work on time, with better quality and with in fairly reasonable price. We just started with backsplash work , but liking his work, we went on to provide...
We hired Jim to replace our hardwood floors with new hardwood. He and his helper Jerry did a fantastic job. Their work ethic is impeccable!! We would highly recommend McColl Floors!
The job went extremely well. Work was done as promised and the job came out better than expected due to Mr. Moyer's commitment to excellence and personal pride in providing the best work possible. He is one of those professionals who is not satisfied until the customer is completely happy...
 Pro Flooring
We needed to have a wall cabinet resized so that we could fit a larger refrigerator underneath. I removed the cabinet from the wall myself and brought it in, where Wally was able to resize it for me in his shop. The results were perfect: it's exactly the size that I asked for, and...
 Pioneer Woodworks
From average costs to expert advice, get all the answers you need to get your job done.
Find out how much it costs to install crown molding by type and size. Use our expert guide to figure out how much crown molding you need, how much crown molding costs near you, and whether you need to hire a pro.

Discover how much it costs to remove crown molding based on factors like its size, location in your home, material, and more.

If your crown molding has edges or seams, you may want to caulk it. You can DIY this work or hire a pro—use this guide to learn the cost for both.
Make tough trim work cuts look easy. Get started installing your crown molding by learning a simple method to achieve near-professional looks.
Need crown molding installed? Learn who to hire, what it costs, and why a trim or finish carpenter is the best choice for a polished, professional look.
Coping, a common woodworking technique, is the secret to perfect inner corners with your trim. This guide will show you how to cope crown molding.