
Installing new baseboards can totally refresh the look of your walls. Learn about the cost to install baseboards in your home.
Repair the wear and tear to keep your baseboards looking great

Baseboard repair methods range from simple sanding and painting for shallow scratches to complete replacement when you face extensive water damage or severe warping.
Expect to pay $50 to $100 per hour for professional labor when your damaged baseboards need expert attention beyond basic DIY fixes.
Wood filler works well for small dents and cracks in your baseboards, letting you shape and sand the surface smooth before matching your paint or stain.
Hiring a local baseboard installation professional provides reliable results when replacing water-damaged sections or completing complex repairs that protect your walls and floors.
You may not think about your baseboards very often, but these trim pieces help protect your walls from bumps, scratches, kick marks, water damage, and more. Since they see so much wear and tear, baseboards often sustain damage that needs to be repaired. In many cases, a handy homeowner can tackle baseboard repair as an afternoon project using one of these five methods to return baseboards to like-new condition.
Depending on the type and extent of the damage, baseboards in need of repair may not only look unsightly but may further damage your walls and floors. Water-damaged baseboards can lead to water-damaged walls, mold growth, and warped floors. Other types of baseboard damage can make it easier for pests to infiltrate your walls, causing infestations that can be costly and time-consuming to control.
Repairing minor baseboard damage can cost as little as $10 for the necessary supplies and tools, or as much as $1 to $10 per linear foot to replace extensively damaged baseboards. The cost to repair baseboards will depend on the material, the extent of the damage, and the method you use for repair.
Before beginning your repairs, assess the extent of the damage and decide if you need to repair or replace the damaged sections. It’s often quicker and easier to replace severely damaged baseboards than to try to fill or patch them to match undamaged sections. If you decide to replace the damaged sections, measure your baseboard trim so you can be sure to get the right replacement baseboard trim size for a seamless match.


The method you choose to repair your baseboards will depend on the type and extent of the damage. These four repair methods cover everything from minor dents and dings to severely water-damaged trim.
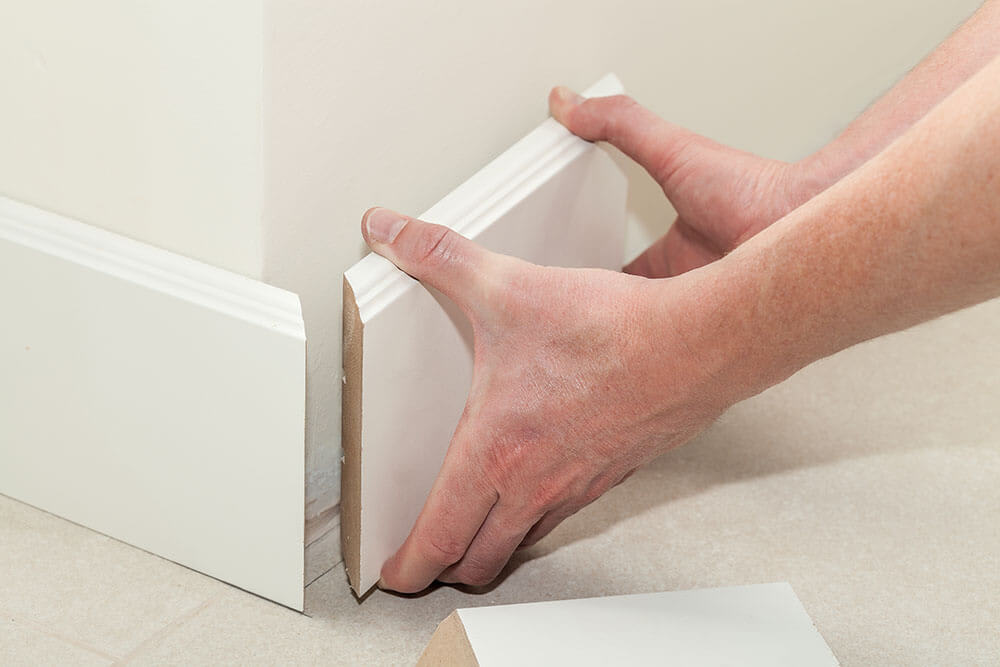
For serious damage like extensive water damage, significant warping, or deteriorating trim, replacing the baseboard may be the best option. To replace a section of baseboard:
Remove the damaged baseboard using a putty knife or pry bar. Gently detach the damaged baseboard from the wall, collecting all nails used to attach the trim.
Measure and cut a replacement length of trim, keeping any angled cuts the same for a snug fit.
Attach the new molding with finishing nails, fill the nail holes with wood putty or filler, and sand the surface smooth.
Paint or stain the new molding to match.
For dents, dings, or small cracks, wood filler can help you get your baseboards looking good as new.
Gently sand down the damaged area to remove loose fibers and paint.
Wipe with a damp cloth to remove dust and fibers and let dry.
Fill the damaged area with paintable or stainable wood filler, molding it to match the existing trim.
Allow the filler to dry according to the manufacturer’s instructions.
Sand the surface with fine-grit sandpaper and wipe with a damp cloth to remove dust.
Paint or stain to match.
Like wood filler, you can use two-part wood epoxy to repair small sections of damage.
Remove damaged material and sand to remove loose fibers and paint.
Wipe with a damp cloth and allow the trim to fully dry. Wood epoxy will not properly adhere to wood with too high a moisture content.
Mix the epoxy together in the amounts indicated on the packaging.
Apply the epoxy to the damaged area and shape it to match the rest of the trim.
Let the epoxy fully dry for the time recommended by the manufacturer.
Sand the surface with fine-grit sandpaper and remove dust with a damp cloth.
Paint or stain to match.
Holes or other damage in the middle of your baseboards rather than against the top or bottom edge can be repaired using a patch of the same material.
Cut a patch that’s slightly larger than the damaged area from the same material your baseboards are made of. The patch should be thinner than the baseboard itself, rather than matching the full depth.
Using a router with a top-bearing flush bit, carefully cut a shallow hole the size and depth of the patch around the damaged area.
Apply wood glue to the back and sides of the patch and insert it into the hole.
Use wood filler to fill in any gaps around the patch.
Let the glue and filler fully dry.
Sand around the patch for a smooth surface and wipe away dust with a damp cloth.
Paint or stain to match.
For very minor damage like shallow scratches, baseboard repair may be as simple as sanding and painting or staining the damaged area.
Use a fine-grit sandpaper to smooth out any shallow surface damage.
Wipe dust away with a damp cloth.
Allow the trim to dry.
Paint or stain to match.
Most baseboard damage results from impact or water damage. Certain materials, like medium-density fiberboard (MDF), are more susceptible to damage. Consider installing wood, PVC, or vinyl baseboard trim, which are more durable and less prone to impact and water damage. Baseboard corner guards can protect trim corners from impact damage, pet damage, and more. These guards may be clear acrylic for unobtrusive protection or decorative materials to add a stylish design flourish.
You can tackle most minor baseboard damage as a DIY project, but if the damage is extensive or you aren’t confident in your repair skills, hire a pro to replace your baseboards or repair the damage. A local baseboard installation pro can repair or replace damaged baseboards and provide like-new results.
You'll pay more for labor fees if you book a pro—between $50 and $100 per hour—but will save money in the long run by avoiding any potential damage done with a DIY job.
Incredible workers! Very skilled with the machinery, climbing, cutting, roping, and removal. Handled everything. Professionals!
 Hoffman Expert Tree Services
I m so impressed with Custom Paint Jobs LLC s craftsmanship. They truly care about quality.
Window Depot did an amazing job on my deck. I wasnt sure what I wanted to do, but their composite decking was affordable and will last a long time. I am excited to have family over, and I am no longer embarrassed by my backyard. Jeff and the ground crew were polite, respectful, and caring for...
Storms Mobile Welding was great to work with. They were prompt, professional and did an overall excellent job on the project. I highly recommend.
Great job...edging and pre clean up went well with a great job with seal coat. Friendly, efficient and professional.
 All Star Paving and Sealing
Great tree company, very professional and honest. Glad we found them, they had the best pricing
It was wonderful working with Yordy and his team. They were very professional and are experts in what they do. They have completed the work on time, with better quality and with in fairly reasonable price. We just started with backsplash work , but liking his work, we went on to provide...
We hired Jim to replace our hardwood floors with new hardwood. He and his helper Jerry did a fantastic job. Their work ethic is impeccable!! We would highly recommend McColl Floors!
The job went extremely well. Work was done as promised and the job came out better than expected due to Mr. Moyer's commitment to excellence and personal pride in providing the best work possible. He is one of those professionals who is not satisfied until the customer is completely happy...
 Pro Flooring
We needed to have a wall cabinet resized so that we could fit a larger refrigerator underneath. I removed the cabinet from the wall myself and brought it in, where Wally was able to resize it for me in his shop. The results were perfect: it's exactly the size that I asked for, and...
 Pioneer Woodworks
From average costs to expert advice, get all the answers you need to get your job done.
Installing new baseboards can totally refresh the look of your walls. Learn about the cost to install baseboards in your home.
Baseboard heaters are smart, budget-friendly options. However, the exact cost of installation depends on the type of heater you choose and the size of your home.
The price to paint your home’s baseboards depends on the square footage and whether you DIY the project. Learn more to budget for baseboard painting.

Learn how to close gaps between your floor and baseboard with caulk, molding, or strips. Discover the best methods for different gap sizes in this DIY guide.

The holiday parties are on the horizon, so it's time to start deep cleaning. Check out these 9 methods to learn how to clean baseboards like a pro.

Baseboard heaters are simple to operate. Learn how to turn on baseboard heaters, how to maintain them, and important safety tips.