

Sink installation costs depend on the type of sink, the material, and the labor. This guide can help you budget for your project—from pedestal to farmhouse.
Everything but the kitchen sink doesn’t apply here

Mounting an undermount sink requires a helper or sturdy support because these sinks are heavy and need secure positioning under your countertop.
Expect to pay $250 to $1,500 for professional installation, with plumbers charging $50 to $200 per hour for this advanced project.
Clean the underside of your countertop thoroughly before applying fresh silicone sealant to create a strong, leak-resistant bond for your new sink.
Hiring a local plumbing professional provides reliable support with high-pressure water lines, electrical disconnections, and protecting your countertop from damage during installation.
Whether you’ve finally had enough of your outdated sink fixture or your home is ready for a major kitchen renovation, learning how to replace and install an undermount sink is an effective way to add to your kitchen’s personality. However, knowing how to swap out your old sink may not be as straightforward as you think. Before you bring in a pro to tackle this project, here’s a step-by-step guide to replacing and installing an undermount sink.
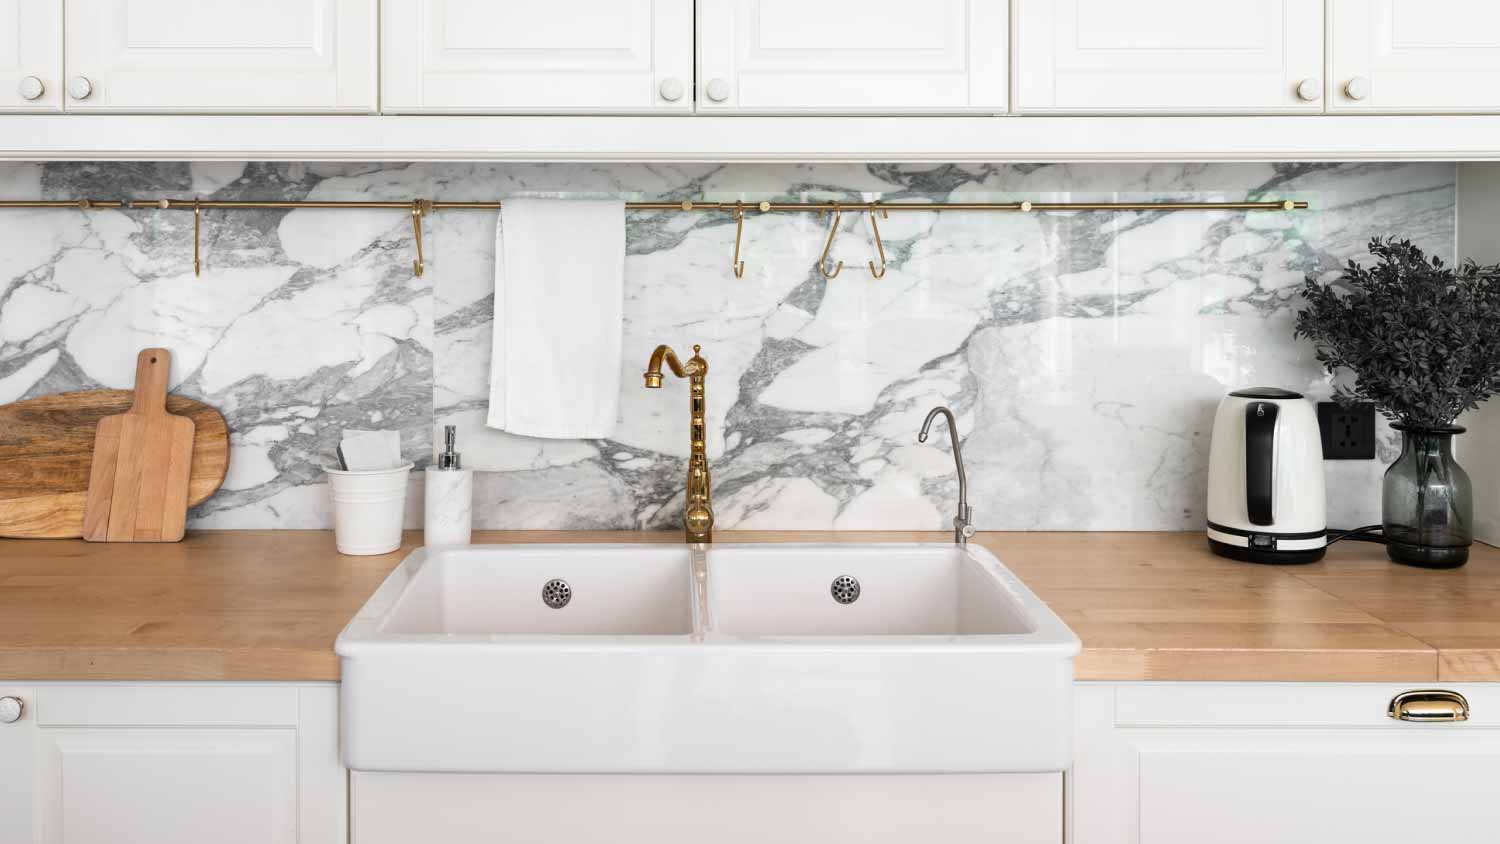
An undermount sink is a sink that’s installed completely under the counter. These sinks are fitted under a custom hole with none of its edges appearing above the counter, creating the look of a seamless, rimless sink. They may not work for everyone, but their appeal is obvious. Not only do undermount sinks add a modern style to the home, but they’re also highly customizable. With options for stainless steel, porcelain, and more, its versatility makes it ideal for matching the style of most kitchens.
Undermount sinks also require deciding whether you want more cabinet space or counter space. If you prefer counter space, installing an undermount sink can be the best choice for your kitchen. These low-sitting sinks will take up a lot of the available cabinet space under your sink, but their edges won’t take up any extra space on your counter.
Because of its versatility, seamless design, and extra space, an undermount sink can add to your home’s resale value.
Before you start taking apart your old sink and swapping it out with your brand-new one, there are some steps you should take to prepare for success. These include inspecting the old sink, preparing for leaks or drips, measuring, and choosing your new sink.
Use your existing sink to your advantage by taking a detailed look at the current setup. You’ll want to ensure your sink isn’t on plywood; rather, there should be adhesive on the counter for this project to work without damaging the existing counter surface.
You should also see mounting clips that hold the sink in place. Make sure you can reach the clips to avoid searching for a ratchet extender. You may want to take pictures of the current setup to help you mimic a similar configuration when it’s time to install the new sink.
Tinkering with plumbing fixtures can be messy. Prevent your floors and cabinet under the sink from getting wet by having buckets and extra absorbent rags on hand to catch and absorb any drips and leaks that may arise.
There’s no getting around it: undermount sinks are heavy. The materials you choose for your undermount sink can also impact its weight, making it harder—or easier—to install.
Kitchen sink materials like cast iron, granite composite, quartz, slate, and porcelain are heavy and may require additional support, like extra mounting hardware. Acrylic, copper, and stainless steel are lightweight and may take less time and materials to install.

The easiest way to measure for a new undermount sink is by taking measurements of the sink you already have. If you plan on changing the depth of your sink, avoid purchasing a sink that is too deep for your cabinet.
To measure your undermount sink size, measure the following:
The length from the outside of the rims
The width from the front to the back
All four sides across the rim or lip of your sink
The depth of your sink from the underside to the top rim
Locate your water supply lines. While you can turn off the main water supply, the kitchen sink shut-off valves are located under the sink.
Turn off the hot and cold valves. Trace the water lines from the faucet to locate the knob or lever on each of the two pipes. If you’re dealing with a knob, turn it clockwise to turn it off. For a lever, it needs to be perpendicular to the pipe to be in a closed position. Turn the lever so it forms a right angle with the pipe.
Turn the faucet on to run any remaining water out of the pipes. This will help you avoid messy leaks while you work or when you remove the faucet.
Disconnect the water supply lines. They connect at the sink and the water shut-off valves. Use a wrench to loosen the metal nuts on the water line. Have your bucket and dry rags ready to catch any water that drips or leaks and wipe up any messes.
Disconnect your drain pipe. Using channel lock pliers or an adjustable wrench, loosen the plastic nut — without separating the pipe — that attaches the metal sink strainer to the drain pipe. Loosen the slip nut on the P-trap – it’s the U-shaped or J-shaped piece of pipe — until you can remove the entire piece of pipe between the strainer and P-trap.

Unplug your garbage disposal from the GFCI electrical outlet. Water and electricity don’t mix, so disconnecting your garbage disposal can protect you from the risk of electrocution.
Remove your garbage disposal. Disconnect your garbage disposal from your drain pipe by undoing the main connection between them. This may require a screwdriver or Allen wrench. Make sure to hold the bottom of the disposal as you loosen and remove it.
Unplug the dishwasher from the drain line.
Move any plugs away from the area to avoid electrocution.
Tape the protruding cords up and out of the way if you can’t fully remove the dishwasher from the vicinity.
Using a utility knife, glide your knife around the edges of your sink to cut through the sealant.
Have someone else hold the sink up for you. Undermount sinks are heavy and shouldn’t be handled alone. If you don’t have help, use a sturdy two-by-four wooden board to hold the sink in place.
Check underneath your sink and countertops for metal clips.
Use a socket ratchet to unscrew the clips.
From below, gently push the sink up to remove it. If it doesn’t budge, wiggle it from side to side until you can remove it without damaging your countertop.
Remove the old caulking. Use a razor scraper to slowly and gently remove old silicone sealant from the countertop. Take your time – you don’t want to damage your countertop!
Double-check that your new sink fits the space.

Use a caulk gun to apply a consistent bead of caulking adhesive to the entire rim of your new sink.
Carefully —with a helper — lift the sink up to the underside of the countertop.
Place a long two-by-four board across your counter on two folded towels. This will protect your countertop.
Pull a bar clamp through the drain hole and secure it to the two-by-four.
Place a smaller two-by-four block of wood on the underside to clamp the sink down without damaging it.
Tighten the clamp until it’s holding the sink firmly in place.
Attach and secure the mounting clips to the sink using a ratchet.
Use an old rag and some denatured alcohol to wipe the countertop, clean the sink, and remove excess caulking where the sink makes contact with the counter.
Make sure your sealant has a full 24 hours — or more — to cure. Default to the instructions on the sealant and your sink’s manual.
Loosen the mounting clips and remove them.
Remove the wooden boards from the sink.

Install your fixtures and appliances that you previously disconnected, including the faucet, pipe fittings, garbage disposal, and dishwasher.
In the process of learning how to install a kitchen sink, you’ll find that Installing an undermount sink isn’t necessarily a job for a beginner. It’s an advanced-level DIY that can be challenging and requires quite a few supplies and know-how. If you’re ready to tackle this project, use these tips to help you install, replace, and manage your undermount sink:
Choose a strong, solid countertop that is durable, weight-bearing, and water-resistant — like quartz — to help support the weight of the sink.
Thoroughly clean the underside of your countertop, as unclean surfaces can weaken the bond and cause it to weaken.
Use a high-quality sealant to avoid serious leaks in the future.
Zero reveal undermount sinks — where the opening of the sink sits flush with the countertop — are easier to clean.
If your countertop hasn’t been attached to your base cabinets, install the sink to the countertop first.
Have someone on hand to help you with holding the weight of the sink.
If you decide to DIY your undermount sink replacement, then you could save between $175 and $325 on your project. A local professional plumber may charge anywhere between $50 and $200 per hour to replace a sink.
While it might save you money to do it yourself, this project is an advanced DIY because of the sheer weight of the sink and the fact that you’re working with water near electrical wiring. To be on the safe side, you might still wish to enlist the help of a trained plumber who can recommend the best products and save you from costly mistakes.
Positive experience. As previously stated, the replacement/repair could not be completed (no fault of the plumbing tech) b/c misinformation was rec?d by property management maintenance. Thanks to the plumbing tech for your efforts. Appreciate you!
 The Waterworks
If you want to pay the most exorbitant prices possible for your job, this is the company for you. “By the job” pricing is a rip-off, at least how these people use it. Every job is plugged into a category and prices are set by category. You might have a job that takes half an hour or one that...
 Benjamin Franklin Plumbing
Cole has been handling plumbing and general contracting for our four properties over the past three years, and he’s always done a great job. Most recently, he installed a sink and countertop in our retail store where none existed before, and it turned out exactly how we needed. He’s...
 ANB Renovations LLC
Matt is a consummate professional. The work turned out to be far more difficult than expected and rather than turn the job down, Matt rose to the occasion and completed a near impossible task. I can not recommend Greene's Plumbing Service more highly. On a scale of 1-5 I would give Matt a...
Involved an extensive bathroom remodel, including removing tub & installing walk in shower, new drywall, custome tile work to ceiling, plumbing, etc. Overall, job was done on time and on budget. Nick & his team were very professional and had high attention to detail. Quality was great. Highly...
 Stamos Flooring and Remodeling LLC
Awesome company. Had a jacuzzi tub taken out and replaced with huge walk in shower with partial glass enclosure. Onyx to the ceiling with a decorative border, moved plumbing and installed hand held shower, new ceiling, flooring, and paint. Replaced window with glass block. Everything was done...
 Columbus Bath Design
The initial quoted price from a walk-through seemed high, but we discussed that the quote represented worst case scenario (re-wiring to two floors) and we were excited about the opportunity to have the work done in a timely manner with closing for fire safety reasons, etc. When the job was...
Initially, I called the Service People to have a leaking garbage disposal replaced. I had purchased a special deal through Angie's List: $79 for $200-worth of plumbing services. <br /> When I went to schedule the work, the earliest date I could get through Angie's List was after the upcoming...
This company did a very good job on the brick wall and it looks just amazing. The staff was always professional and was practically OCD on how the bricks were stacked and how they were laid. Although it took longer than expected, I am willing to sacrifice time over perfection anyday. The...
 My Handy Mate LLC Improvement & Remodeling
<p>I am so glad we called Rotor-Rooter. I was hesitant to call them because we usually prefer to give business to local providers. But when we had sewage back up in our basement on a Saturday evening, I had a hard time getting a hold of someone, not to mention the high weekend/evening rate...
From average costs to expert advice, get all the answers you need to get your job done.
Sink installation costs depend on the type of sink, the material, and the labor. This guide can help you budget for your project—from pedestal to farmhouse.

Not sure who to hire for undermount sink repair? Countertop specialists are the best place to start, but plumbers may also be helpful.

Undermounted sinks are elegant upgrades to any kitchen and can add to your home’s resale value. But are they the best option? Here we’ll learn the pros and cons of having an undermount sink.

The type of sink you have can make all the difference in a kitchen or bathroom. Here’s how undermount and drop-in sinks stack up for cost, aesthetics, and more.
When researching fireclay sink pros and cons, consider the high price, large size, and tendency to scratch. Read on and see if a fireclay sink is right for you.

This handy guide will walk you through 17 types of bathroom sinks to help you decide on the best one for your bathroom remodel.