
Sump pump replacement costs depend on the type of unit you have and the cost of labor, which varies by region. Read on to find out more about what to expect.
Get pumped for a DIY dry basement

Sump pumps are usually out of sight and out of mind—until you’ve got a wet basement. Your home’s sump pump collects water that sneaks in through your foundation to help protect the home from water damage. If your current sump pump has seen better days, replacing it in a timely manner can help you avoid needing a boat to navigate your basement. Don’t let sump pump replacement costs bring on the waterworks, you can get it done on your own with a few basic DIY skills.
Replacing a sump pump is a relatively straightforward task that almost any homeowner can tackle, but it’s important to take the right preparatory steps before diving in.
Make sure your replacement sump pump is appropriate for your home—it should be the right size for your sump basin and have enough power to keep your basement dry. If your old sump pump performed well but just reached the end of its life, a newer model of the same pump is a safe bet. If your sump pump isn’t doing its job, however, it’s worth getting professional advice to determine what model works best for your home.
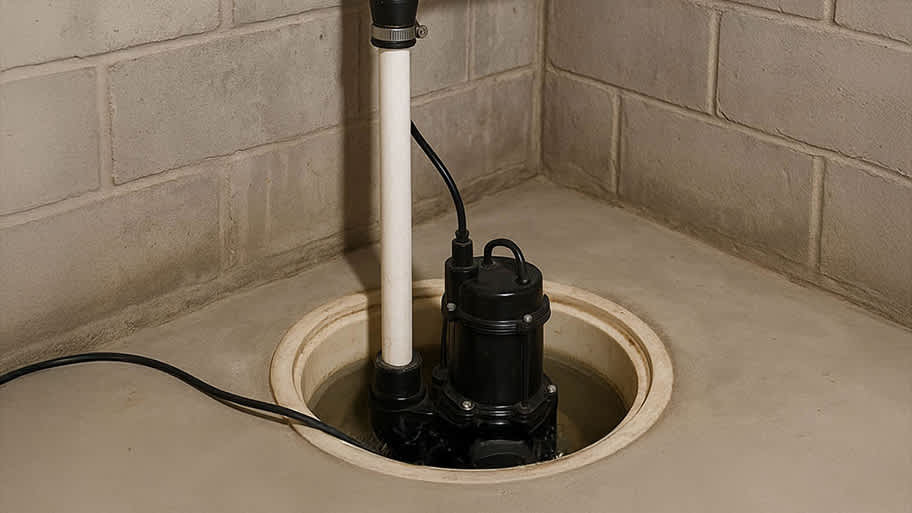
The first step in removing your old sump pump is disconnecting the power, which means turning off power from the circuit breaker and unplugging the unit. This is when you may need a good flashlight or work light. Then, disconnect the sump pump from the discharge line. Disconnect the bottom pipe from the check valve and separate.
To avoid getting water all over the floor, the next step involves removing the sump pump lid, removing the check valve, and draining any remaining water into the open sump pump pit. You should now be able to remove the sump pump.

Before starting the replacement, read through the user manual to get familiar with your new sump pump. The manual not only comes with model-specific instructions but also provides important safety and accessory compatibility information.
Once you’ve removed the old unit, it’s time to center and align your new sump pump. Depending on your home’s configuration, that means placing it in the sump pump pit or on top of a pump stand. Use the level to make sure the pump is on level ground. If needed, you can use spacers or shims to level it, allowing the float to move freely in the center of the pit without touching the sides.
Find the discharge outlet on the new sump pump. If your old discharge pipe is a match to your new sump pump, you don’t need a new pipe. If you need a new pipe, you can cut a piece of PVC to the required length.
To connect the discharge line, attach a length of PVC pipe to the pump using a male adapter. Most discharge pipes either screw onto a threaded connection or need to be glued on with PVC cement. Once you’ve attached and fastened the discharge pipe, ensure that the arrow on the pipe is pointing up—this indicates that the water flows up and out of the pit.

With the sump pump and pipes properly assembled, you’re ready to plug the unit in. Turn the power back on at the circuit breaker, then plug the cord into the outlet. To protect you from electrical shocks, this outlet should be a ground fault circuit interrupter.
You’re not finished yet—it’s important to test your new sump pump to ensure it’s working properly. Fill the pit with water, which should cause the float to rise and activate the sump pump. The sump pump should begin processing the water and turn off as soon as the water level drops below the float. If the sump pump isn't draining water, turn off the power at the source again before troubleshooting.
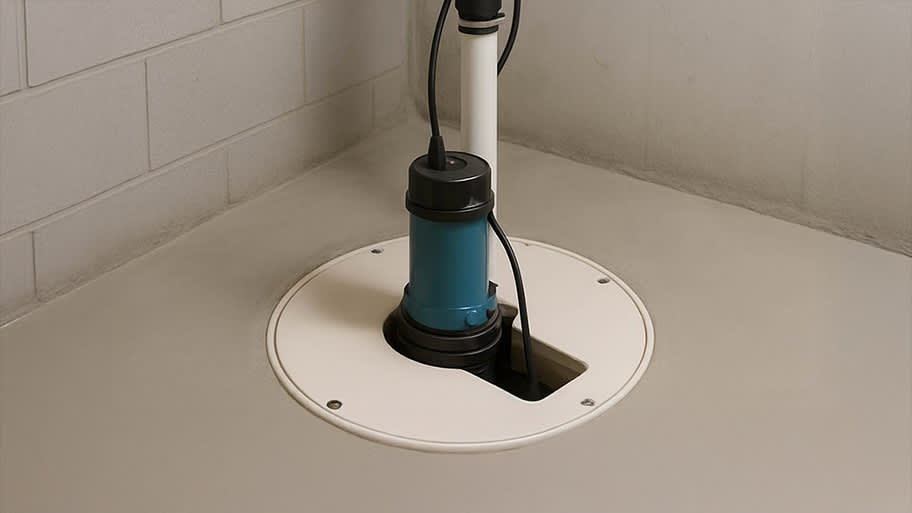
Although not technically required, it’s recommended to cover your sump pump once it’s working. Sump pumps usually come with tight-fitting covers that reduce noise and smell and keep kids, pets, and pests out of the pit. Depending on your model, line up your pipes and wiring with the built-in cutouts, and fasten the cover with screws, bolts, or another method.
According to data from Angi, around 58% of homeowners want to repair their sump pumps within 1 to 2 days, and another 26% want the work done within 2 weeks, highlighting that most of these requests are emergencies or very urgent. Roughly 13% of homeowners were unsure or still in the planning and budgeting process, while only 3% could wait more than 2 weeks.
Replacing a sump pump on your own is a doable DIY task with the right amount of patience, focus, and knowledge. You’ll essentially save on the cost of installation labor and only pay for the parts and materials required. Keep in mind that those materials also include the tools needed for the job, which can rack up your bill if you don’t already have them in your workshop.
Hiring a local sump pump repair person or plumber can be more expensive, but doing so comes with a number of handy benefits. Depending on your area, replacement labor fees can range from $90 to $800 in addition to the cost of the unit. With those fees, you get access to an experienced and licensed professional who has all the expertise and equipment to get the job done correctly and efficiently, giving you peace of mind about your new pump. They can assess your specific situation, recommend the ideal sump pump, and deal with details such as sizing and troubleshooting.
Remember that sump pump installation costs and individual units can vary depending on the model, power source, horsepower, and type of unit. Pedestal sump pumps are typically cheaper, averaging at about $115, but they take up more space in your home. Submersible sump pumps are quiet, powerful, and space-efficient, and they average $225.
Finished Basements Plus was wonderful from beginning to end! First, they came out quickly for an estimate. I had 4 estimates and theirs was by far the best. (2 of the estimates were more than $20K higher than for the exact same work). Beyond their fair pricing, the work was excellent. They...
 Finished Basements Plus Inc.
Amazing job. Efficient and quick without compromising quality. Basement feels brand new. Would use them again in a heartbeat.
 AffordaPro Restoration
Window Depot did an amazing job installing the windows in my basement! The process from start to finish was by far more than what I expected. I would highly recommend Window Depot if you want professionalism from the the consultation to the installation. Dont settle for mediocre when you can...
They cleaned my very dirty basement. They were prompts, quick, thorough and their price was fair.
I am very pleased with the services performed by OTS. Bless my late Mother, but she was a bit of a pack-rat. The basement of her home was crammed with 40+ years of "stuff," and the other companies I contacted were concerned with possible mold contamination of the items due to the musty smell...
The company was very easy to work with. My family is now able to enjoy a space that at one point, only collected junk!!!! I feel like i have a whole new addition to the house!!! Wonderful work Blurock on our basement, will recommend!
Excellent work. Opted for the service contract which provides spring and fall checkups and deduction on maintenance charges which seems to be a good value. Initial dehumidifier for our large basement was undersized. They replaced unit after it failed with a larger unit and charged only for...
 Total Comfort Heating & Cooling Inc
We had water in our basement and Roto Rooter was original contact to evaluate the situation. We were informed that our sewer main was fractured and needed repair. We received their estimate and then looked for counter offers. Ohio Basement Authority came with the best quote for the work. Once...
 Ohio Basement Authority
Called Mark on a Thursday morning. Not really knowing if he could help me or not. I was having driveway, flooding issues due to a clogged channel drain and I was trying to figure out what direction to take. Heavy rains had come on Monday and again on Thursday leading to flooding in my garage...
The crumbling basement wall needing repair is beneath a large 2 story porch. What i thought would be a complicated project was made very easy by this crew. I was very impressed with the speed and quality of the work performed. The job was finished in just a week as estimated. There were...
From average costs to expert advice, get all the answers you need to get your job done.
Sump pump replacement costs depend on the type of unit you have and the cost of labor, which varies by region. Read on to find out more about what to expect.
Discover how much sump pump installation costs, including average prices, key cost factors, and tips to save on your basement waterproofing project.
Sump pump battery backup costs depend on the type and the design of the system purchased. Follow this guide to learn how to budget for your backup battery.

Sump pumps last 7 to 10 years, but other factors can reduce the life span. Find out if it’s time to replace your sump pump and maintenance tips.
A sump pump doesn’t remove water from your home on its own. Check out this diagram of a sump pump to see how it works with a sump pit, discharge pipe, and more.
If something seems off with your sump pump, follow this guide to learn how to check if your sump pump is working (and what to do if it’s not).