
•
Discover wallpaper installation cost. Learn about material, labor, and project factors to estimate your budget and make informed choices for your home.
Your walls deserve a glow-up

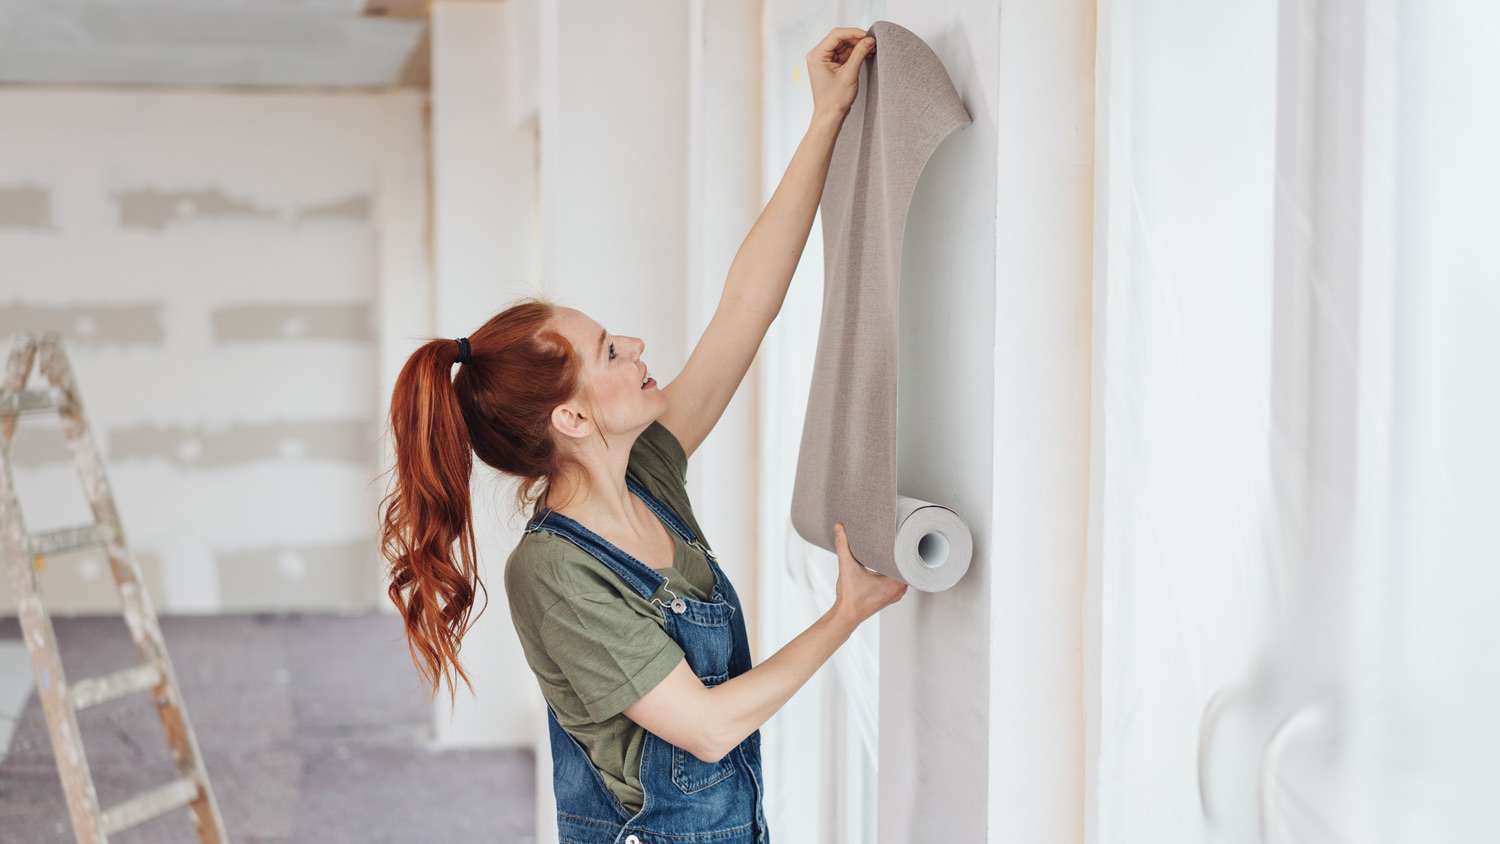
Tired of plain, painted walls that lack personality? Vinyl wallpaper could be the refresh your space needs. Before you start peeling, pasting, and pressing, there are a few things to know about how to install vinyl wallpaper to ensure a smooth, long-lasting finish.


Remove any existing wallpaper or flaking paint, then fill in holes or cracks. Once dry, sand the area smooth and wipe down the walls with a mild soap-and-water solution to remove dust. Let the wall dry thoroughly. If your wall is porous (like bare drywall or matte paint), apply a primer to help the wallpaper adhere better.

Decide where you'll begin hanging your wallpaper by choosing a focal point like a corner or doorway. Using a level and a pencil, draw a straight vertical line down the wall. This line will act as your guide for placing the first strip of wallpaper straight. Even slightly crooked placement at the start can throw off the alignment for the entire wall, so this step is crucial.

Measure the height of your wall and cut your first strip of wallpaper, leaving an extra 2 to 3 inches at the top and bottom for trimming. If your wallpaper has a pattern, align it before cutting additional strips so the design flows seamlessly across the wall. Lay the strips face-down on a clean surface if you're applying adhesive manually, or keep the backing intact if it’s a peel-and-stick style.

If your wallpaper requires adhesive, apply glue to either the back of the wallpaper or directly to the wall. Use a paint roller or wide brush for even coverage. For peel-and-stick wallpaper, skip the adhesive and begin peeling a small section of the backing to start the application. Be cautious not to peel too much at once to avoid the paper sticking to itself.

Carefully position the top of your first wallpaper strip at the ceiling line, aligning it with the pencil guide you drew earlier. Gently press the paper to the wall, smoothing it downward as you go. Work from the center outward to remove any air bubbles or wrinkles, and take your time to ensure it's straight and securely adhered.

Use a plastic wallpaper smoothing tool or scraper to press out any remaining air pockets, moving from the center to the edges. Then, use a sharp utility knife and a straight edge to trim the excess paper from the top and bottom of the strip and around switches and outlets so it fits snugly along the ceiling and baseboard.

Continue the process by applying the next strip of wallpaper, aligning the edges precisely so the pattern (if applicable) matches and the seams butt together without overlapping. Smooth each new strip the same way, working out any bubbles and pressing the seams flat. A seam roller can help ensure a smooth, tight finish along the edges of each strip.
As you go, keep a clean, damp sponge or cloth nearby to gently wipe away any adhesive that seeps out from under the seams. Do this immediately and gently before the glue dries. Use clean water and rinse the sponge frequently to avoid streaks or residue. When you're done, leave the wallpaper undisturbed for 24 to 48 hours to dry.
Knowing how to hang wallpaper can be tedious, but performing each step carefully helps avoid mistakes that leave your space looking less-than-perfect. Here are a few common mistakes to steer clear of as you install vinyl wallpaper:
Skipping Wall Prep: Failing to clean, smooth, or prime the wall can prevent the wallpaper from sticking properly and may cause peeling or bubbling.
Not Using a Level: Hanging the first strip without using a level to mark a straight vertical line can throw off the entire wallpaper alignment and make it look crooked.
Mismatching Patterns: When working with patterned wallpaper, not aligning the design between strips can ruin the overall look. Always double-check the match before cutting or hanging each strip.
Applying Too Much or Too Little Adhesive: If you're using non-peel-and-stick wallpaper, uneven glue application can cause bubbles, seams that won’t stay down, or staining on the wallpaper surface.
Peeling Too Much Backing at Once: With peel-and-stick wallpaper, pulling off too much of the backing at once makes it harder to control and can lead to wrinkling or sticking it in the wrong place.
Trapping Air Bubbles: Not smoothing from the center outward with a wallpaper tool can leave air bubbles under the surface, which not only look bad but can lead to long-term adhesion problems.
Not Trimming Carefully: Using a dull blade or cutting without a straight edge can lead to rough, jagged edges along the ceiling, baseboards, or around outlets and trim.
Overlapping Seams: Most vinyl wallpaper styles are designed for edge-to-edge seams. Overlapping seams can create visible ridges and prevent proper adhesion.
Not Wiping Off Excess Adhesive: If glue oozes out and you don’t wipe it off right away, it can dry into a visible residue or stain the wallpaper.
Rushing the Job: Trying to hang wallpaper too quickly without measuring or smoothing carefully can lead to crooked strips, wrinkles, and poorly matched seams.
Not Letting It Dry Properly: Turning on fans or exposing the wallpaper to humidity too soon can interfere with drying and cause peeling or bubbling.
The ideal conditions for installing vinyl wallpaper are temperatures between 60°F and 75°F with low to moderate humidity. Spring or fall are the best seasons for this project. Installing the wallpaper during humid or rainy periods when there's more moisture in the air can prevent it from adhering and bonding properly. Extremely dry or hot conditions can cause the adhesive to dry too quickly, making it challenging to adjust once the wallpaper is applied.
DIYing vinyl wallpaper installation can be cost-effective, especially if you’re working with peel-and-stick vinyl or a small area like an accent wall. Learning how to install peel-and-stick wallpaper can be more straightforward than applying the adhesive yourself. Either way, the project takes some patience and attention to detail, but many homeowners can achieve good results, especially with smooth walls and simple, non-repeating patterns.
Hiring a local wallpaper installer would be a better choice for large rooms, textured or damaged walls, or wallpaper with intricate patterns that require precise matching. The labor cost to install wallpaper can range between $320 and $820 on average. Pros have the experience to deal with tricky corners, seams, and uneven surfaces, and they can complete the job more efficiently with fewer mistakes. If you're unsure of your skills or want a flawless finish, investing in a professional can save you time, stress, and potential material waste.
Terrible experience. Walls/trim/floors/cabinets/doors all have drip marks, overspray, etc. Tiling at the fireplace had to be redone by another vendor due to incorrect and shoddy install by Profect. Contractor had his children in our house while he was on site without prior authorization or...
 Profect painting & exteriors
The Cisco team did an exceptionally good job of painting (very detailed), and they were professional, courteous, helpful and just pleasant to have in our home for a week. I have already recommended Cisco to some neighbors.
 Cisco Finishes
I couldnt be happier with Custom Paint Jobs LLC! Their attention to detail transformed my home.
Would hire again. Wall looks great. Happy with job.
 Central Paving
The task proved more difficult than anticipated. When they arrived the first day, they had no tools with them at all, and had to make a run to purchase appropriate tools. It was quickly determined that the paper had to be steamed off, and neither the workers, nor the company itself, had...
 ABS Interiors of Mid-Ohio LLC
We needed them to do extra work to remove existing wallpaper, and provide full primer and painting/trim work around existing furniture etc, during a move-in period. They did everything top-notch with minimal mess. They were always extremely on time, and very professional. They also cleaned...
WALLS IN OLD VICTORIAN WERE GOUGED AND CRACKED AFTER REMOVAL OF WALLPAPER. VERY CAREFUL WORK. GOOD ATTENTION TO DETAIL. CLEAN-UP WAS A LITTLE MESSY.
From average costs to expert advice, get all the answers you need to get your job done.
Discover wallpaper installation cost. Learn about material, labor, and project factors to estimate your budget and make informed choices for your home.

Discover vinyl flooring installation costs, including average prices, key cost factors, and tips to save on your new floors.
Find out how much it costs to install vinyl windows in a single room or throughout your house—and see how the size and style of the windows impact the overall price.

Learn how to hire a wallpaper installer with confidence. Find qualified pros, ask the right questions, and get expert installation for your home.
Wallpaper can be eye-catching and unique, but installing it is tricky. Use this guide to know who to hire to install wallpaper in your home.
Vinyl flooring is affordable and DIY-friendly, whether you make a template or cut it in place. Learn how to install sheet vinyl flooring with this guide.