
This guide breaks down the cost of installing epoxy flooring in your garage, basement, or other space. Costs depend on resin type, floor size, and more.
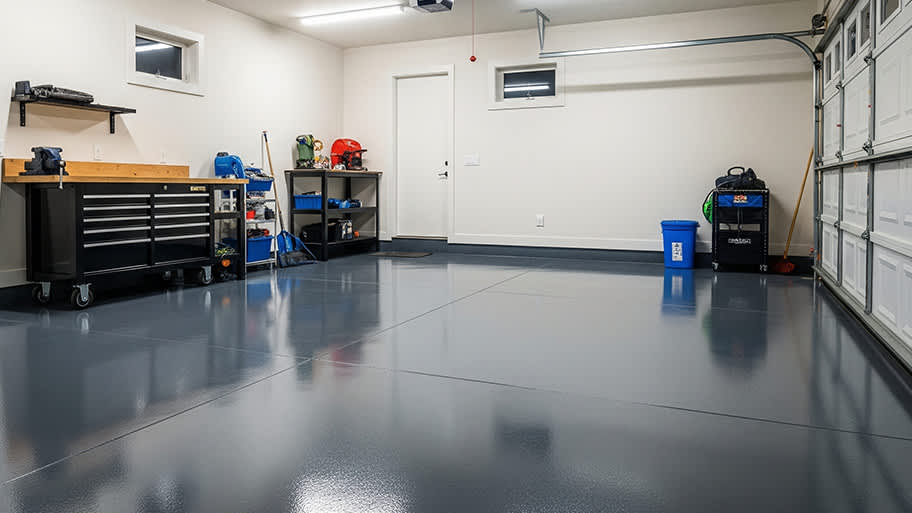
Bring your garage back to life with this epoxy floor DIY guide

DIY epoxy garage floor kits make installation manageable for most homeowners when you follow directions carefully and complete thorough surface preparation steps.
Professional garage floor coating costs $2 to $12 per square foot, while DIY epoxy saves $4 to $7 per square foot on labor.
Your concrete floor needs proper etching, degreasing, crack repairs, and complete drying before you apply epoxy coating for lasting adhesion and durability.
Hiring a local garage floor coating professional prevents common installation problems like peeling, bubbling, and weak adhesion while ensuring industrial-grade materials and proper application.
Garage floors have seen it all—cars constantly driving in and out, oil leaks, heavy shop equipment, paint splatters, an uninvited rodent or two, you name it. Depending on where you live, your concrete garage floors will contract in the cold weather and expand come spring and summer, potentially creating chips and cracks throughout the year, not to mention other cracks that can develop from the natural settling of a foundation. It might seem like a big undertaking, but you can totally take on this DIY project and learn how to epoxy your garage floor for a satisfyingly smooth finish.
Epoxy floor coatings come with distinct advantages that go beyond aesthetics, though we cannot talk about epoxy without mentioning its sleek, streamlined appearance. Garages are functional spaces for working on projects, exercising, or organizing the home—and they are no longer a design afterthought. Epoxy comes in different colors and finishes, including metallics and color mixes that give the garage visual appeal.
Additionally, the epoxy fills and covers unsightly cracks, creating a unified, seamless floor that is easier to keep clean. It covers imperfections so the garage can blend into a more decorated and lived-in space within the home. There are also highly reflective epoxy options that can improve visibility in a dimly lit space. Finally, epoxy offers resistance to acids, bleach, gas, and motor oil, making it less likely to stain than standard garage floors.
Most DIYers, even inexperienced ones, can install a garage epoxy floor, but it does require time and patience. The floor has to be prepared carefully and correctly to ensure proper adhesion of the epoxy. Epoxy flooring kits are one way to make the process easier because you do not have to guess or mix and match epoxy materials. As long as directions are followed carefully, most people with minimal DIY experience can successfully install an epoxy floor.
Thorough preparation is the most important part of an epoxy floor installation. Without it, the epoxy may not adhere to your concrete floors properly, ultimately wasting your time and money in the long run. Also, keep in mind that an epoxy coating is different from epoxy paint, which has a simpler installation.
For a high-quality DIY job, it is always worth the time and effort to do it right the first time. That way, you do not have to stress about redoing it in the near future. Follow this section for proper preparation, but be sure to double-check with the instructions that come with whatever epoxy kit you have purchased.
The durability and longevity of the garage floor depend on carefully following the steps below. You might be tempted to skip one, but it is better to stick to the steps and follow manufacturer instructions to ensure that all materials are mixed and applied correctly.

Yes, everything. Do not try to paint around stuff—trust us.
Though you may be tempted, do not skip this step! A moisture problem in your concrete floors could be a sign of a larger issue. If moisture is present, it may be difficult for epoxy to adhere to your garage floor.
Check for moisture by using duct tape to secure a large square piece of Visqueen or plastic to the garage floor. Spread the material out tight and make sure the duct tape is covering every edge.
Let the plastic sit for about 24 hours. When time is up, look for any signs of moisture or condensation inside the plastic. If it is dry, you are good to move on to the next step. If there is condensation, stop and contact a local concrete repair specialist to assess the situation.

Next, it is time to clean off your garage floors. Use a leaf blower, a clean push broom, or a shop vacuum to get the job done.
Use a degreaser to remove any grease or oil residue from your floor so that the epoxy can adhere to the concrete properly. For this step, follow the instructions on the degreaser formula you purchased. Instructions may vary by manufacturer. Though it is possible to spot-treat for grease and oil stains, you are better off degreasing the entire garage floor so you do not accidentally miss a spot.
Before moving on to the next step, make sure your garage floor has been thoroughly rinsed with a pressure washer. If you do not have access to a pressure washer, a regular garden hose should work just fine. Squeegee any leftover water toward your garage doors so it can empty out to the driveway.

Before moving on to the epoxy application, do one more look-over to ensure your garage floor is totally clear of any dirt or debris. It may be a good idea to do a final sweep or vacuum.
Now, we can get to the good part!
You may be wondering what etching is. Etching is the process of using acid to remove the top coating of your garage floor. Since you will be working with acid, you should use gloves here to prevent skin irritation.
This is an important step to ensure the epoxy adheres correctly (and stays). Etching solution usually comes as a powder that you mix with water. Most garage floor epoxy kits come with an etching solution.
Again, we recommend following the instructions that come with your specific epoxy kit, but if you are looking for a basic overview on etching concrete, it usually entails three steps:
Cover the entire garage floor with the etching solution.
Let it sit for 20 to 30 minutes.
Thoroughly wash all of the solution off the floor with a hose or pressure washer.
Before moving on, it is important to make sure the floor is completely dry. To do so, it may be best to let the garage floor sit for 24 hours. During this time, limit foot traffic through the garage to prevent tracking in more dirt and dust.

For full adhesion of the epoxy, sand away any lingering stains that may be stuck to the concrete, including paint and glue. Repair cracks with a concrete patch kit. Let the patchwork dry according to the instructions on the kit, and sand it down to smooth out if needed. Do not forget to sweep up any dust left behind by sanding.
For this step, you will want to get a plastic container and stirrer ready. A plastic container, like a basic bucket, works best for mixing the solution. Just be sure it is wide enough to fit the paint roller you will use to apply the epoxy.
With kits, the epoxy solution usually comes in two parts—resin and a hardener/activator. Epoxy has a maximum window of about two hours before it hardens and becomes unusable, so you may want to consider mixing smaller batches of epoxy if you have a large garage to cover or if you have not applied epoxy before. Follow the instructions on the epoxy container for accurate measurements and specific instructions.

Depending on the type of epoxy you choose, you may need to wear safety gear. If you are using solvent-based epoxy, use a respirator to protect yourself from harmful fumes and ventilate the area properly.
Now that you have thoroughly mixed the epoxy solution, get started by using a brush to paint the surfaces around the walls and floorboards. A paintbrush gives you more control and better coverage in tight corners while avoiding getting epoxy on the walls. Once the entire outer perimeter of your garage is painted, use a roller brush on a long painter’s pole to cover the rest.
If you would like, add color flakes to give your floor some texture and dimension. It also helps take focus away from any remaining cracks, stain spots, and imperfections. Color flakes or paint chips usually come included with an epoxy kit.
As always, follow the instructions in your epoxy kit. But as a general rule of thumb, it is best to paint small sections of epoxy at a time. Before moving on to the next section, evenly sprinkle color flakes over the entire section before the epoxy dries.
Note: The benefits of DIYing an epoxy floor certainly outweigh the cons in most cases. But if you are unsure about tackling this project yourself, you may want to consider hiring an epoxy flooring professional with experience.

Here are some tips to help you bring your epoxy floor ideas to life:
Try to refrain from applying epoxy to your garage floors in the winter if you live in a cold climate.
To mix the epoxy, opt for a flat metal stirrer; a traditional wooden mixing stick may add unwanted moisture to the mixture.
Be strategic and have a plan before you start painting your garage floor to avoid having to step on fresh paint as you go.
After applying one coat of epoxy, let it sit overnight and then assess the end result before deciding to apply another coat. If you are unsure whether or not your garage floor needs another go-around, refer back to the instructions in your epoxy kit.
Use our epoxy floor care guide to keep your new floors in tiptop shape for years to come.
DIYing your epoxy floor installation can save you about $4 to $7 per square foot on labor. This usually accounts for 10% to 40% of your total garage floor epoxy costs.
While saving on the epoxy coating for your garage floor is appealing, you may want to think twice before taking on this project. There are numerous steps involved, especially during the prep stages, that you need to complete correctly for a successful installation.
If the installation is done improperly, you can have issues like craters, bubbles, and cracks on the floor. Other common problems include soft spots, lumps, peeling, and more. To avoid wasting funds on less-than-desirable results, consider leaving this one to a pro and calling a garage floor coating company near you.
This company does it right. Firstly, I want to say that Landan was a joy to work with. He was so kind, transparent, and had everything under control. His entire team showed up ready to work and they were all very respectful of the fact that we were in an office space. A little backstory – we...
Terrible experience. Walls/trim/floors/cabinets/doors all have drip marks, overspray, etc. Tiling at the fireplace had to be redone by another vendor due to incorrect and shoddy install by Profect. Contractor had his children in our house while he was on site without prior authorization or...
 Profect painting & exteriors
Finished Basements Plus was wonderful from beginning to end! First, they came out quickly for an estimate. I had 4 estimates and theirs was by far the best. (2 of the estimates were more than $20K higher than for the exact same work). Beyond their fair pricing, the work was excellent. They...
 Finished Basements Plus Inc.
AFS was excellent from start to finish. Jess, the sales associate, was fantastic...very knowledgeable and very professional. The installation crew was excellent. I couldn't be more pleased with the process. Best of all, my new floor looks fantastic!
 America's Floor Source
We were having 2”x 2” tile installed . There was a small installation error and the new additional replacement tile was from a different lot and the colors didn’t match. Joe assured us that he would rectify everything , which he did without hesitation. We decided to go with the 18” x 36” tile...
 CarifaTile
We hired Jim to replace our hardwood floors with new hardwood. He and his helper Jerry did a fantastic job. Their work ethic is impeccable!! We would highly recommend McColl Floors!
This was our second experience with The Waterworks and both times have been Exceptional! This time, Michael P. was our technician. He arrived on time, was super professional and respectful of our home and he even wore booties, a face mask, gloves and protected out kitchen floors with drop...
 The Waterworks
Chaz, the owner, was very responsive and he communicated with us throughout the entire process. The overall cost was in the middle compared to the three estimates we received. The installation crew was very professional. Chaz was considerate enough to send a crew back to our home to repair...
 Unique Hardwood Floor LLC
After our last tile guy took 3 weeks and all the tiles were uneven it was so great to find a true tile installer that takes pride in his work. Flooring Solutions is A quality, on time, and keep the job area clean. Will use over and over.
Despite written and verbal direction they installed floor in wrong room.
From average costs to expert advice, get all the answers you need to get your job done.
This guide breaks down the cost of installing epoxy flooring in your garage, basement, or other space. Costs depend on resin type, floor size, and more.
Garage floor replacement costs $2,200 on average but can vary depending on several factors. Review our guide for a more accurate estimate.
Epoxy floors are beautiful, durable, and easy to care for. Here, discover our best tips for epoxy floor maintenance and cleaning.
Looking for a way to update your concrete garage floor on a budget? From epoxy paint coatings to rubber and carpet tiles, explore the pros and cons of the top affordable garage flooring ideas, and compare prices using our helpful guide.
Whether you’re installing an epoxy floor or epoxy countertop, this calculator will help you determine how much epoxy you need to complete your project.
Epoxy flooring adds shine and durability to your basement, studio, or garage floor. Check out these epoxy flooring ideas to create the room of your dreams.