
OSB is a common material used for subflooring, wall sheathing, and roofing. Here’s a breakdown of how much OSB panels will cost for your project based on type and size.
Enhance your home's safety and aesthetic with this simple DIY project


Transition strips bridge the gap between two floors while helping to prevent potential trips and falls. They can also help minimize noise between rooms when installed in a doorway. Installing transition strips on concrete or a concrete subfloor requires a few additional steps and increases the flooring installation cost, but it is a fairly straightforward DIY project. Most people can complete this project in an afternoon. This guide can help with the installation steps.
Complex, high-risk projects demand more than typical DIY projects. They require time, specialized tools, and trained expertise to make sure the job is done safely and correctly. We made it easy for you to find a local pro—with our skilled network, you'll get the job done without the stress of doing it yourself or significant safety risks.

Before beginning, make sure you are using the appropriate transition strip for your floor types. If you are installing a strip on two floors of equal heights—like two concrete floors or a concrete and wood floor—then you will use seam binders or T-molding. If you are connecting a concrete floor to a taller floor type like carpet, you will want to opt for reducer molding transition strips. These strips feature a slight slope that helps to bridge the height difference between floors.
Additionally, make sure you have at least a one-inch-long seam between the two floors. The seam should show your subfloor, which is what you will attach the transition strip to. Finally, make sure your transition strip is wide enough to extend at least ¼ inch over each floor type.
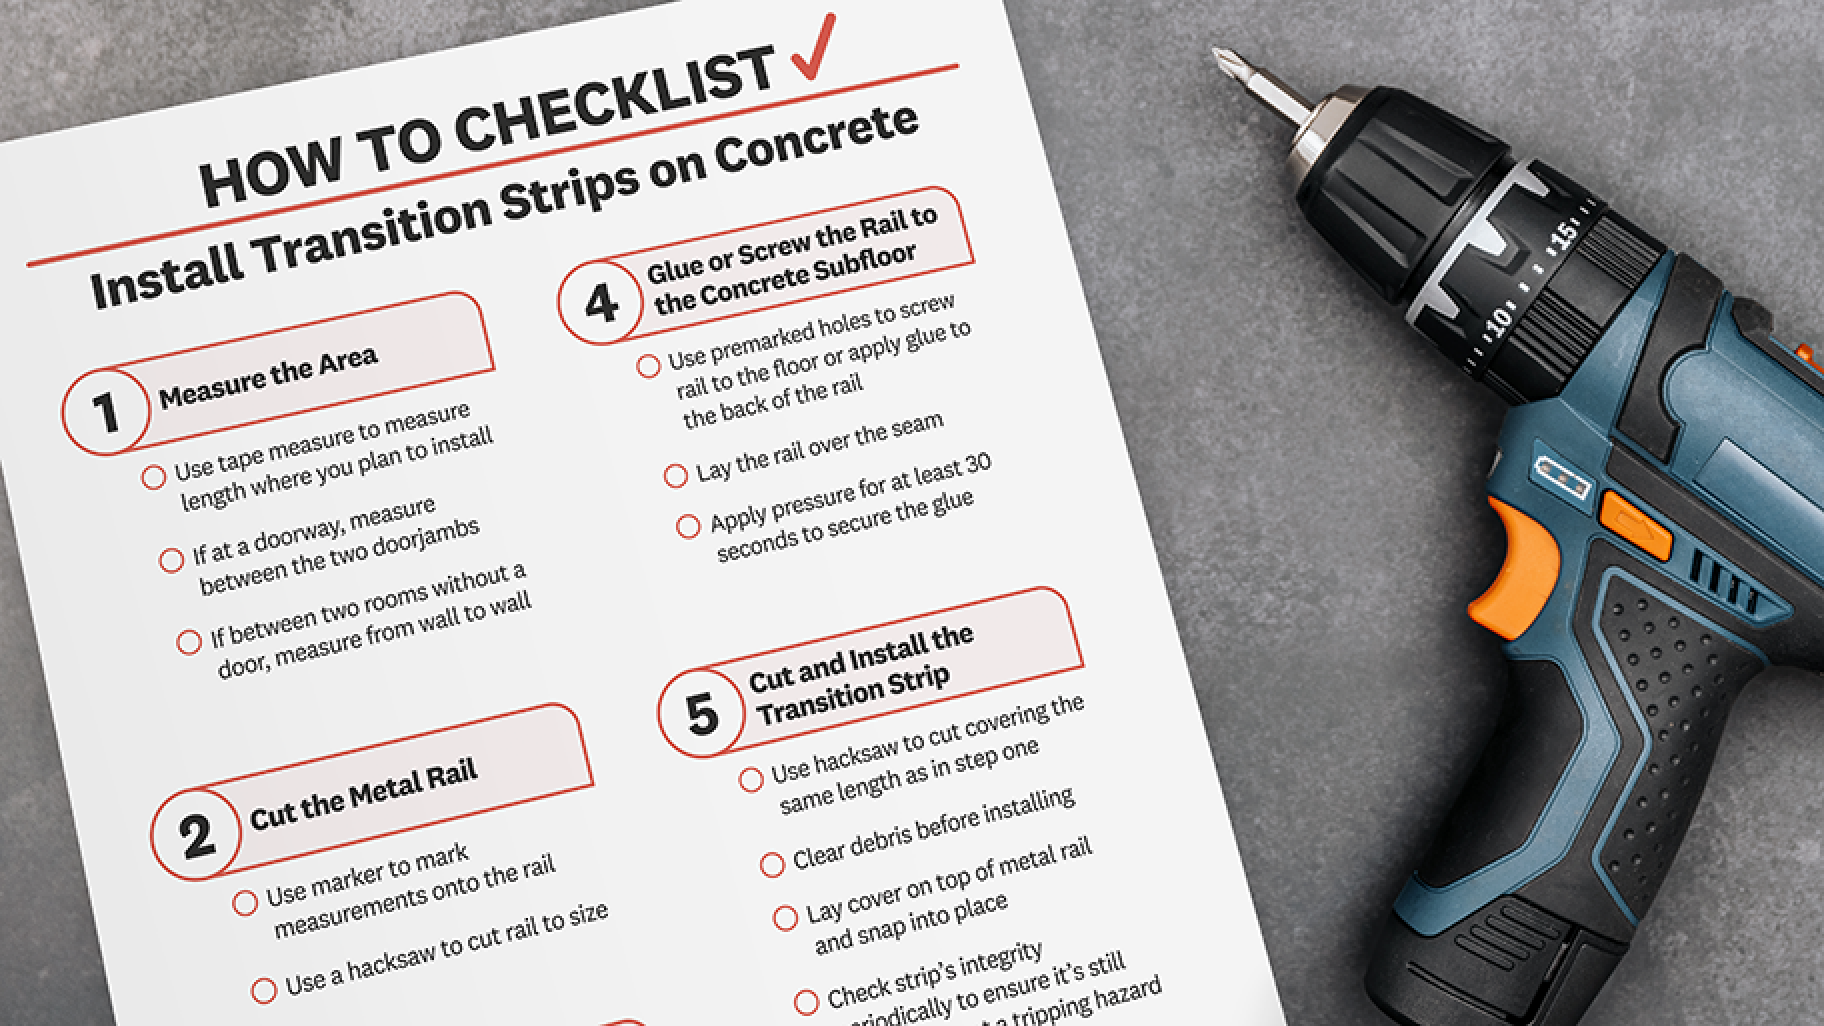

Use a tape measure to measure the length of the area where you plan to install the transition strip. If it's in a doorway, measure the distance between the two doorjambs. If you are connecting two rooms without a doorway, then you will measure the entire length of the seam between the two floors, extending from wall to wall.

Your transition strip might be a standalone metal rail, or it might have a vinyl or hardwood covering that is attached using a metal rail beneath it. Either way, you should cut the metal rail to fit your measurements from step one. Use a marker to mark off the precise measurements on the rail, then use a hacksaw to cut the rail to size.

If you are screwing down the rail, lay the rail over the seam and mark where the rail's holes line up on the floor. Next, using a masonry drill bit, drill pilot holes through the marks you just made. Finish by inserting the anchors into the holes.

When learning how to install flooring transition strips on concrete, decide whether you are gluing or screwing the rail to the concrete subfloor. Screws are the best option in high-traffic areas, while glue provides a more streamlined appearance.
Use your premarked holes if screwing the rail to the floor, or apply glue to the back of the rail and lay it over the seam, applying pressure for at least 30 seconds to secure it in place.

You can skip this step if you have a standalone metal transition strip without a vinyl or hardwood covering. But if you have a cover for it, use a hacksaw to cut it to the right length; this will be the same length you measured during step one. Then lay the cover on top of your metal rail and snap it into place.
Clear any debris before installing transition strips on concrete, as this could cause wear and decrease the transition strip’s durability. Also, pay close attention to the aesthetic of the strip to ensure it fits with the rest of the home. Finally, check the strip’s integrity periodically to ensure it has not come loose, posing a tripping hazard.
If you hire a handyperson to complete the project, you will have to pay for labor in addition to the cost of the transition strip and installation materials. Typically, a handyperson charges around $50 to $150 per hour for flooring projects like this, and it typically takes one to two hours to complete.
Installing floor transitions on concrete is a fairly simple project that many people can complete themselves without any construction experience under their belt. Transition strips range from $1 to $30 per square foot, but taking on this project yourself can save you money.
From average costs to expert advice, get all the answers you need to get your job done.
OSB is a common material used for subflooring, wall sheathing, and roofing. Here’s a breakdown of how much OSB panels will cost for your project based on type and size.
Updated flooring can make any room in your home feel brand new. Explore flooring installation costs in Baltimore, MD, from materials to labor costs.

Warm floors, warm feet. Learn how much radiant heated floor costs, types of radiant floor heating systems, and pros and cons.

Learn how to fix scratches in bamboo flooring with these simple DIY strategies and what to do to prevent them from returning.

Less fuss and mess: Here's every type of flooring that can be installed right on top of your ceramic tile.
Discover the cost to polish concrete floors, including price ranges, key cost factors, and tips to help you budget for your next flooring project.