

When your window AC isn’t cutting it, but central AC is too expensive, installing a new ductless mini-split AC may be the cooling solution you’re looking for. Find out what a mini-split costs and how to hire the right pros to get the job done.
Ductless AC is a challenging DIY, but the reward is a cool space you’ll enjoy all summer

Central air isn’t the only option for cooling your home. Mini-split air conditioners have several attractive advantages over traditional AC—they’re more efficient and flexible, helping homeowners heat and cool individual rooms without ducts. Some systems are DIY-friendly, but installation is still complex and requires knowledge and a lot of care. Use this guide to learn how to install a mini-split system in your home.
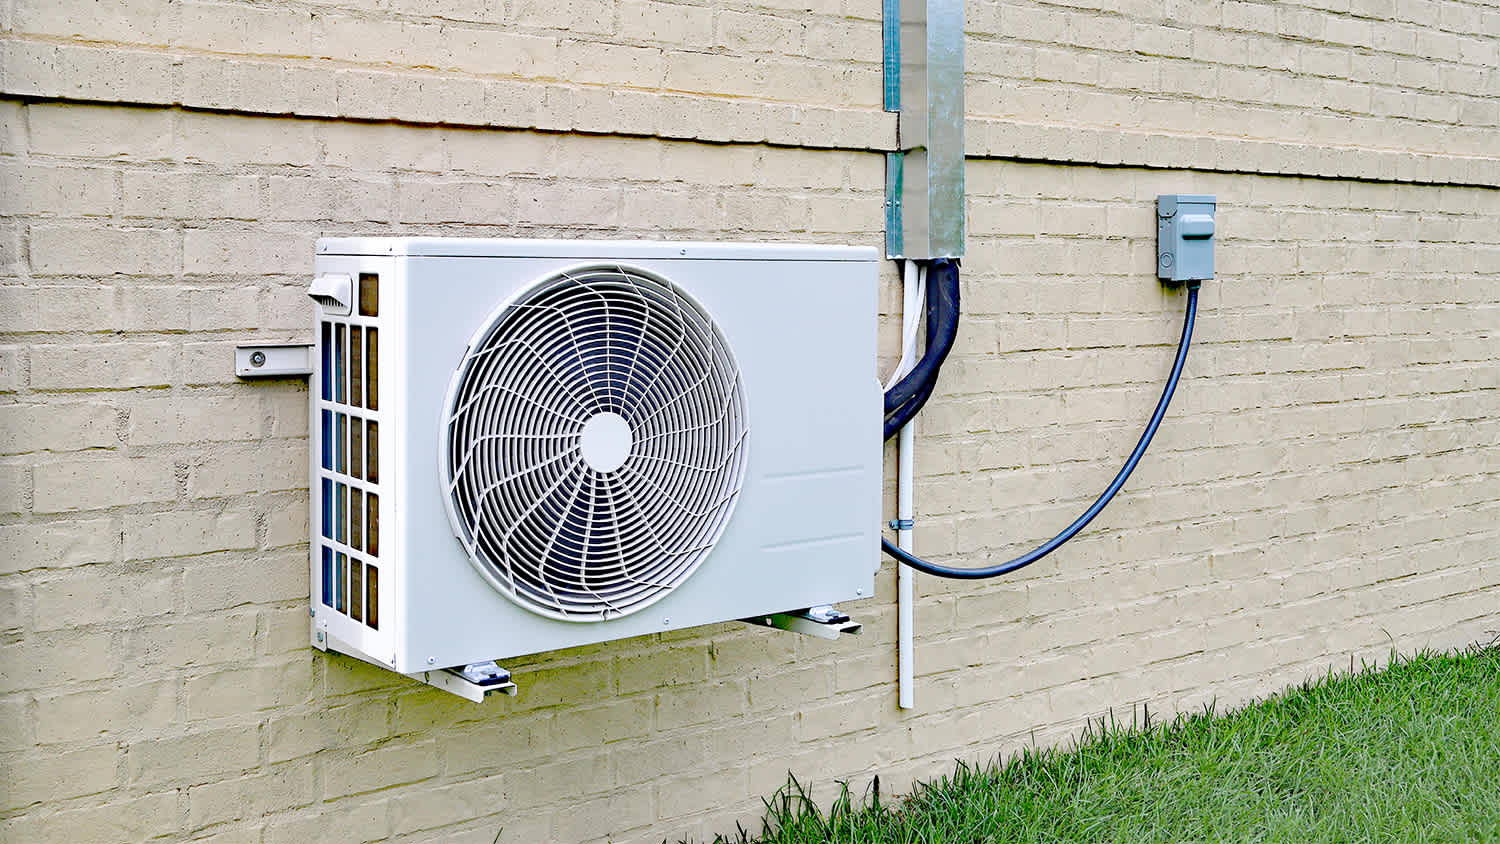
A mini-split system requires high-voltage electrical connections. Only handle electrical work if you have previous electrical experience. Otherwise, hire a licensed local electrician to create a dedicated circuit for your system and run power from the new circuit in your breaker panel through a disconnect box to the outdoor condenser unit.
If you have electrical experience, adhere to all local code requirements. Your state or municipality may require a license or electrical permit to perform this work.
Choose the right size AC unit for your home. One that's too small won't cool your space properly, and one that's too large will cycle on and off often enough to damage the condenser.
Mini-splits are sized by British Thermal Unit (BTU) output. More BTUs mean a higher cooling capacity. To determine the BTUs you need, carefully measure the square footage of the area you want to cool. A rough rule of thumb is 20 BTUs per 1 square foot. For example, if you're cooling a 600-square-foot garage, you'll need a 12,000-BTU mini-split system.
Some DIY mini-splits come with a pre-charged refrigerant line, which streamlines installation. If you choose one without a pre-charged line, you’ll need to call a local HVAC contractor to complete your refrigerant line setup after installation.
Before you begin, ensure that you have an assistant to help you for the entire installation.
Mount your indoor evaporator unit on a wall that connects to your home's exterior. Choose a spot that's not exposed to direct sunlight or other heat sources, which impact your unit's ability to monitor indoor temperatures. Make sure that shelving or other obstructions won’t block the unit.
Use a stud finder to locate and mark your stud layout. There should be no wires, pipes, ducts, or obstructions in the wall where your unit will go, as these can interfere with your mounting hardware and line set.

With your stud locations marked, place your bracket and use a level to ensure it's aligned. A unit that's not level won't drain properly. Drill pilot holes in the marked stud locations. If you don’t hit a stud, hammer hollow screw anchors into each hole. Use your drill to fasten the brackets in place with screws.
Your line set hole should slope slightly downward toward the outside so that condensate can drain via gravity. Drill a pilot hole in one of the lower corners of your mounting brackets according to the manufacturer's instructions for your unit. The hole should be long enough to reach your home's exterior.
Check outside to ensure no obstructions such as trim will complicate drilling the full-sized hole.
If the path for the hole is clear, use your hole saw to drill a 2- to 3-inch hole angled slightly downward for drainage. The hole should be long enough to exit the exterior. The exact hole width needed depends on the size of the line set, which includes refrigerant lines, control lines, and drainage tubing. Consult your manufacturer's instructions for the required measurements.
If the line set isn't already connected to the indoor unit, connect it per the manufacturer's instructions. Carefully unfold all lines from the back of the evaporator unit. Use electrical tape to keep the lines together.
With your assistant on the exterior side of the hole, feed the line set through. As it emerges, have your assistant carefully bend it downward toward where you plan to install the outdoor condenser unit. Feed the drain line through below the other lines. Place plastic trim around the edges of your hole to prevent rough edges from damaging your lines.

Lift the indoor unit and hang it on the mounting bracket. Secure the unit on the wall using the hardware that came with the unit. Wrap a foam sleeve around the line set within the hole in your wall and move back any insulation displaced during installation.

As long as the refrigerant lines can easily reach the condenser unit, you can either install the unit on a pad placed on the ground or mount it to a wall with wall brackets. Maintain plenty of clearance from bushes and other landscaping. Route your line set tight to the building exterior.
This step will vary by manufacturer and should only be done if your lines are already cut and pre-charged with refrigerant. If not, you must contact an HVAC pro to finish the job.
Connect the line set from the indoor unit to the outdoor unit per the manufacturer's instructions. You'll need an adjustable wrench and a torque wrench. Insulate and seal the hole in the outside wall and cover your line set with your plastic line set cover for a neater appearance.
Carefully inspect all refrigerant lines for kinks and ensure all electrical connections are secure. Turn on your dedicated circuit and test the function of your new AC.
If you hire a local mini-split installation pro, expect the average cost to install a mini-split to be about $3,000. However, costs can exceed $14,500 depending on the size of the system.
In contrast, it costs a minimum of $2,000 to install the smallest single-zone ductless AC system yourself. This includes all necessary parts and equipment. In most states, you must hire a licensed electrician to install a dedicated electrical circuit for your system, which costs $250 plus an additional $50 to $100 per hour for labor.
Many homeowners decide the potential savings aren't worth the time, effort, and danger of DIY mini-split installation. Hiring a pro will ensure you have the right-sized system properly installed to maximize its lifespan and save you money on your energy bill.
I normally do not leave reviews, but my experience with Worthington Air was extremely frustrating and disappointing. About 30 days ago, I had a consultation done for an HVAC replacement and was quoted approximately $15,079. Based on that quote, I applied for financing through their company...
Great company! Price was competitive, technician showed up on time and completed the job (exterior electric Radon fan replacement) quickly. Would hire them again.
Raven and crew does absolutely fantastic job. They are very professional if any concerns were to occur with any of her work she always took responsibility and finished out with a great job. I have worked with her business for a year and have always been satisfied. Very trusted business and...
I would recommend this company to anyone! He showed up on time, was friendly, completed a very difficult repair on our dryer vent cover, was responsive, and pricing was extremely fair and competitive. I would have him back to do any of our repairs or cleanings without hesitation!
Ace Fireplace Services' chimney sweep service is truly exceptional. They used advanced technology to ensure a thorough cleaning process, and my chimney has never looked better. I highly recommend their services.
 Ace Fireplace Services
The technician was very professional and friendly. He answered all my questions and was very thorough. He left the fireplace area very clean . He inspected from the roof and advised me as to other work that might need to be done. There was no pressure there. I was very satisfied with the...
 Supreme brick & chimney
Excellent experience with hiring Tether House to Mount our 77’ Samsung TV in our bedroom. Fast, friendly, and knowledgeable. Highly recommend.
On time, clean and finished fast. Windows seem sturdy and the finish is good. Caulking was done with no smudges. Would recommend.
Great job...edging and pre clean up went well with a great job with seal coat. Friendly, efficient and professional.
 All Star Paving and Sealing
Good workers and they do a good job.
From average costs to expert advice, get all the answers you need to get your job done.
When your window AC isn’t cutting it, but central AC is too expensive, installing a new ductless mini-split AC may be the cooling solution you’re looking for. Find out what a mini-split costs and how to hire the right pros to get the job done.

A mini-split allows for zoned cooling, helpful for cooling spaces like garages. Learn the cost to install a mini-split unit in a garage with this guide.

A ductless mini-split heat pump can cool and heat your home without all of the costly and complicated ductwork. Learn more about how a mini-split works.

Review the disadvantages of mini-split systems as well as the benefits before buying. Review our breakdown of the mini-split pros and cons.

Mini split systems are an energy-efficient option to regulate your house’s temperature. Learn more about how mini splits work to cool or heat your home.
Adding a ductless mini split can be the right choice for a home addition or small space. Review these ductless mini split questions to prep for talking with a pro.